The shot starts pulling, and you know something is wrong. It gushes out in three seconds, or it barely drips. You adjust the grind, but nothing changes. The machine is fine. The beans are fresh. The problem is almost always the grinder.
Most espresso taste issues trace back to one of a handful of grinder failures. This guide is grinder-first. We’ll map your exact symptom to the specific mechanical or operational fault causing it, then walk through the fix. You’ll leave with a diagnostic chart, repair-versus-replace math, and a maintenance calendar tied to how often you actually pull shots.
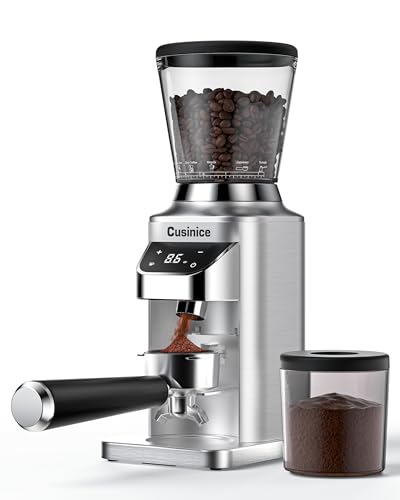
Cusinice
Conical Burr Coffee Grinder, Anti-Static, 0.1s Single/Double…
- 0.1s Timer with Smart Memory for Repeatable Dosing: The 0.1-second electronic timer lets you fine-tune grinding time for better do…
- 40mm Stainless Steel Conical Burr for Even Grinding: Built with a 40mm stainless steel conical burr, this conical burr coffee grin…
- Anti-Static Design for a Cleaner Countertop: The anti-static coffee bean grinder helps reduce clumping and scattered grounds durin…
As an Amazon Associate I earn from qualifying purchases.
If you’re shopping rather than troubleshooting, a grinder with clear controls helps from day one. The Cusinice Conical Burr Grinder uses a 40mm stainless steel conical burr and a 0.1-second timer, which removes two variables (inconsistent burrs and guesswork dose timing) that cause many of the problems below.
Quick Diagnostic Chart: Match Your Symptom to the Fix
Use this chart first. It shortcuts the guesswork and points you to the right section below.
| Symptom | Likely Culprit | Check First | Fix Section |
|---|---|---|---|
| Sour, weak shot | Grind too coarse | Particle size | Grinder Problems That Ruin Espresso |
| Bitter, harsh shot | Grind too fine | Particle size | Grinder Problems That Ruin Espresso |
| Shot chokes or gushes | Inconsistent particle size | Burr alignment | Grinder Problems That Ruin Espresso |
| Grinder gets hot, stops | Overloaded motor | Duty cycle | Mechanical Failures |
| Loud, high-pitched noise | Dull or damaged burrs | Burr condition | Mechanical Failures |
| Grounds fly everywhere | Static cling | RDT or anti-static design | Operational Annoyances |
| Old grounds in fresh dose | High retention | Cleaning schedule | Operational Annoyances |
Your symptom might point to more than one cause. Start with the first check, then move to the second if the fix doesn’t resolve it.
Grinder Problems That Ruin Espresso Extraction (Taste & Flow)
Espresso is a precise extraction. You’re forcing water through a dense puck at 9 bars of pressure. The grind size and consistency dictate the flow rate, which dictates what dissolves in your cup. When the grinder fails, the shot tells you immediately.
Sour or Under-Extracted Shots (Grind Too Coarse)
A sour shot tastes sharp and thin. It happens when water moves through the puck too fast. The extraction time drops below 25 seconds, and the water only pulls the bright, acidic compounds. The fix is straightforward: grind finer.
Turn the adjustment ring one or two steps finer, then pull another shot. For a grinder with 34 settings, like the Cusinice Conical Burr Grinder, that’s a small, repeatable change. Keep a log. If you’re consistently at the fine end of the range, your beans might be darker roasted, which needs a slightly coarser grind to avoid bitterness.
Bitter or Over-Extracted Shots (Grind Too Fine)
A bitter shot tastes dry and astringent. The extraction runs past 35 seconds, pulling harsh, woody compounds from the coffee. The flow is slow, and the puck often looks muddy and sloppy.
Grind coarser. Go two steps back on the adjustment dial. If the shot is still bitter, check your water temperature. Water over 203°F (95°C) can cause bitterness even with a correct grind. But start with the grind. It’s the most common cause.
Choked or Gushing Shots (Inconsistent Particle Size)
This is the frustrating one. The shot starts fine, then stalls, then surges. It’s a classic sign of burr alignment issues or a worn burr set. When burrs are misaligned, one side of the burr cuts finer than the other. You get a mix of boulders and powder. The fine particles clog the puck, and the boulders create channels where water rushes through.
Check the burrs first. Remove the upper burr and inspect the cutting edges. Look for shiny spots or nicks. If they look uneven, the burr carrier might be loose. Re-seat it carefully. If the burrs are visibly worn, replacement is the fix. We’ll cover that cost below.
Channeling also causes gushing. That’s when water finds a path through the puck, leaving dry spots. A level tamp helps, but a consistent grind is the real solution. An inconsistent grind makes channeling almost unavoidable.
Mechanical Failures: Motor, Burrs, and Power Issues
Sometimes the taste is fine, but the grinder itself stops working correctly. These failures are mechanical, and they often come with warning signs.
Motor Overheating or Shutting Off
Grinders have a duty cycle. A cheap blade grinder might run for 30 seconds before needing a rest. A conical burr grinder can run longer, but it’s still not a commercial machine. If you grind for a long time for a large batch, the motor gets hot. Most grinders have a thermal cutoff that shuts the motor off to prevent damage.
Wait 20 to 30 minutes for it to cool down. If it shuts off again quickly, you’re likely grinding too fine for the motor’s capability. The fine setting creates more resistance. Ease up on the grind size or grind in shorter bursts. If the motor still trips, it might be a failing capacitor or winding. That’s a repair cost that often exceeds the grinder’s value.
Burrs Are Dull, Misaligned, or Cracked
Dull burrs crush the bean instead of cutting it. This creates a huge amount of fines—the super-fine powder that causes channeling and bitter shots. The grinding noise changes too. A sharp burr makes a crisp, metallic ring. A dull set sounds dull and thuddy.
You can check for dullness by grinding a few beans and rubbing the grounds between your fingers. If they feel like flour with a lot of dust, the burrs are likely dull. Most home burrs last 500 to 800 pounds of coffee. That’s a lot for a home user, but if you pull five shots a day, you’ll get there in a few years.
Misalignment is a separate issue. It often happens after cleaning when the burr isn’t seated correctly. Always align the alignment pins or marks before locking the burr in place. A cracked burr is rare, but it happens if you drop the grinder or run a rock through it. Replace immediately. A cracked burr can shed metal fragments into your coffee.
Grinder Turns On But Won’t Grind
The motor spins, but the beans don’t move. This is usually a jam. A hard bean or a small stone can lodge between the burrs. Unplug the grinder first. Remove the hopper and the upper burr. Inspect the gap for debris. Use a brush to clean it out. Never stick a metal tool into the burr chamber while it’s plugged in.
Another cause is a worn drive gear. The motor spins, but the gear that turns the lower burr is stripped. This is more common in cheaper grinders with plastic gears. It’s often cheaper to replace the grinder than to fix the gear.
Operational Annoyances: Static, Retention, and Jams
These problems don’t ruin the shot, but they ruin your workflow. They’re the reason many people give up on home espresso.
Static Cling and Messy Grounds
Static builds up when dry beans are ground quickly. The grounds stick to the catch cup, the chute, and your countertop. It’s annoying, and it makes dosing messy.
The fix is the Ross Droplet Technique, or RDT. Add a single drop of water to the beans before grinding. Use a small spray bottle or a wet spoon handle. This reduces static dramatically. Some grinders also have anti-static designs built in, which helps. The Cusinice Conical Burr Grinder includes an anti-static design to keep grounds from scattering, which saves you the extra step.
High Retention (Old Grounds Contaminate Fresh Shots)
Retention is the coffee left inside the grinder after you dose. It’s problematic because stale grounds mix with your fresh dose. You might grind 18 grams, but only 16 grams come out. The retained 2 grams are from yesterday, and they’re stale.
Check retention by weighing your output. If you’re losing more than 0.5 grams, you have a retention problem. Causes include a long chute, a poorly designed grind chamber, and a buildup of oily coffee residue. A regular cleaning schedule helps. For a home grinder, aim for less than 0.5 grams of retention. If you can’t get there, you can use a small brush to sweep the chute after each grind.
Handle Stuck or Wobbles (Manual Grinders)
Manual grinders have their own quirks. A handle that sticks usually means the central shaft is misaligned or the bearings need lubrication. A wobble means the burr is not seated flat. Disassemble, check the burr carrier, and re-assemble carefully. Use food-grade grease on the shaft if the manufacturer recommends it.
If the handle slips and doesn’t turn the burr, the internal coupling is worn out. Replacement parts for manual grinders are often available, but they can cost half the price of a new unit.
The Cost-Benefit Fix: Repair vs. Replace
Not every grinder is worth fixing. Here’s the rule of thumb: if the repair cost exceeds 50% of the replacement cost, buy a new one.
Burr replacement is usually worth it. A new set of conical burrs costs $30 to $60 for most home grinders. It restores grinding performance to like-new condition. It’s a simple DIY job on most models.
Motor replacement is not worth it. The motor is the most expensive part. A new motor for a $150 grinder might cost $80 to $100 in parts, plus your time. A new grinder is a better investment.
Capacitor replacement is a gray area. A failed capacitor is a $10 part. If you’re handy with a soldering iron, it’s a cheap fix. If you have to pay a technician, the labor cost pushes it past the threshold.
For a grinder under $100, just replace it. The build quality isn’t designed for long-term repair. For a grinder over $300, repairs are often worth it because the burrs and motor are higher quality and last longer.
Preventive Maintenance Calendar for Espresso Grinders
Prevention beats repair. Here’s a schedule tied to how often you use your grinder. Adjust the frequency if you grind more or less.
- Weekly (for daily users): Brush out the burr chamber and the chute. Use a dedicated coffee grinder brush. This removes the oily residue that causes retention and stale contamination.
- Monthly: Remove the upper burr and clean both burrs with a dry brush. Check the burr alignment. Look for any visible wear or nicks.
- Quarterly: Run a batch of grinder cleaning tablets through the grinder. These absorb oils and break down residue. Follow the manufacturer’s instructions. Grind a few grams of fresh beans afterward to purge the chamber.
- Annually: Inspect the burrs for dullness. If you’ve ground more than 500 pounds, replace them. Check the power cord for fraying or damage.
- As needed: If you use dark-roasted beans, clean more often. The oils are stickier and build up faster.
A clean grinder is a consistent grinder. Most of the problems in this article, from static to retention to inconsistent shots, are made worse by a dirty grinder. You can find a detailed coffee grinder cleaning guide on this site if you need the full process.
Frequently Asked Questions (Safety and Quick Fixes)
Is it safe to clean the burrs with water?
No. Water causes the metal burrs to rust. It can also get into the motor and cause an electric shock hazard. Clean burrs with a dry brush or a specialized cleaning tablet. If you must wipe them, use a barely damp cloth and dry them immediately.
My grinder smells like burning plastic. What do I do?
Stop using it immediately. A burning plastic smell usually means the motor is overheating. It could be a blocked cooling vent or a failing motor winding. Unplug the grinder and let it cool. Check the vents for dust and clean them out. If the smell persists after cleaning, the motor is likely damaged. Do not use it. The risk of an electrical fire is real.
How do I fix a grinder that is clogged with oily beans?
Oily beans, often dark roasts, can gum up the burrs. First, unplug the grinder. Remove the hopper and upper burr. Use a stiff brush to clear the burr teeth. If the residue is hard, use a grinder cleaning tablet. For a severe clog, you may need to remove the lower burr, but only if your grinder’s manual permits it.
Why does my espresso still taste bad after cleaning the grinder?
If the grinder is clean and the grind size seems right, the issue might be elsewhere. Check your water temperature and your tamp pressure. A consistent tamp is important, but an inconsistent grind will override it. Also, check the freshness of your beans. Stale beans produce flat, lifeless shots no matter what you do. If your machine has other issues, you might need to look at Breville grinder-specific problems or a general machine troubleshooting guide.
Can I use a blade grinder for espresso?
You can, but you won’t get good results. A blade grinder chops beans into random-sized pieces. It creates too many fines and too many boulders. This makes consistent extraction impossible. You’ll get channeling and sour-bitter shots. A conical burr grinder cuts beans to a uniform size. If you’re weighing a burr grinder vs blade for espresso, the burr grinder wins every time.
What to Do Next With Your Grinder
You don’t need to become a repair technician. You need a system.
- Diagnose with the chart first. It saves time and frustration.
- Keep a log of your grind settings and shot times. Write it down. You’ll spot drift early.
- Clean your grinder on a schedule. Set a reminder on your phone.
- Check your burrs every three months. Look for wear and misalignment.
- Use the RDT technique if static is a problem. One drop of water is enough.
- Weigh your output. If retention is over 0.5 grams, clean the chute.
- Replace the grinder if the motor fails. Repair it if the burrs are dull.
Your grinder is the most important piece of equipment in your espresso setup. The machine just pushes water. The grinder controls the extraction. When it works, your shots will be balanced and sweet. When it doesn’t, you’ll chase taste issues with the machine and the beans. Fix the grinder first, and most of those problems disappear.
Products related to this article
Sponsored / affiliate links. As an Amazon Associate I earn from qualifying purchases. I may earn additional commission from eligible campaigns.
 Coffee Espresso Machine Handle Replacement Parts, Cafe Bracket Handle for Lidl Silvercrest CM4621 CM4218 KF5002 KF500S Barista (for 51mm Portafilter Basket - Not included)
 Linnkyfloa Coffee Espresso Maker Handle Replacement for Stovetop Moka Pot or Percolator, Black Plastic for Spare Part Compatible with Italian(9-12 Cup)
 Stainless Steel Moka Pot Pressed Powder Tool for 2 4 6 9 Cup Espresso Coffee Brewer(6 Cups)