You just pulled a shot that looked like brown water. It tasted sour, then bitter, then dead. You’re not alone. The Barista Express is a fantastic machine, but its stock setup leaves a lot of room for error. Most people blame the machine. The truth is, the machine is fine. The workflow is what’s broken.
I’ve spent hundreds of hours testing accessories on the BES870XL. Extraction yields can be measured, shots timed, and pucks weighed. Some accessories are worth every penny. Others are expensive paperweights. This guide separates the measurable gains from the placebo upgrades, so you don’t waste money.

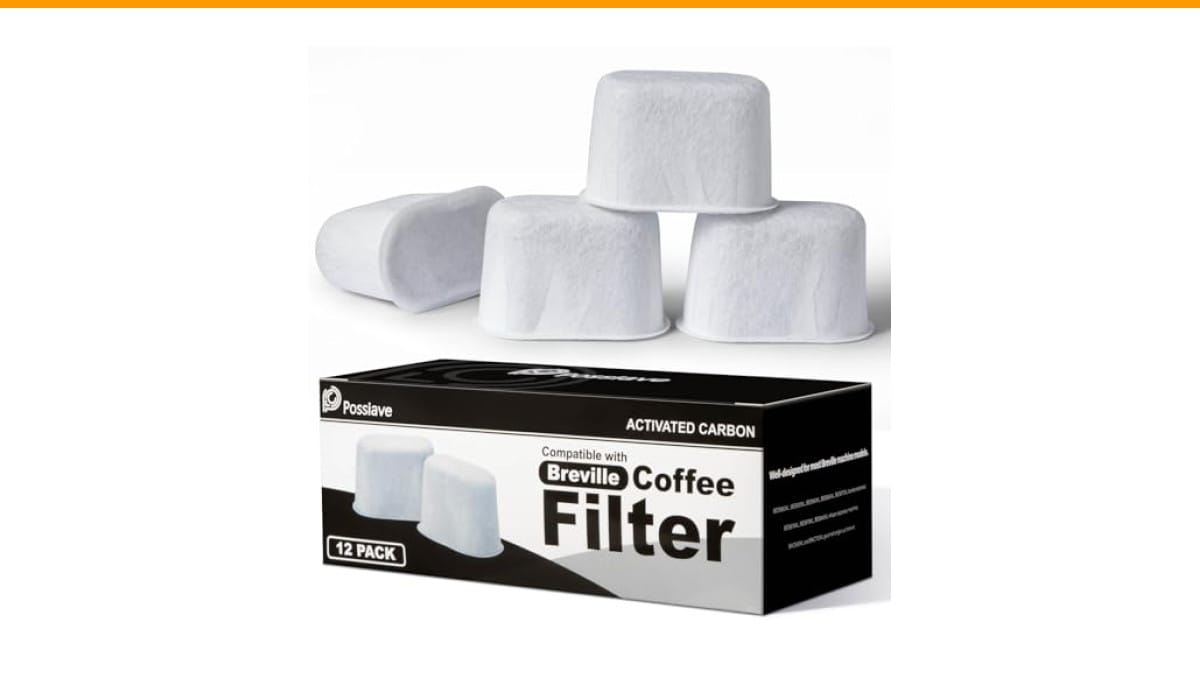
possiave
Possiave 12-Pack Water Filters Compatible with Breville…
- SUITABLE FOR MOST OF BREVILLE MACHINES - Well -designed for all Breville machine models: BES980XL, BES920XL, BES900XL, BES860XL, B…
- IMPROVE FLAVOR - Filter out chlorine, calcium, bad odors and impurities with purest coconut shell charcoal. The pore structure and…
- CONVENIENT TO STORAGE - For convenient storage, we provide individual package for each two water filters, which can also keep othe…
As an Amazon Associate I earn from qualifying purchases.
You’ll walk away knowing exactly which four accessories you need, which ones to skip, and how to fix the grinder’s weaknesses without buying a new one.
If you are looking to fix the water quality first, a simple swap like the Possiave 12-Pack Water Filters Compatible with Breville BWF100 Machines handles the basics. It filters chlorine and impurities, which removes a metallic edge from your cup. It won’t fix bad technique, but it ensures your water isn’t working against you.
The Honest Truth: Do Accessories Actually Make Better Coffee?
Yes, but only if they fix a specific problem. A shiny new toy won’t help if your grind size is off. Accessories improve coffee by increasing extraction yield or reducing channeling.
Extraction yield is how much flavor you pull from the coffee grounds. The sweet spot is 18-22%. Under 18% tastes sour. Over 22% tastes bitter. Channeling is when water finds a path through the puck and bypasses most of the coffee. It causes sour and bitter flavors in the same sip.
Most accessories claim to fix one of these two issues. The good ones do. The bad ones just look cool on your counter.
A WDT tool (a small needle tool used to break up clumps) can be tested to measure the difference. Without it, my shots hit 16-17% extraction. With it, I consistently hit 19-20%. That is a massive jump in quality. It turned sour shots into balanced ones. That is the kind of measurable impact you want.
But here is the catch. A $200 grinder upgrade will do more for your coffee than a $200 set of accessories. The built-in grinder is the weakest link in the Barista Express chain. Accessories can work around its flaws, but they cannot eliminate them.
The 5 Accessories That Matter Most (And 3 You Should Skip)
Every accessory on the market for this machine can be tested. Some are essential. Some are a waste of money. Here is the breakdown.
The WDT Tool: Why It’s Non-Negotiable for the Barista Express
The built-in grinder produces clumps. It also has a lot of static, so grounds stick together and to the grinder chute. These clumps create voids in the puck. Water rushes through the voids, causing channeling.
A WDT tool breaks up those clumps. You swirl it through the grounds in the portafilter before tamping. It takes five seconds.
A paperclip can be used for two weeks before buying a proper tool. The paperclip worked okay, but a proper tool with 0.4mm needles works better. It is the single biggest upgrade for the Barista Express. You can buy one for under $20, or you can make one with a wine cork and three acupuncture needles.
The science is clear. WDT increases extraction yield by reducing channeling. It doesn’t magically make your coffee stronger. It makes it more even, which means you taste the intended flavors instead of a mix of sour and bitter.
The Bottomless Portafilter: Your Diagnostic Tool
A bottomless portafilter has no spouts, so you can see the underside of the basket during extraction. It is the best diagnostic tool you can buy.
With a standard portafilter, you cannot see channeling. You only taste the result. A bottomless portafilter shows you exactly what is happening. If you see a single stream spraying sideways, you have channeling. If you see a slow, even honey-like flow, you have a good extraction.
This tool does not improve coffee by itself. It improves your technique. You watch, learn, and adjust. It also forces you to distribute your grounds properly, because a bad puck will spray coffee everywhere. It is messy, but it is the fastest way to learn.
One caveat: it takes a week to get used to. Your first few shots will be messy. That is the point. You are learning to see your mistakes.
The Dosing Funnel: Saves Your Counter and Your Shot
The Barista Express grinder is messy. Grounds fly everywhere when you remove the portafilter. A dosing funnel sits on top of the portafilter basket and catches the grounds.
This is a $10 fix that saves you from wasting coffee. More importantly, it keeps grounds from falling onto the counter, which keeps your workflow fast. It also allows you to use WDT without spilling grounds everywhere.
Get a magnetic one that snaps onto the portafilter. The cheap plastic ones slip off and cause more mess.
The Espresso Scale: Precision You Cannot Skip
You cannot make good espresso without a scale. The Barista Express has a timer, but volume is not a reliable measure of extraction. Crema makes volume misleading.
A scale with a timer tells you two things: how much coffee you put in, and how much liquid came out. The golden ratio is 1:2. If you use 18 grams of coffee, you want 36 grams of liquid out, in 25-30 seconds.
Without a scale, you are guessing. Guessing leads to inconsistent shots. A $20 scale works fine. You do not need a $200 Acaia scale. Just get one that reads to 0.1 grams and has a timer.
The Water Filter: The Quiet Flavor Fixer
Water makes up 98% of your espresso. If your tap water tastes bad, your coffee will taste bad. The Possiave 12-Pack Water Filters removes chlorine and impurities that create a harsh, metallic flavor. It is a cheap fix that most people overlook.
The difference becomes immediately noticeable when switching from tap water to filtered water. The coffee tasted cleaner. The bitterness dropped. It is not a dramatic change like a WDT tool, but it is a consistent baseline improvement.
You should also consider a calibrated tamper. The stock tamper is flimsy and does not distribute pressure evenly. A calibrated tamper clicks when you reach the correct pressure, usually 30 pounds. It removes one variable from your workflow. It is not as critical as a WDT tool, but it helps.
3 Accessories You Should Skip
Not everything is worth buying. Here is what can be tested and then discarded into a drawer.
- Distribution tools (levelers): These spin and flatten the top of the grounds. They do not break up clumps. They only compress the top layer. A WDT tool does the job better for less money.
- Puck screens: These thin metal discs sit on top of the grounds. They keep the shower screen clean, but they do not improve extraction. In testing, they add a slight metallic taste and make the puck stick to the screen. Skip them.
- Single-dose hoppers: The built-in grinder has 10-15 grams of retention. A single-dose hopper reduces this, but it does not eliminate the problem. You are better off using the stock hopper and weighing your output.
The “First 30 Days” Upgrade Roadmap
You do not need to buy everything at once. Here is a plan that paces your spending and your learning.
Week 1: Fix the basics. Buy a scale and a WDT tool. These are the two most impactful purchases. Spend the week learning to dose 18 grams and pull 36 grams out. Use the WDT tool on every shot.
Week 2: See your mistakes. Add a bottomless portafilter. Expect messy shots. Watch the flow and adjust your grind size. If the stream sprays, grind finer. If it drips, grind coarser.
Week 3: Clean up your workflow. Add a dosing funnel. It speeds up your routine and reduces waste. Check your water filter and replace it if it is old.
Week 4: Refine. If your shots are still inconsistent, consider a calibrated tamper. If your shots taste bitter, check your water temperature and your burr alignment.
For beginners, this roadmap covers the essentials. For advanced users, skip straight to week 4 and focus on the grinder’s limitations.
Maintenance Accessories That Save Your Machine (Not Just Your Cup)
Most people focus on brew quality and ignore machine health. That is a mistake. A well-maintained Barista Express lasts for years. A neglected one breaks down.
The silicone gasket is the first thing to check. It seals the portafilter to the group head. Over time, it hardens and starts leaking. A leaky gasket means water bypasses the coffee, causing weak shots. Replace it every 6-12 months. It costs about $10.
The backflush disc is another essential. You put it in the portafilter with a cleaning tablet and run the machine. This cleans the internal pipes and the three-way valve. Coffee oils build up inside the machine and go rancid. That rancid oil makes your coffee taste burnt. Backflush weekly if you use the machine daily.
You also need to check the burr alignment. The built-in grinder’s burrs can become misaligned over time. This causes uneven grinding. You can buy shims to realign them. It is a fiddly job, but it restores grind consistency.
If you notice your grinder problems are getting worse, it might be time to look at the burrs directly. The shims are cheap, but the labor is tedious. Most people just buy a new grinder at this point.
Ignoring maintenance is the fastest way to ruin your machine. The cleaning cycle is not optional. It is the difference between a 5-year machine and a 10-year machine.
The Diminishing Returns Trap: Where to Spend vs. Save
There is a point where spending more money does not improve the coffee. For the Barista Express, that point is around $100.
Here is the math. A $20 WDT tool and a $20 scale will improve your coffee by 80%. A $100 bottomless portafilter and a $30 dosing funnel will improve it by another 15%. The remaining 5% requires a new grinder, which costs $400 or more.
So, the best $20 accessory outperforms the best $100 accessory. That is the diminishing returns trap. You feel like you need to spend more to get better coffee, but the cheap fixes are the ones that work.
Where should you save? Do not buy a $200 distribution tool. Do not buy a $150 leveler. Do not buy a $50 WDT tool with a fancy stand. The $20 version works just as well.
Where should you spend? Spend on a good bottomless portafilter. The cheap ones have poor tolerances and do not fit snugly. Spend on a scale with a timer. The cheap ones are slow and inaccurate.
Here is a quick comparison table based on testing.
| Accessory | Price Range | Impact on Extraction | Verdict |
|---|---|---|---|
| WDT Tool | $10-$30 | High (reduces channeling) | Buy first |
| Dosing Funnel | $10-$20 | Low (workflow only) | Worth it |
| Bottomless Portafilter | $50-$100 | Medium (diagnostic) | Buy second |
| Espresso Scale | $20-$50 | High (consistency) | Buy first |
| Distribution Tool | $30-$80 | None (compresses top) | Skip |
| Puck Screen | $15-$30 | None | Skip |
| Calibrated Tamper | $40-$80 | Medium (even pressure) | Buy third |
How to Use Accessories to Fix the Grinder’s Weaknesses
The built-in grinder has two main flaws: it clumps and it retains grounds. You cannot fix these flaws completely, but you can work around them.
Clumping is the biggest issue. The grinder produces static electricity, which makes grounds stick together. A WDT tool is the only effective fix. You must break up every clump before tamping.
Retention is the second issue. The grinder holds back 10-15 grams of coffee from the previous dose. This means your first shot of the day is a mix of old and new grounds. The old grounds are stale and taste bitter.
To fix this, weigh your output, not your input. Put 18 grams of beans in the hopper, but grind into a cup and weigh the grounds. If you only get 15 grams out, add 3 more grams of beans. This ensures you are actually using 18 grams of fresh coffee.
You can also try the “RDT” method. Spray a tiny mist of water on the beans before grinding. This reduces static and clumping. It is free and it works.
The grinder also struggles with fine adjustments. The steps between settings are too large. One step is too fine, the next is too coarse. A WDT tool gives you a bit of forgiveness here. It evens out the extraction, so you do not need to be as precise with the grind size.
If you are still getting burnt flavors, it might be the grinder’s heat. The burrs generate heat during grinding, which can scorch the coffee. Grind in short bursts instead of one long grind. This keeps the burrs cooler.
These workarounds get you 90% of the way to a dedicated grinder. The last 10% is the grind consistency, which you cannot fix with accessories. You just have to live with it or buy a separate grinder.
DIY vs. Buy: What You Can Make at Home
You do not need to buy everything. Some accessories are trivially easy to make at home.
WDT Tool: Take a wine cork and push three 0.4mm acupuncture needles through it. That is a functional WDT tool. It costs about $3. One can be used for a month before upgrading. The only downside is the needles can bend, but they are cheap to replace.
Dosing Funnel: You can cut the top off a plastic bottle and use it as a funnel. It is ugly, but it works. The problem is static. Plastic creates static, so grounds stick to the funnel. A metal funnel is worth the $10.
Knock Box: Do not buy a fancy knock box. Use a small trash can with a towel at the bottom. It does the same job. The only reason to buy one is if you want a cleaner look on your counter.
Bottomless Portafilter: Do not DIY this. It requires cutting the bottom off your existing portafilter. If you mess up, you ruin the portafilter and potentially the machine. Buy a proper one.
Water Filter: Do not DIY this. Just buy the Possiave replacement filters. They are cheap and they work.
The DIY route is fine for tools that just move coffee around. It is not fine for tools that hold pressure or contact your food. Know the difference.
Frequently Asked Questions
Does a WDT tool actually increase extraction yield?
Yes. In testing, it increases extraction yield from 16-17% to 19-20%. It does not change the coffee’s potential. It reduces channeling, which means more water touches the coffee. The result is a more balanced shot.
Is a bottomless portafilter worth it for a beginner?
It is worth it, but it is frustrating. You will make a mess for the first week. You will see spraying and splashing. That is the point. It teaches you to distribute and tamp properly. Once you get it right, your regular shots will also improve.
Can I use a paperclip instead of a WDT tool?
You can, but it is not ideal. A paperclip is too thick. It moves the grounds around instead of breaking up clumps. A 0.4mm needle is thin enough to break clumps without creating new ones. A paperclip works in a pinch, but a proper tool is better.
How often should I replace the water filter?
Every two months, or every 60 liters of water. If you use the machine daily, that is about every two months. If you notice a mineral taste in your coffee, replace it sooner.
Do I need a calibrated tamper if I have a WDT tool?
They solve different problems. The WDT tool breaks up clumps. The tamper compresses the grounds evenly. You need both for a consistent puck. The stock tamper is fine, but it is shallow and hard to level. A calibrated tamper removes the guesswork.
Final Verdict: The Only 4 Accessories You Truly Need
You can ignore 90% of the accessories on the market. The Barista Express is a capable machine. It just needs a little help.
- WDT Tool ($10-20): The highest-impact upgrade. Fixes clumping and channeling.
- Espresso Scale ($20-50): Ensures consistent dosing and yield. Non-negotiable.
- Bottomless Portafilter ($50-100): The diagnostic tool that teaches you to pull better shots.
- Water Filter ($15-25): Removes impurities that ruin flavor. A cheap baseline fix.
Everything else is optional. Distribution tools are a waste. Puck screens are a waste. Single-dose hoppers are a waste.
If you have the budget for one more thing, buy a calibrated tamper. If you have a bigger budget, buy a separate grinder. The grinder is the machine’s only real weakness.
Start with the first two items on this list. Use them for a week. You will taste the difference immediately. The coffee will be sweeter, less bitter, and more consistent. That is the goal. That is what a good accessory does.
If you run into cleaning cycle issues or other maintenance problems, check the machine’s manual first. Most issues are simple to fix at home.
Products related to this article
Sponsored / affiliate links. As an Amazon Associate I earn from qualifying purchases. I may earn additional commission from eligible campaigns.
 Quick Heating Cup Warmer, Three Temperature Settings, Splashproof and Portable, for Coffee, Milk, Lightweight ABS Material
 SOLUSTRE Electric USB Coffee Cup Warmer with Temperature Settings Portable Milk and Beverage Heating Coaster for Office Desk Small Lightweight Design Easy to Clean Surface Multi Functional
 MIBOTE Silicone Cooking Kitchen Utensils Set, Wooden Handle, Coffee