You pour your morning cup, and there it is — a puddle spreading across the counter. Not from your mug. From the machine itself. Water drips down the side, pools under the base, or seeps out around the brew basket. It’s annoying, it’s messy, and it usually happens at 6:45 AM when you’re already running late.
Most single serve coffee maker leaking water problems come down to one of three things: a worn seal, a cracked basket, or a blocked needle. This article walks through each cause, how to test for it, and what replacement parts actually fix the issue. You’ll know exactly where to look and what to order.

SURPOUF
2-Pack Coffee Replacement Brew Basket Spring Loaded…
- The coffee machine spring stop kit is located at the bottom of the coffee replacement brewing basket and is suitable for 112435-00…
- We have learned from feedback from multiple users that they have received multiple complete coffee blues, but the springs at the b…
- This component has high compatibility and is suitable for models such as 49947, 49954, 49957, 49966, 49976 for Mr. Coffee; Black a…
As an Amazon Associate I earn from qualifying purchases.
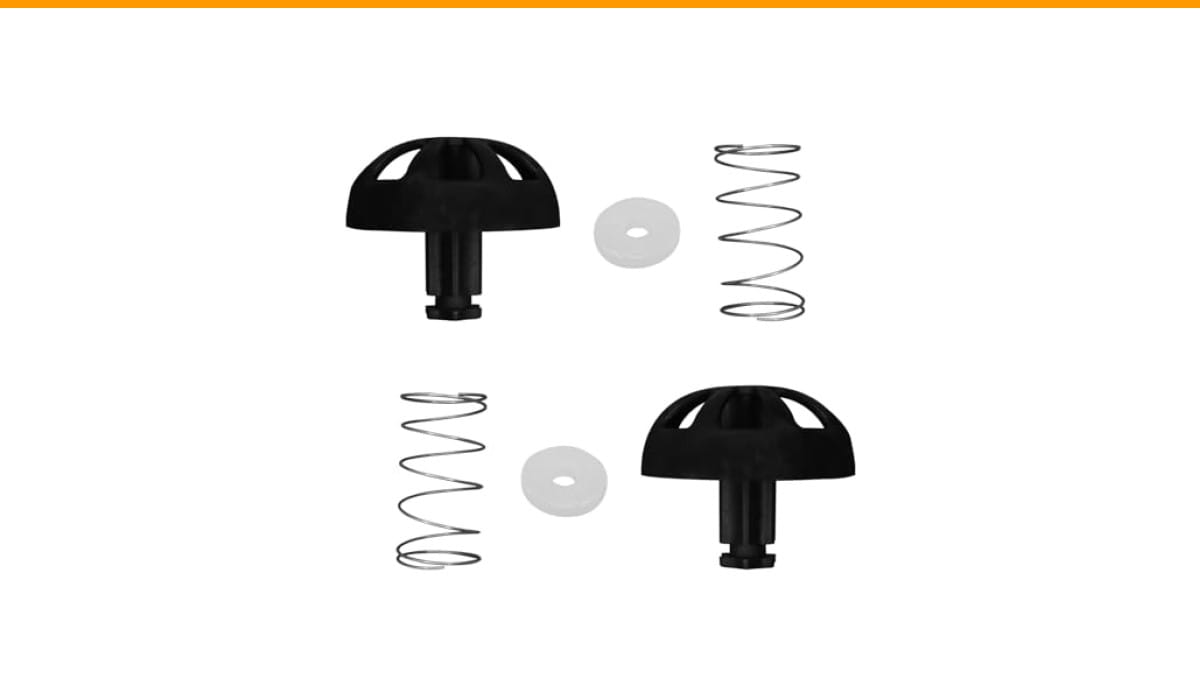
If the leak comes from the bottom of the brew basket, the spring-loaded stopper is the usual suspect. The SURPOUF 2-Pack Coffee Replacement Brew Basket Spring Loaded Stopper Kits replaces that worn part directly — it fits Mr. Coffee, Black and Decker, and Hamilton models with part numbers 990117900 and 990237500.
Why Single Serve Machines Leak in the First Place
Single serve brewers push hot water through a small basket under pressure. That pressure has to go somewhere. When a seal fails, water takes the path of least resistance — which is usually sideways out of the basket or down through the bottom.
The most common failure point is the spring-loaded stopper at the bottom of the brew basket. That little plastic-and-spring assembly acts as a valve. It opens when the basket sits in the machine, letting brewed coffee flow into your mug. When it wears out, the spring loses tension, the stopper doesn’t seal, and water leaks around it instead of through it.
Over time, mineral buildup from hard water makes things worse. Scale deposits on the spring and stopper prevent them from seating properly. That’s why a machine that worked fine for two years suddenly starts leaking — the spring didn’t break overnight, it just lost its tension gradually.
Finding the Source of the Leak
Before ordering any parts, figure out where the water is coming from. Run a brew cycle with the top open and watch carefully. You’re looking for three things:
- Water dripping from the top of the basket — the spreader or lid seal is worn
- Water running down the outside of the basket — the stopper or spring is failing
- Water pooling under the machine — a cracked reservoir or internal hose issue
For leaks around the basket itself, remove the basket and inspect the bottom. The stopper should sit flush. Press it with your finger — it should spring back firmly. If it feels mushy, sticks, or doesn’t return to a sealed position, that’s your problem.
If the leak comes from the base of the machine, that’s a different issue. Check the water reservoir for cracks, especially around the connection point where it meets the machine. Internal hose leaks are less common but happen when the machine has been dropped or the hoses have hardened with age.
Replacing the Spring Stopper: The Most Common Fix
The spring-loaded stopper kit is a cheap, simple repair. The SURPOUF kit comes with two complete assemblies — the spring, the stopper, and the mounting hardware. You swap out the old one, and the basket seals again.
Here’s what makes this part fail in the first place. The original springs on many Mr. Coffee and Hamilton baskets are thin and lose tension fast. Users report getting new baskets where the spring is already loose with no elasticity. The SURPOUF replacement uses a stiffer spring that holds its tension longer.
Installation takes about five minutes. Remove the old stopper from the bottom of the basket — it usually twists or pulls out. Drop the new spring into the recess, seat the stopper on top, and secure it. Test with a water-only brew cycle before making coffee.
One thing to note: this fix only works if the leak is from the stopper. If the basket itself is cracked, no spring replacement will help. Inspect the plastic basket for hairline cracks, especially around the rim and the bottom edges. Cracks often form after years of thermal cycling — hot water expands the plastic, cold water contracts it, and eventually the material fatigues.
Cleaning and Maintenance That Prevents Leaks
Regular cleaning prevents most leak problems. Mineral scale is the enemy of every seal and spring in your machine. A monthly descale keeps the moving parts moving.
Run a vinegar solution through the machine — one part white vinegar to two parts water. Let it sit in the reservoir for 30 minutes, then run a full brew cycle. Follow with two clean water cycles to rinse. This dissolves scale on the spring, the stopper, and the internal needles.
The needle that punctures the basket can also clog. When it clogs, pressure builds up inside the basket and forces water out around the edges. A paper clip or a specialized cleaning tool clears the needle. Check your machine’s manual for the proper procedure.
If you’re dealing with a machine that won’t pump water at all, that’s a separate issue from leaking. Our guide on Mr. Coffee pump issues covers that troubleshooting path. And if your automatic espresso machine is leaking from multiple points, the espresso machine leak guide goes deeper into internal component failures.
Comparing Your Repair Options
When your single serve coffee maker is leaking water, you have three paths: replace the spring stopper, replace the whole brew basket, or replace the entire machine. Here’s how they stack up.
| Option | Cost Range | Time to Fix | Best For | Downside |
|---|---|---|---|---|
| Replace spring stopper | Low (under $15) | 5 minutes | Leaks from basket bottom, weak spring | Doesn’t fix cracked baskets |
| Replace brew basket | Moderate ($15–$30) | Immediate | Cracked or warped basket plastic | New basket may have same weak spring |
| Replace the machine | High ($50–$150+) | Setup time | Internal leaks, multiple failure points | Cost, waste, learning curve |
The spring stopper replacement is the smart first move. It’s cheap, fast, and solves the most common failure. If that doesn’t fix it, you’ve spent ten minutes and a few dollars to rule out the obvious — then you can decide whether the basket or the whole machine needs replacing.
Keep the second stopper from the 2-pack as a spare. The replacement spring will eventually wear out too, and having the spare on hand means you’re never stuck with a leaking machine on a Monday morning.
Frequently Asked Questions
Why does my single serve coffee maker leak from the bottom?
The bottom leak almost always comes from the spring-loaded stopper in the brew basket. The spring loses tension over time, the stopper doesn’t seal, and water drips through. Replace the stopper assembly to fix it.
Can I fix a leaking coffee maker without replacing parts?
Sometimes. If the leak is caused by mineral buildup, descaling the machine can restore the seal. If the spring has physically weakened or the plastic has cracked, no amount of cleaning will fix it — you need a replacement part.
How often should I replace the brew basket spring?
There’s no set schedule. Most springs last 1–3 years depending on water hardness and how often you use the machine. If you notice slow dripping from the basket or inconsistent brew strength, check the spring tension.
Is it safe to keep using a leaking coffee maker?
Short-term, yes — the water is clean and the leak is usually just a nuisance. But water inside the machine’s base can damage electrical components over time. Fix it promptly to avoid a bigger problem.
Why does my coffee maker leak only sometimes?
Intermittent leaks usually mean the stopper isn’t seating consistently. A weak spring might seal when the basket is cold but leak once the heat expands the plastic. It can also depend on how tightly you insert the basket — an angled insertion leaves a gap.
What To Do Next
- Run a test brew cycle and watch where the water escapes — this tells you which part is failing.
- Press the stopper in the bottom of your brew basket. If it doesn’t spring back firmly, replace it with the SURPOUF kit.
- Descale your machine monthly to prevent mineral buildup from weakening seals.
- Inspect the basket plastic for cracks before ordering parts — a cracked basket needs replacement, not a new spring.
- Keep the spare stopper from the 2-pack in your pantry. You’ll need it eventually.
- If the leak persists after replacing the stopper, the problem is internal — check the leak troubleshooting guide for the next steps.
- Regular cleaning prevents most issues. See our cleaning frequency guide for a schedule that keeps your machine working.
Products related to this article
Sponsored / affiliate links. As an Amazon Associate I earn from qualifying purchases. I may earn additional commission from eligible campaigns.
 HomeBeyond Espresso Coffee Maker 12 Cups, Classic Stovetop Espresso Maker, 600ml / 20oz Coffeemaker for Gas & Ceramic Stovetops (Silver)
 Belly Moka Coffee Maker Stovetop Espresso Maker 9 Cup Aluminum Moka Pot Percolator 15oz 450ml Easy Brewing for Electric Ceramic Stoves Home Camping Italian Cuban Café Classic Black
 Belly Moka Coffee Maker Stovetop Espresso Maker 6 Cup Aluminum Moka Pot Percolator 10oz 300ml Easy Brewing for Electric Ceramic Stoves Home Camping Italian Cuban Café Classic Silver