You bought a moka pot, filled the basket with your favorite beans, and the first cup came out harsh, bitter, or thin. You’re not alone. Most people blame the pot, but the real culprit is usually the grind. The moka pot sits in a strange spot between espresso and drip, and it demands a grind size that’s just right. Too fine and you’ll choke the brew; too coarse and you’ll get weak, sour coffee.
This guide walks you through finding the best grind size for moka pot coffee, with a repeatable method you can use for any bean, roast, or altitude. You’ll learn what to look for, how to adjust, and how to fix common problems. By the end, you’ll be able to dial in a new bag of beans in two or three brews.

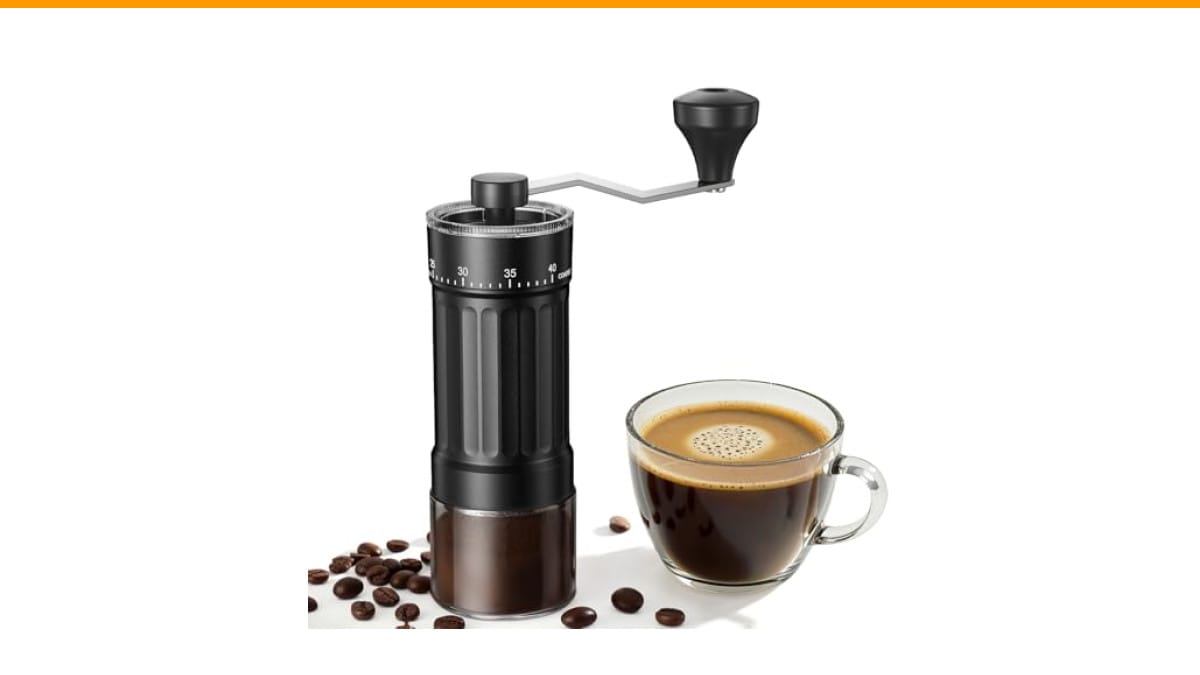
CEVING
CEVING Mini Manual Coffee Grinder With 40…
- 40 EXTERNAL ADJUSTABLE GRIND SETTINGS - Unlike traditional grinders with internal adjustments, our manual coffee grinder offers 40…
- MINI & PORTABLE DESIGN - Weighing only 325g and measuring 6.7x2.3x7.4in, it's ideal for camping, travel, RVs, patios, or the offic…
- CONICAL CERAMIC BURR - Ceramic burrs provide a more uniform grind and generate less heat than stainless steel or blade burrs, pres…
As an Amazon Associate I earn from qualifying purchases.
If you don’t have a grinder yet, a manual option like the CEVING Mini Manual Coffee Grinder gives you 40 external settings, so you can fine-tune your grind without opening the machine. It’s a solid travel companion too, but more on that later.
Why Grind Size is the #1 Variable for Moka Pot Success
The moka pot uses steam pressure to push hot water through a bed of coffee. That pressure is lower than espresso (about 1.5 bars vs. 9 bars), but higher than drip. The grind has to match that pressure. If the particles are too small, water struggles to pass through, and you get over-extraction: bitter, burnt, and muddy. If the particles are too large, water rushes through, under-extracting and leaving you with sour, weak coffee.
Think of it as a balance between flow rate and extraction time. A typical moka pot brew takes 2–4 minutes from the moment water heats up. The grind determines how fast the water moves through the coffee. You want a steady, honey-like flow, not a sputtering mess.
The common advice is to use a fine grind, close to espresso, but that’s misleading. True espresso grind is often too fine for a moka pot. You need something slightly coarser, like fine table salt. That’s the sweet spot for most beans and roasts.
Your grinder type matters too. A blade grinder gives you uneven particles, which ruins the extraction. A burr grinder, even a manual one, produces consistent sizes. If you’re using a blade grinder, you’ll struggle to get a repeatable result. Check out our burr vs. blade comparison to see why that matters.
The Ideal Grind Size: A Visual Reference Guide
Forget numbers for a second. Here’s what the ideal moka pot grind looks like compared to common kitchen items:
- Fine table salt – This is your target texture. The grains should feel like fine sand between your fingers, not powdery.
- Granulated sugar – Slightly coarser than ideal. If your grind looks like this, you’ll get under-extraction.
- Flour – Too fine. This is espresso territory. Using this in a moka pot will clog the filter and cause bitter, over-extracted coffee.
- Coarse sea salt – Way too coarse. Water will rush through, and your coffee will taste sour and weak.
If you’re using a burr grinder, the setting will vary by model, but a good starting point is 2–3 notches finer than your drip setting. On the CEVING grinder, that’s around setting 12–15 out of 40. You’ll adjust from there based on taste.
Here’s a quick visual table to keep by your grinder:
| Grind Size | Looks Like | Best For | Moka Pot Result |
|---|---|---|---|
| Extra Fine | Flour | Espresso | Bitter, slow flow, clogged |
| Fine | Fine table salt | Moka pot | Balanced, rich, honey-like flow |
| Medium-Fine | Sea salt | Drip, pour-over | Sour, weak, fast flow |
| Medium | Sugar | French press | Under-extracted, thin |
Fine vs. Medium vs. Coarse: What the Differences Actually Do
The difference between fine and medium isn’t just about particle size. It changes the extraction rate. Fine grounds have more surface area, so water extracts more flavor compounds quickly. That sounds good, but it also extracts bitter compounds if the water lingers too long. Medium grounds extract slower, but they can leave your cup sour if the water passes through too quickly.
For moka pot, you want a grind that extracts enough flavor in the short brew time without going bitter. That’s why fine table salt works. It gives you a balanced extraction. If you’re using a dark roast, you might go slightly coarser to avoid bitterness. If you’re using a light roast, go slightly finer to get more flavor out of those dense beans.
Don’t be afraid to experiment. The moka pot is forgiving once you understand the relationship between grind and flow. Watch the stream: it should look like warm honey, not a jet or a drip.
How to Dial In Your Grind (Step-by-Step Protocol)
Dialing in is the process of adjusting your grind to get the best taste from a specific bean. It’s not a one-time thing. Every new bag of beans requires a small adjustment. Here’s a simple method that works every time.
First Brew: Starting Point
- Grind 15–20g of coffee (about 2 tablespoons, depending on your basket size) at a fine table salt texture.
- Fill the bottom chamber with hot water (not boiling) up to the valve. Use filtered water if you can.
- Fill the basket loosely, don’t tamp. Level it with your finger or a knife.
- Assemble the pot and place it on medium-low heat. Watch the flow.
- When the stream turns blonde (light yellow), remove the pot from heat and run the bottom under cold water to stop extraction.
Your first brew is your baseline. Taste it. Notice the mouthfeel, acidity, and bitterness. That’s your reference point for the next adjustment.
Adjusting for Taste: Bitter vs. Sour
If your coffee tastes bitter, dry, or burnt, your grind is too fine. Go one notch coarser on your grinder and brew again. If it tastes sour, sharp, or weak, your grind is too coarse. Go one notch finer.
Make only one change at a time. Change the grind, keep the same dose and water, and taste again. It takes 2–3 brews to dial in a new bag. That’s normal. Even experienced baristas do it.
One more thing: the moka pot isn’t espresso. Don’t expect a thick crema. You’ll get a thin layer of foam at best. That’s fine. The goal is a smooth, strong coffee that you can drink straight or dilute with hot water for an Americano-style cup.
Grind Size Troubleshooting Matrix
Here’s a quick reference for common moka pot problems and the grind-related fixes:
| Symptom | Likely Cause | Fix |
|---|---|---|
| Bitter, burnt taste | Grind too fine | Go 1–2 notches coarser |
| Sour, weak taste | Grind too coarse | Go 1–2 notches finer |
| Slow flow, sputtering | Grind too fine or overfilled | Coarsen grind, reduce dose |
| Fast flow, thin body | Grind too coarse | Finen the grind, check water level |
| Hissing sound, steam only | Not enough water or heat too high | Check water level, lower heat |
| Bitter and sour in same cup | Uneven grind (blade grinder) | Switch to a burr grinder |
If you’re using a blade grinder, you’ll see the last row a lot. Uneven particles mean some bits are over-extracted while others are under-extracted. That’s why a burr grinder is worth the investment. The CEVING manual grinder uses ceramic burrs, which give you a consistent grind without heating the beans. That’s a big plus for flavor.
Matching Grind to Roast Level and Bean Type
Roast level changes how soluble the coffee is. Dark roasts are more porous and extract faster, so you need a slightly coarser grind to avoid bitterness. Light roasts are denser and extract slower, so you need a finer grind to get enough flavor.
Here’s a general guideline:
- Dark roast: Start at fine table salt, but be ready to go one notch coarser if it tastes bitter.
- Medium roast: Fine table salt is perfect. This is the most forgiving roast for moka pot.
- Light roast: Go one notch finer than fine table salt. These beans need more extraction.
Bean origin matters too. African beans (Ethiopian, Kenyan) tend to be brighter and more acidic, so a slightly finer grind helps balance that. South American beans (Brazilian, Colombian) are nuttier and more chocolatey, and they work well with a standard fine grind.
Altitude and humidity also play a role. At higher altitudes, water boils at a lower temperature, which means less extraction. You might need a finer grind to compensate. In humid climates, coffee beans absorb moisture and grind coarser than they should. If you live in a humid area, store your beans in an airtight container and check your grind size regularly.
Pre-ground coffee is a gamble. You don’t know the exact grind size, and it’s often too coarse for moka pot. If you’re using pre-ground, look for an espresso or moka pot label, but even then, it’s not guaranteed. Grinding fresh is the only way to get consistent results.
Grinder Types: How to Achieve the Right Grind
Blade Grinders vs. Burr Grinders
Blade grinders chop beans into random fragments. Some bits are powder, some are chunks. That uneven mix ruins moka pot coffee. You’ll get a bitter, sour, muddy cup no matter how long you grind. I’ve tested this side by side, and the difference is dramatic. If you own a blade grinder, upgrade before you change anything else.
Burr grinders crush beans between two abrasive surfaces, producing uniform particles. They come in two types: flat and conical. Conical burrs, like the one in the CEVING grinder, are quieter and produce less heat, which protects delicate flavors. They’re also easier to clean.
Manual burr grinders are a great option for moka pot because you control the grind with a simple adjustment ring. The CEVING has 40 external settings, so you can make tiny changes that matter. It’s not perfect for espresso (you’d need a finer range), but for moka pot, it’s ideal. Plus, it’s small enough to throw in a bag for camping or travel.
Electric burr grinders are faster, but they’re bulkier and pricier. If you brew multiple cups a day, an electric grinder might be worth it. But for most home users, a manual grinder does the job and takes up less counter space.
Moka Pot vs. Espresso: Clearing Up the Confusion
People often treat moka pot and espresso as the same thing. They’re not. Espresso uses 9 bars of pressure, a fine grind, and a 25–30 second extraction. Moka pot uses about 1.5 bars, a slightly coarser grind, and a 2–4 minute brew. The result is different: espresso has a thick crema and concentrated flavor; moka pot produces a strong, full-bodied coffee that’s closer to a concentrated drip.
That’s why you shouldn’t use espresso grind in a moka pot. It’s too fine and will clog the filter. You’ll get a bitter, over-extracted cup that tastes burnt. Conversely, using moka pot grind in an espresso machine will produce a fast, watery shot with no crema.
The moka pot is its own thing. Treat it that way, and you’ll get better coffee.
Frequently Asked Questions
Can I use espresso grind in my moka pot?
Technically, yes, but you’ll likely get a bitter, over-extracted cup. Espresso grind is finer than what moka pot needs. If you have no other option, use less coffee and stop the brew early to avoid bitterness. But for best results, use a fine table salt texture.
How fine should I grind for a 6-cup moka pot?
Same as any size: fine table salt. The pot size doesn’t change the grind size, only the dose. A 6-cup pot holds about 30g of coffee, so you’ll grind more, but the particle size stays the same.
Why does my moka pot coffee taste bitter?
Most likely your grind is too fine or your water is too hot. Use water just off the boil, and if the coffee is still bitter, go one notch coarser on your grinder. Also, don’t let the brew run past the blonde phase.
Should I tamp the coffee in the moka pot basket?
No. Tamping creates a dense bed that resists water flow, which can cause sputtering and over-extraction. Just level the grounds with your finger or a knife. The pressure from the steam is enough.
What’s the best grinder for moka pot?
A burr grinder, either manual or electric, is the best choice. Look for one with fine adjustments, like the CEVING manual grinder with 40 settings. Avoid blade grinders because they produce uneven particles.
Final Verdict: Your Perfect Grind Awaits
Finding the best grind size for moka pot isn’t a one-time discovery. It’s an ongoing adjustment that depends on your beans, roast, and environment. But now you have a method to dial it in quickly:
- Start with fine table salt texture. That’s your baseline.
- Watch the flow. It should be steady and honey-like.
- If bitter, go coarser. If sour, go finer.
- Use a burr grinder for consistent particles.
- Adjust for roast level: darker = coarser, lighter = finer.
- Don’t tamp. Just level the basket.
- Keep a log of your settings for each bean you try.
The moka pot rewards attention. Once you dial in that first perfect cup, you’ll wonder why you ever settled for mediocrity. And if you’re still using a blade grinder, the upgrade to a burr grinder will be the single best change you make.
For more tips on getting the most from your coffee gear, check our guide on maintaining your coffee machine. And if you’re curious about other brewing methods, our automatic espresso machine guide covers the next step up.
Products related to this article
Sponsored / affiliate links. As an Amazon Associate I earn from qualifying purchases. I may earn additional commission from eligible campaigns.