You bought a 12-cup machine because you wanted options. A full pot for the Monday morning rush, or just four cups for a quiet Saturday. But if you are like most people, that first pot came out bitter, or weak, or it overflowed the filter basket. The machine isn’t the problem. The technique is.
This guide walks through the exact steps for using a 12 cup drip coffee maker, from measuring water correctly to timing the brew. You will also learn why the carafe markings lie to you, and how to fix the most common brewing mistakes. By the end, you will know how to get a consistent, clean cup every single time.

BLACK+DECKER
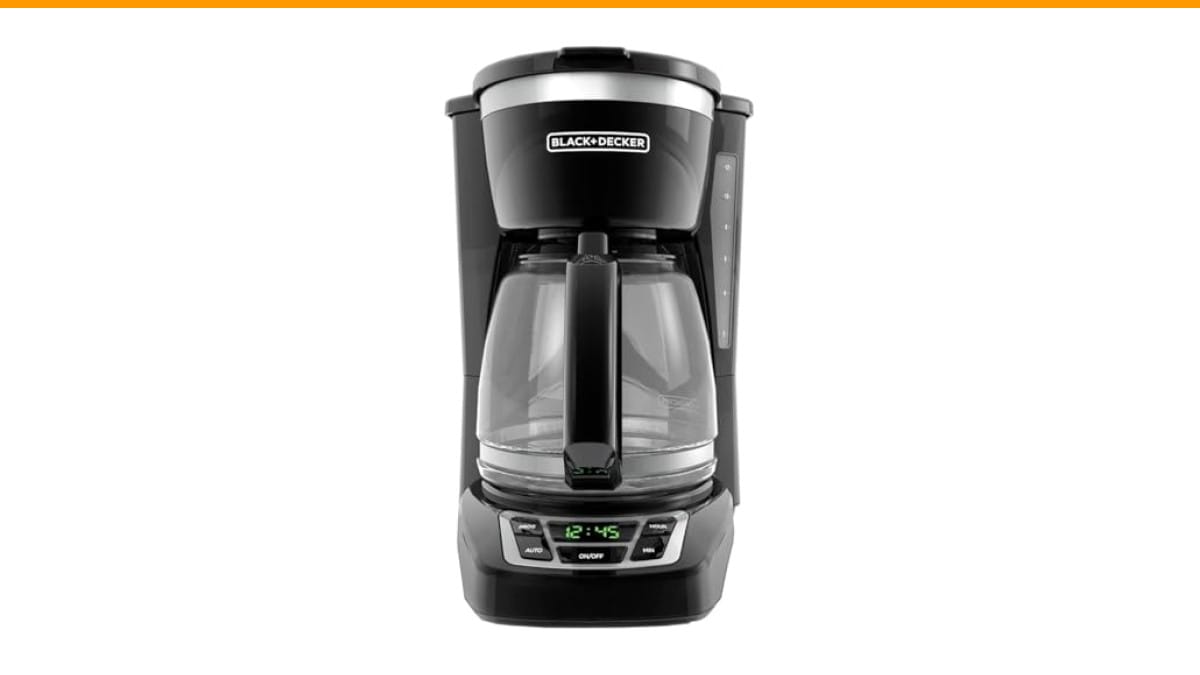
BLACK+DECKER 12-Cup Drip Coffee Maker with Vortex…
- 12-CUP DURALIFE GLASS CARAFE: The sturdy 12-cup* carafe has measurement markings for accurate filling and an easy-grip handle for…
- SNEAK-A-CUP FEATURE TO PREVENT DRIPS: This feature temporarily stops the flow of coffee so you can pour your first cup before brew…
- EASY-VIEW WATER WINDOW: The front-facing window shows you the exact amount of water that will turn into coffee, and the brew baske…
As an Amazon Associate I earn from qualifying purchases.
A solid workhorse for this is the BLACK+DECKER 12-Cup Drip Coffee Maker with Vortex Brewing. It has a front-facing water window that makes filling easier, and the Sneak-a-Cup feature stops the flow so you can grab a mug mid-brew without dripping coffee all over the hot plate. It is not a fancy espresso machine, but it handles the basics well.
The Water Ratio Myth: Why Your Coffee Tastes Weak
Most people fill the carafe to the 12-cup line and dump it in. That is the first mistake. The carafe markings assume a 5-ounce cup, but most mugs hold 8 to 12 ounces. So a full pot of water only gives you about 5 regular mugs of coffee, not 12.
That is not the real problem though. The real problem is the coffee-to-water ratio. The standard golden ratio is 1 to 2 tablespoons of ground coffee per 6 ounces of water. For a full 12-cup pot (which is 60 ounces of water), you need between 10 and 12 tablespoons of coffee. That is roughly 2/3 to 3/4 of a standard measuring cup.
If you fill the basket with only 6 tablespoons because it looks like a lot, you get weak, watery coffee. The machine did not fail. You underdosed it.
Use a scale if you have one. 60 grams of coffee per 1000 grams (1 liter) of water is a good starting point. Adjust from there based on your taste. Dark roasts often need slightly less, light roasts slightly more.
Filter Types: Paper vs. Permanent Mesh
Your 12-cup maker probably came with a permanent mesh basket. It works, but it lets fine coffee grounds slip through into your cup. That sludge at the bottom of your mug is not a brewing fault; it is a filter problem.
Paper filters (like a #4 cone) catch those fines and produce a cleaner cup. They also absorb some of the coffee oils, which can mute the flavor slightly. Some people prefer that. Others want the fuller body that a mesh filter provides.
| Feature | Paper Filter (#4 Cone) | Permanent Mesh Filter | |
|---|---|---|---|
| Cup clarity | Clean, no sediment | May have fine grounds | |
| Flavor profile | Bright, crisp | Heavier, more oils | |
| Cleanup | Throw it away | Rinse or wash | |
| Cost over time | Recurring cost | One-time purchase | |
| Best for | Drip machines | French press style |
For a standard drip machine, paper is usually the safer bet. It is simpler and prevents clogging. If you use the mesh basket, rinse it immediately after brewing. Dried coffee oils turn rancid and ruin the next pot.
Programming and Auto Brew: Set It and Forget It
Most 12-cup machines have a 24-hour programmable timer. The BLACK+DECKER model uses QuickTouch programming with a digital clock. The process is similar across brands: set the clock, press the Program button, set the brew time, then press Program again to lock it in.
Here is the trick most people miss: you must arm the auto-brew feature before you go to bed. On many machines, pressing the Program button only sets the time. You then need to press the Auto Brew or Timer button to activate it. If you skip that step, nothing happens in the morning.
Also, do not put coffee grounds in the basket the night before. Moisture and air make them stale by morning. Grind your beans and put them in an airtight container. Set up the machine with water, then add the grounds right before you hit the brew button or arm the timer.
One more thing: the 2-hour auto shutoff is a safety feature, but it also means your coffee sits on the hot plate for two hours max. That is fine for a morning. If you need coffee at 2 PM, brew a fresh pot instead of reheating the old one. Burnt coffee is a common complaint, but it is not the machine’s fault.
Myth-Buster: More Watts Does Not Mean Better Coffee
People look at wattage to judge a coffee maker. That is a mistake. Wattage only tells you how fast the heating element warms the water. A 900-watt machine heats faster than a 600-watt one, but neither makes better coffee.
What matters is the water temperature during brewing. The ideal range is 195°F to 205°F. Most cheap drip machines do not hit that range consistently. They brew at 180°F or lower, which under-extracts the coffee and leaves it sour. You cannot fix that by buying a higher-wattage machine.
You can fix it by pre-heating your water. Boil water in a kettle and pour it into the reservoir instead of using cold tap water. This forces the machine to start at a higher temperature. It is not perfect, but it makes a noticeable difference in the cup.
Another myth is that running a cleaning cycle with vinegar will fix a slow brew. It helps with scale buildup, but if your machine takes 15 minutes to brew a pot, the heating element might be failing. Check the water temperature first. If it is below 185°F, the machine is not worth fixing.
Cleaning and Maintenance: The Real Secret to Good Coffee
You cannot brew good coffee in a dirty machine. Old coffee oils coat the internal tubing and the carafe. They go rancid and add a bitter, ashy taste to every pot. This is why your coffee at home tastes worse than the same beans at a cafe.
Run a cleaning cycle every month. Fill the reservoir with a mix of half water and half white vinegar. Run a full brew cycle with a paper filter in the basket. Then run two more cycles with just clean water to rinse out the vinegar taste.
If you use your machine daily, do this more often. Hard water makes scale buildup worse. You can also use a commercial descaling solution, but vinegar works just as well and costs less. For a deeper look at the process, check this guide on cleaning with vinegar.
The carafe needs attention too. The Duralife glass carafe on the BLACK+DECKER is dishwasher safe on the top rack, but hand washing with a soft sponge is gentler on the markings. Avoid abrasive scrubbers; they scratch the glass and make the measurement lines hard to read.
If your machine stops brewing mid-cycle, do not panic. Clogged lines are the usual cause. Here is a guide on unclogging the lines that walks through the steps. Regular cleaning prevents this from happening.
Frequently Asked Questions
How much coffee do I put in a 12-cup maker?
Use 10 to 12 tablespoons of ground coffee for a full pot. That equals about 2/3 to 3/4 of a standard measuring cup. If you use a scale, aim for 60 grams of coffee per liter of water. Adjust to taste.
Why is my coffee maker brewing weak coffee?
You are underdosing the coffee or using too much water relative to the grounds. Check the carafe markings. They measure 5-ounce cups, not the 8-ounce mug you drink from. Measure your water with a liquid measuring cup instead of trusting the carafe lines.
Can I use regular ground coffee in a 12-cup maker?
Yes, but use a medium grind. Fine espresso grind will clog the filter and over-extract. Coarse French press grind will under-extract and taste weak. A medium drip grind is the sweet spot.
Why does my coffee maker take so long to brew?
Scale buildup in the heating element is the most common cause. Run a descaling cycle with vinegar. If that does not fix it, the heating element may be failing. Check the water temperature; if it is below 185°F, the machine is dying.
Is it safe to leave the coffee maker on all day?
Most modern machines have a 2-hour auto shutoff. The BLACK+DECKER model does. If yours does not, turn it off manually after brewing. Leaving it on wastes electricity and burns the coffee. It is also a fire risk if the water runs dry.
What to Do Next for a Better Cup
- Measure your water with a real measuring cup, not the carafe markings.
- Use 10-12 tablespoons of coffee for a full pot, or 60 grams per liter.
- Switch to paper filters if you see sludge in your cup.
- Pre-heat your water to improve extraction in cheap machines.
- Clean the machine with vinegar monthly to remove scale.
- Grind beans fresh daily and store them in an airtight container.
- Do not leave grounds in the basket overnight; add them right before brewing.
Using a 12-cup maker is not complicated, but it does require attention to ratios and cleaning. Skip those steps and you get bad coffee. Follow them and you will wonder why you ever bought coffee out. For more on keeping your machine in top shape, read about why regular cleaning matters.
Products related to this article
Sponsored / affiliate links. As an Amazon Associate I earn from qualifying purchases. I may earn additional commission from eligible campaigns.
 HomeBeyond Espresso Coffee Maker 12 Cups, Classic Stovetop Espresso Maker, 600ml / 20oz Coffeemaker for Gas & Ceramic Stovetops (Silver)
 Belly Moka Coffee Maker Stovetop Espresso Maker 9 Cup Aluminum Moka Pot Percolator 15oz 450ml Easy Brewing for Electric Ceramic Stoves Home Camping Italian Cuban Café Classic Black
 Belly Moka Coffee Maker Stovetop Espresso Maker 6 Cup Aluminum Moka Pot Percolator 10oz 300ml Easy Brewing for Electric Ceramic Stoves Home Camping Italian Cuban Café Classic Silver