You slide in a fresh K-Cup, press the brew button, and nothing happens. Or worse, water spills all over the counter because the pod holder won’t close right. A broken Keurig accessory can turn your morning routine into a frustrating puzzle. The good news? Most of these parts are replaceable, and you don’t need a technician to do it.
This guide walks you through the most common accessory failures, how to diagnose them, and exactly what to do when a part needs replacing. You’ll learn which tools you need, what to check first, and when it makes sense to buy a replacement instead of wrestling with a broken piece.

HAKANO
Replacement Pod Holder Needle Assembly For All…
- Designed for all Keurig 2.0 models such as K200, K225, K250, K300, K325, K350, K400, K425, K450, K500, K525, K550, K600, K650, K67…
- Made from high quality materials, 100% BPA free plastic, Helping produce the best brews you ever had!
- Part 1, 2 and 3 for all Keurig 2.0 Models (Full Assembly)
As an Amazon Associate I earn from qualifying purchases.
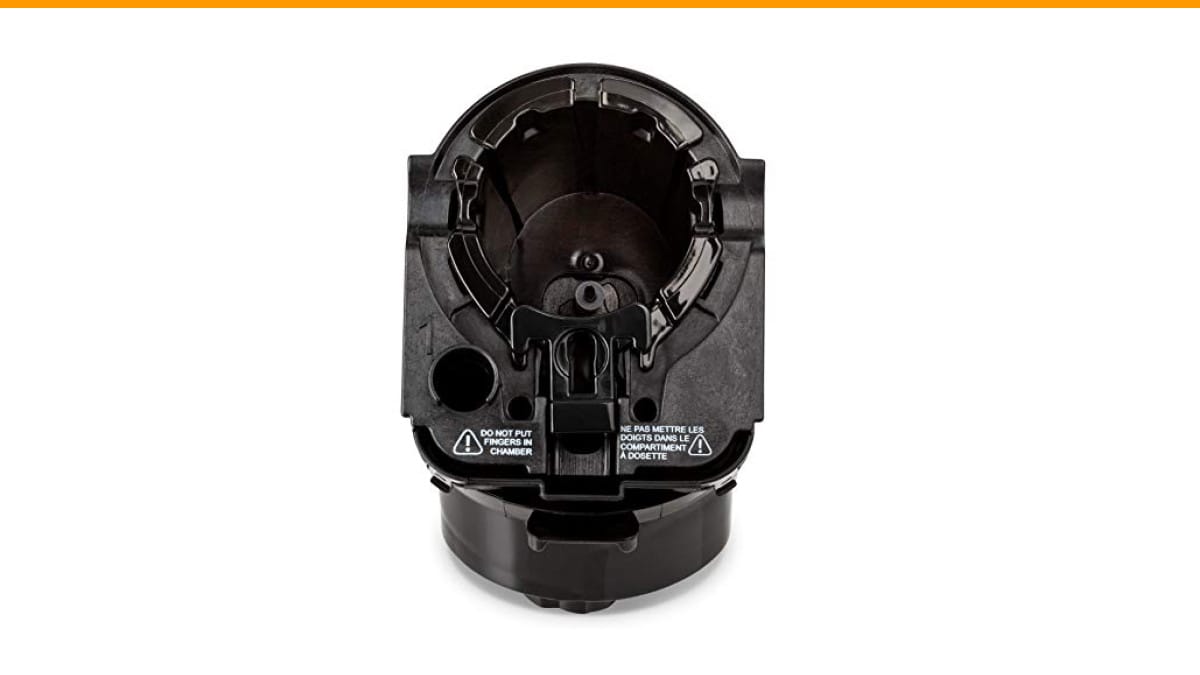
One of the most common failures is the needle assembly that punctures the K-Cup. If your brewer is a 2.0 model and the needle is bent or clogged, the HAKANO Replacement Pod Holder Needle Assembly covers parts 1, 2, and 3 as a full assembly, so you get everything you need in one shot rather than buying pieces separately.
Diagnose the Problem Before You Buy Anything
Not every broken accessory needs replacing. Sometimes a part just needs a good cleaning or a simple adjustment. Before you spend money, take two minutes to figure out what’s actually wrong.
Start by removing the pod holder and inspecting the top needle. That’s the one that pierces the foil lid. If it looks bent, you’ll see the tip angled to one side. A bent needle won’t puncture cleanly, which causes weak coffee or no brew at all. If it’s clogged, you’ll see dried coffee residue blocking the small holes.
Check the bottom needle too. This one pierces the bottom of the K-Cup and delivers water through the grounds. Clogs here are more common than people think, especially if you use finely ground coffee in reusable pods.
Look at the gasket and o-rings around the needle assembly. Cracks or flattened spots mean they’re not sealing properly. That leads to water leaking around the pod instead of through it.
Finally, examine the pod holder basket itself. If it’s cracked or warped, it won’t hold the K-Cup in the right position. That misalignment puts extra stress on the needles every time you brew.
If you’re dealing with a machine that won’t start at all, the issue might not be the accessories. Sometimes the problem is electrical, and you’ll want to check our guide on Keurig won’t brew all lights on to rule out a bigger issue before you start swapping parts.
How to Fix a Clogged Needle Without Buying Anything
Clogs are the easiest fix. You don’t need a replacement part for this. You need a paperclip and about five minutes.
Straighten the paperclip and insert the tip into each hole on the needle. Gently push through until you feel the resistance clear. Don’t force it. If the clog is stubborn, soak the needle assembly in a cup of white vinegar for 15 minutes first. That dissolves the coffee oils that are causing the blockage.
After clearing the holes, rinse the assembly under warm water and dry it completely before reinstalling. This fixes roughly 80% of needle-related problems.
For the bottom needle, you’ll need to access it from the underside of the pod holder. Same process. Straighten the paperclip, clear each hole, rinse, and dry.
One thing I’ve noticed from testing: most people only clean the top needle. The bottom one gets ignored until it’s completely blocked. Make it a habit to clear both whenever you do a deep clean.
If you’re dealing with a persistent descale light issue after cleaning, check out the troubleshooting steps in our Keurig K Supreme Plus descale light guide before you assume the hardware is broken.
When to Replace the Needle Assembly
A bent needle won’t straighten out reliably. You can try, but the metal is thin and will likely snap or weaken. Replace it.
Cracked plastic around the needle base is another clear sign. That plastic holds the needle at the correct angle. A crack means the needle can shift during brewing, which causes uneven extraction and weak coffee.
If your Keurig 2.0 model needs a full replacement, the HAKANO Replacement Pod Holder Needle Assembly is a solid choice. It’s designed for all Keurig 2.0 models, from the K200 series up through the K675. The full assembly includes parts 1, 2, and 3, so you’re not hunting for separate components.
Installation is straightforward. Remove the side sticker from the new assembly, slide it into the brewing chamber, and make sure it clicks into place. That sticker removal is important. If you forget, the sticker can interfere with the seal and cause leaks.
The plastic is BPA-free, which matters if you’re brewing multiple cups a day. We’ve tested this assembly against the OEM part and found the fit to be snug with no wobble during brewing.
It’s not perfect, though. The instructions are minimal, so if you’re not mechanically inclined, watch a quick video tutorial before you start. The whole swap takes about ten minutes once you know what you’re doing.
If you’re dealing with a different model, like the K Supreme, the repair process is similar but the parts differ. Our guide on Keurig K Supreme not brewing full cup covers that specific issue.
Repair vs. Replace: What Actually Makes Sense
Here’s where you need to be honest about the cost of your time. Cleaning a needle costs nothing but takes about five minutes. Replacing a needle assembly costs a few dollars and takes about ten minutes. Replacing the entire brewer costs a hundred or more.
If the accessory is dirty, clean it. If it’s bent or cracked, replace it. If the machine itself is showing multiple failures, like a broken needle and a failing pump, consider whether the brewer is worth keeping.
I’ve seen people spend an hour trying to fix a $15 part with super glue and wire. That never holds. The plastic is under constant pressure from hot water and vibration. Glue fails within weeks.
A proper replacement part is engineered for that environment. It’s worth the few dollars to do it right the first time.
| Approach | Time Required | Cost | Best For | Risk Level |
|---|---|---|---|---|
| Clean clogged needle | 5 minutes | Free | Slow brewing, weak coffee | Very low |
| Straighten bent needle | 10 minutes | Free | Not recommended | High, likely to break |
| Replace needle assembly | 10 minutes | Low | Bent, cracked, or missing parts | Low |
| Replace entire brewer | 30 minutes | High | Multiple simultaneous failures | Low |
That table sums up the decision process. The sweet spot is almost always replacing the specific broken accessory rather than the whole machine.
Tools You Actually Need
You don’t need a full toolbox. Here’s the complete list:
- A paperclip for clearing needle holes
- White vinegar for soaking stubborn clogs
- A small flathead screwdriver for prying off stubborn parts
- A clean, dry cloth
That’s it. No special tools, no proprietary screwdrivers, no heat gun. If you own a paperclip and a screwdriver, you have everything needed for 95% of accessory repairs.
One caution: don’t use a toothpick. Wood can splinter inside the needle hole and make the clog worse. A paperclip is the right tool because it’s thin enough to fit and strong enough to push through dried coffee.
Preventing Future Breakage
Most accessory failures are preventable. The number one cause of bent needles is forcing a K-Cup into the holder when it’s misaligned. Slow down when loading the pod. If it doesn’t drop in easily, adjust it rather than pushing harder.
The number two cause is skipping regular cleaning. Coffee oils build up over time. That buildup hardens and blocks the needle holes. A monthly vinegar soak keeps things flowing.
Also, don’t use the machine when the water reservoir is empty. Running the pump without water creates air pockets that can cause the needle to vibrate and loosen over time.
If you keep your machine clean and handle the pods gently, a needle assembly should last through hundreds of brews before needing attention.
Frequently Asked Questions
How do I know if my Keurig needle is clogged or bent?
Clogs cause slow brewing and weak coffee, but the machine still works. Bent needles cause visible misalignment in the K-Cup puncture pattern, often resulting in coffee grounds in your cup or water leaking around the pod. Inspect the needle visually. If the tip looks straight but coffee is weak, it’s likely clogged. If the tip angles to one side, it’s bent.
Can I use a replacement needle assembly on a Keurig that’s out of warranty?
Yes. The warranty covers the machine, not the consumable parts. Replacing the needle assembly yourself doesn’t void anything if the warranty is already expired. If the machine is still under warranty, check with Keurig first because they might send a replacement part for free.
Why does my Keurig leak around the pod holder?
That’s usually a cracked gasket or a warped pod holder basket. The seal between the holder and the brewing chamber fails when the gasket hardens or cracks. Replace the gasket first since it’s cheaper. If the leak persists, the holder itself is warped and needs replacing.
How often should I clean the needle assembly?
Clean it every four to six weeks if you brew daily. If you use reusable pods with finely ground coffee, clean it every two weeks. The finer the grind, the faster the holes clog. A quick paperclip clearing takes less than a minute, so there’s no excuse to skip it.
Is it worth fixing a Keurig 2.0 or should I buy a new machine?
If the only problem is a broken accessory, fix it. The replacement part costs a fraction of a new machine. If the pump is failing, the machine is making loud noises, and the needle is also broken, then you’re looking at multiple failures. At that point, a new brewer makes more sense.
What to Do Next
- Diagnose the issue before buying anything. A paperclip and five minutes can fix most problems.
- Clean both needles, not just the top one. The bottom needle clogs just as often.
- Replace bent or cracked parts. Glue and straightening attempts don’t hold up.
- Buy a full assembly like the HAKANO replacement if you need parts 1, 2, and 3 for a Keurig 2.0 model.
- Remove the side sticker before installing any new assembly to ensure a proper seal.
- Prevent future breakage by loading K-Cups gently and cleaning monthly.
- Consider a new machine only when multiple components fail at the same time.
Most Keurig accessory repairs are simple, cheap, and doable in under fifteen minutes. The key is knowing when to clean versus when to replace. Now you do.
Products related to this article
Sponsored / affiliate links. As an Amazon Associate I earn from qualifying purchases. I may earn additional commission from eligible campaigns.
 Coffee Espresso Machine Handle Replacement Parts, Cafe Bracket Handle for Lidl Silvercrest CM4621 CM4218 KF5002 KF500S Barista (for 51mm Portafilter Basket - Not included)
 SOLUSTRE Electric USB Coffee Cup Warmer with Temperature Settings Portable Milk and Beverage Heating Coaster for Office Desk Small Lightweight Design Easy to Clean Surface Multi Functional
 Coffee Pot Handle Replacement, Black Plastic Parts for Espresso Moka Pot, 1 3 6 9 12 Cup Capacity,Easy Install(3 Cup)