You’ve got the espresso dialed in. The beans are fresh, the grind is right, and your shots are pulling like a dream. Then you steam the milk, pour it into the cup, and end up with a mess of big bubbles and watery liquid. The culprit is usually not your technique alone — it’s the pitcher.
Most beginners pick up a frothing pitcher and treat it like a simple cup. It’s not. The shape, the size, the material, and even the angle you hold it at change how the milk spins. After testing pitchers side by side for months, I’ve narrowed down the mistakes that ruin more lattes than bad espresso ever will.

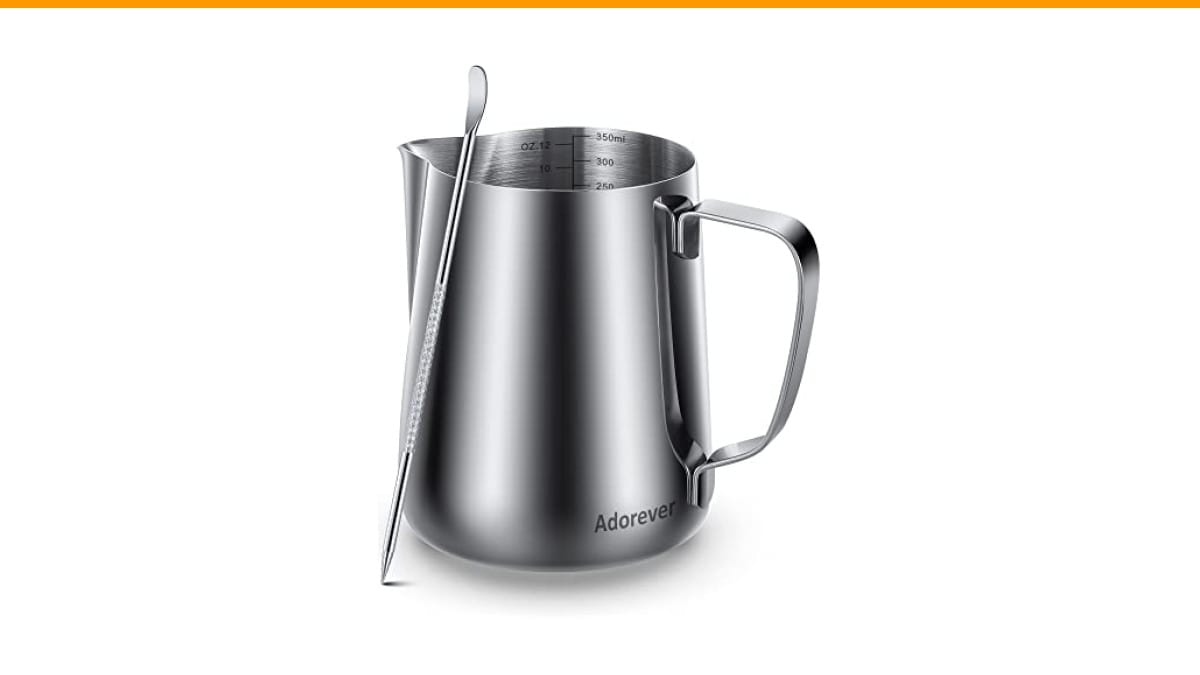
Adorever
Milk Frothing Pitcher, 8.5oz/12oz/20oz/32oz/50oz/66oz Milk Frother Cup…
- Perfect Combination Of Milk Frothing Pitcher And Latte Art Pen: The milk frother jug can be used in different ways: froth or steam…
- Premium Quality: The milk steaming pitchers and coffee art pen are made of chrome finished #304 stainless steel. Rust-proof, stain…
- Point-Mouth Design: Can prevent liquid leaking from the jug and make the coffee pattern pretty. Offer 12oz/20oz/32oz/50oz milk jug…
As an Amazon Associate I earn from qualifying purchases.
This guide walks through the seven most common milk frothing pitcher mistakes beginners make, what to do instead, and how to pick a pitcher that doesn’t fight you. You’ll walk away with a checklist you can use tomorrow morning.
If you’re starting from scratch, a solid entry point is a stainless steel pitcher like the Adorever Milk Frothing Pitcher. It’s got a pointed spout for pouring and comes with a latte art pen, so you won’t need to buy anything else to practice.
Mistake 1: Using the Wrong Size Pitcher for Your Milk Volume
Beginners grab whatever pitcher looks good on the shelf. That’s a mistake. The pitcher size dictates how much room the milk has to spin and expand.
Here’s the rule: fill the pitcher to about one-third full with cold milk. That leaves two-thirds empty for the milk to expand as it froths. If you fill it halfway, the milk will overflow. If you fill it too little, the steam wand won’t reach deep enough to create a proper vortex.
For a single 12-ounce latte, you need about 6 ounces of milk. That means a 12-ounce pitcher works, but just barely. An 18-ounce or 20-ounce pitcher gives you more room to work with and is easier to control. The Adorever pitcher comes in sizes from 8.5oz up to 66oz, so you can match it to your typical drink volume. I’d recommend the 20oz for home use — it handles everything from a cortado to a large latte.
Don’t buy a tiny pitcher thinking it’s cuter. You’ll be fighting the wand angle the whole time.
Mistake 2: Ignoring the Spout Shape
You might think all spouts are the same. They’re not. A round spout pours a thick, gluggy stream. A pointed spout gives you a thin, controlled line that lets you draw hearts and rosettas.
If you’re serious about latte art, the spout matters more than the handle. The Adorever pitcher has a point-mouth design that prevents dripping and gives you a clean cut-off when you lift the pitcher at the end of a pour.
Test this yourself: pour water from a round-spout pitcher and then from a pointed one. The difference is night and day. The pointed spout lets you place the milk exactly where you want it, which is the whole game when you’re trying to pour a tulip or a swan.
For beginners, I’d say this is the single biggest upgrade you can make without spending more money.
Mistake 3: Not Chilling the Pitcher First
Cold milk needs a cold pitcher. That’s not a nicety — it’s a physics thing. If the pitcher is warm, the milk heats up faster, and you lose the window where you can stretch the milk before it reaches 140°F (60°C).
Baristas keep their pitchers in the fridge for a reason. A cold pitcher gives you about 30 extra seconds of stretch time, which is huge when you’re learning to control the air intake.
Put your pitcher in the fridge for at least 10 minutes before you start. If you forget, you can rinse it with cold water and dry it quickly. It’s not perfect, but it helps.
One caveat: don’t freeze the pitcher. Condensation forms on the outside, and that water drips into your milk. You want cold, not wet.
Mistake 4: Holding the Pitcher at the Wrong Angle
The angle of the pitcher determines whether the steam wand creates a vortex or just blasts bubbles to the surface. If you hold the pitcher straight up and down, the wand tip is too close to the surface, and you get big, sloppy bubbles.
Here’s the correct technique: tilt the pitcher about 20 degrees, just enough to submerge the steam wand tip just below the surface. The milk should be spinning in a circular motion, not splashing.
You’ll hear a paper-tearing sound during the stretching phase. That’s the sound of air being sucked into the milk. If you hear a loud hissing, you’re too high — the wand is above the surface. If you hear nothing, you’re too deep — no air is getting in.
Practice with water first. Seriously. Add a drop of dish soap to water and practice getting that vortex going. It’s the fastest way to build muscle memory without wasting milk.
Mistake 5: Over-Stretching or Under-Stretching the Milk
Stretching is the phase where you introduce air into the milk. It’s not the same as heating. Beginners either stretch for too long and end up with stiff, dry foam, or they don’t stretch at all and end up with hot milk that has no texture.
For a latte, you want about 20% foam by volume. For a cappuccino, you want closer to 50%. The easiest way to gauge this is by feel: the pitcher should feel slightly warmer than your hand when you’ve stretched enough.
Here’s a rough timeline: for a 6-ounce milk portion, stretch for about 5-7 seconds, then lower the wand tip just below the surface and let the milk spin until it reaches 140°F. That’s it. Over-stretching makes the foam look like shaving cream, which is fine for a cappuccino but ruins a latte.
If you’re using a pitcher with a temperature strip or a thermometer, aim for 130-140°F. Any hotter and the milk proteins break down, giving you a thin, watery texture.
Mistake 6: Pouring Too High or Too Low
You’ve got perfect microfoam in the pitcher, and then you ruin it by pouring wrong. This is the most frustrating mistake because it happens after all the hard work is done.
When you pour, hold the pitcher high (about 4-6 inches above the cup) to break the crema and integrate the milk. Then, when the cup is about half full, lower the pitcher to just above the surface and pour slowly to create the design.
If you pour from high the whole time, you’ll blast through the crema and end up with a muddy mess. If you pour from low the whole time, the milk will sit on top of the espresso and never mix.
The transition from high to low is the trick. It takes practice, but once you get it, you’ll wonder why it ever felt hard.
Mistake 7: Not Cleaning the Pitcher Immediately
Milk residue dries like cement. If you leave a dirty pitcher on the counter for an hour, you’ll be scrubbing for ten minutes. Worse, old milk residue can affect the taste of your next drink.
Rinse the pitcher with cold water immediately after use. Hot water will bake the milk proteins onto the surface. A quick rinse and a wipe with a cloth is all you need. The Adorever pitcher is dishwasher safe, which is a nice convenience, but hand rinsing takes ten seconds and keeps the finish looking new.
I’ve seen pitchers with a white film on the inside that no amount of scrubbing removes. That’s from letting milk sit. Don’t be that person.
Pitcher Comparison: What to Look For
Not all pitchers are created equal. Here’s a quick comparison of the features that matter most for home users.
| Feature | Why It Matters | Beginner Recommendation |
|---|---|---|
| Material | Stainless steel conducts heat well and is durable. Plastic pitchers are harder to control temperature with. | #304 stainless steel, like the Adorever pitcher |
| Spout | Pointed spouts give you control for latte art. Round spouts are for steaming only. | Pointed or ‘point-mouth’ design |
| Size | Too small means overflow. Too big means you can’t feel the temperature change. | 20oz for home use |
| Handle | A welded handle is more durable than a glued one. Check the joint before buying. | Firm, welded joint |
| Measurement Marks | Helpful for consistency, but not essential once you learn your cup sizes. | Nice to have, not required |
The Adorever pitcher checks all these boxes. It’s made from #304 stainless steel, has a pointed spout, and comes in a 20oz size that works for most home drinks. It also includes a latte art pen, which is a small bonus for practicing.
Frequently Asked Questions
Q: Can I use a regular measuring cup to froth milk?
You can, but you’ll fight the shape. Measuring cups have wide mouths and rounded bottoms, which don’t create a good vortex. The steam wand needs a narrow, tapered shape to get the milk spinning properly. A purpose-built pitcher is worth the few dollars it costs.
Q: How do I know when the milk is done frothing?
Two signs: the pitcher feels too hot to hold comfortably for more than a few seconds (around 140°F), and the milk has doubled in volume. If you’re using a thermometer, aim for 130-140°F. If you don’t have one, trust your hand — it should be hot but not burning.
Q: Why does my milk have big bubbles instead of microfoam?
Big bubbles mean you introduced air too aggressively. The wand tip was too high above the surface, or you stretched for too long. Lower the tip just below the surface and keep it there. You want a gentle hiss, not a violent splash.
Q: Should I tap the pitcher on the counter after steaming?
Yes, but gently. A couple of light taps on the counter will pop large bubbles. Then swirl the pitcher in a circular motion to incorporate the foam into the milk. Don’t bang it — you’ll knock out all the microfoam you just created.
Q: Can I froth oat milk or almond milk in the same pitcher?
You can, but plant-based milks behave differently. Oat milk froths well but separates if overheated. Almond milk is thinner and produces less foam. The pitcher doesn’t care — it’s the milk chemistry that changes. Keep the same technique, but stop heating at a slightly lower temperature (around 130°F) for plant milks.
What to Do Differently Tomorrow Morning
Here’s the short version you can act on right now:
- Use a pitcher that’s 20oz or larger for home lattes — more room means more control.
- Chill the pitcher in the fridge for 10 minutes before steaming.
- Tilt the pitcher 20 degrees and keep the wand tip just below the surface.
- Stretch for 5-7 seconds, then submerge the tip and heat to 140°F.
- Pour high to integrate, then low to create art.
- Rinse the pitcher with cold water immediately after use.
- Don’t overthink it — practice with water and soap first to build muscle memory.
If you’re still using a round-bottomed cup or a poorly designed pitcher, upgrade before you upgrade your coffee beans. The pitcher is the tool you touch the most, and it’s worth getting one that works with you, not against you. The Adorever pitcher is a solid choice to start with, and it won’t break the bank.
For more on getting the most out of your milk, check out our guide on fixing a frother that won’t froth. And if your machine is acting up, read about common coffee maker issues before you call a repairman.
Products related to this article
Sponsored / affiliate links. As an Amazon Associate I earn from qualifying purchases. I may earn additional commission from eligible campaigns.
 Quick Heating Cup Warmer, Three Temperature Settings, Splashproof and Portable, for Coffee, Milk, Lightweight ABS Material
 Coffee Mug Warmer & You are Awesome Mug Set, Electric Cup Warmer for Desk
 SOLUSTRE Electric USB Coffee Cup Warmer with Temperature Settings Portable Milk and Beverage Heating Coaster for Office Desk Small Lightweight Design Easy to Clean Surface Multi Functional