You’ve got the beans dialed in, the portafilter is locked, and the shot looks gorgeous. Then you flip the wand over to steam milk and nothing happens. Or it sputters. Or it blows bubbles so large your latte looks like a bath bomb exploded. This is the most common failure point on any home espresso setup, and it’s almost never the machine’s fault.
Most frothing problems trace back to three things: a clogged steam wand, mineral buildup from hard water, or a technique that needs a small correction. This guide walks through each issue in the order you should check them, with the exact fixes that work on machines like the CASABREWS CM5418 and other compact espresso makers with a steam wand. You’ll walk away with a diagnostic routine you can run in under a minute, plus a clear answer on when a repair is worth the money.

CASABREWS
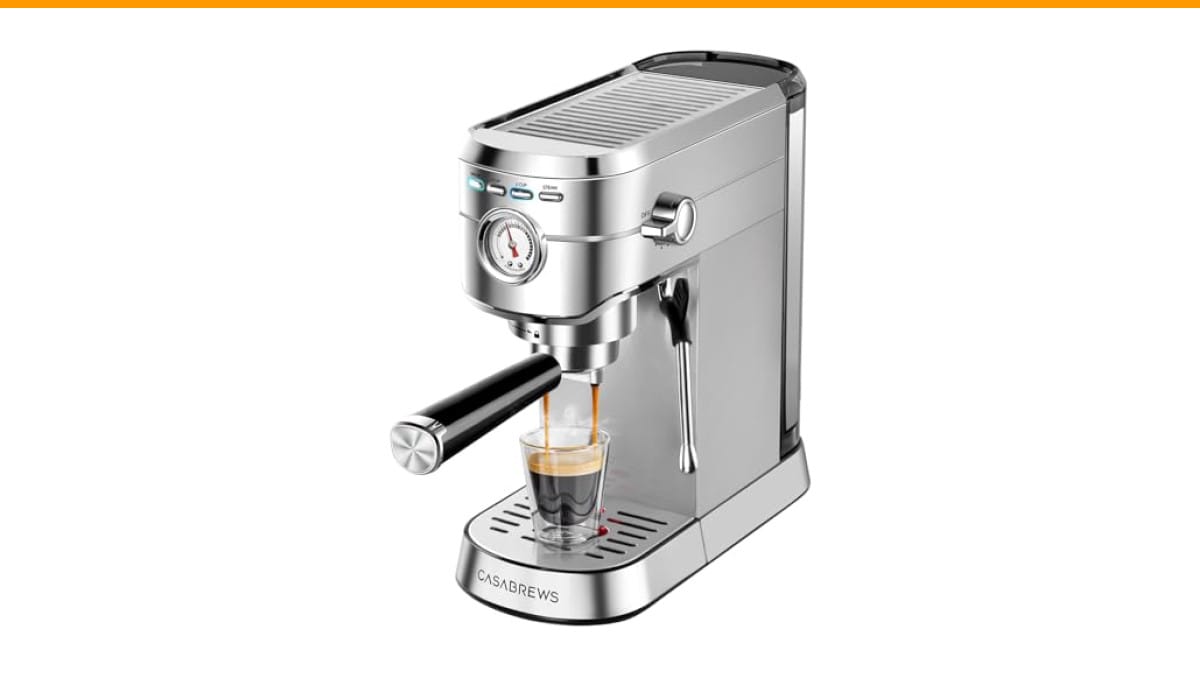
CASABREWS CM5418 Compact Espresso Machine with Milk…
- Make Your Favorite Espresso Coffee At Home: The CASABREWS coffee machine with milk frother allows you to prepare all your favorite…
- Professional 20 Bar Pressure System: Semi-Automatic 2-in-1 Espresso Maker, with 20 bar professional Italian pump and 1350 W powerf…
- Milk Frothing System: Our espresso machine with milk frother has a powerful steam wand, so you can texture creamy, rich microfoam…
As an Amazon Associate I earn from qualifying purchases.
If you’re shopping for a machine that handles milk well without taking up half your counter, the CASABREWS CM5418 Compact Espresso Machine with Milk Frothing Steam Wand is a solid option. Its 20-bar Italian pump and 1350 W boiler give you real steam pressure for texturing milk, and the built-in pressure gauge helps you see what’s happening during extraction. It’s the kind of machine where the steam wand actually keeps up with a double-shot routine.
Diagnose Your Frothing Problem in 60 Seconds
Before you take anything apart, run this quick diagnostic. It tells you where to focus your effort.
- Does steam come out at all? No steam means the wand is clogged, the heating element isn’t reaching temperature, or the pump is failing. Yes, steam but weak means a partial clog or scale buildup.
- Is the steam sputtering or intermittent? That’s almost always a partial blockage in the wand tip or a kink in the hose inside the machine.
- Does the milk heat but not froth? This points to a technique issue, not a hardware one. You’re likely keeping the wand too deep or using milk that’s too warm.
- Does the machine shut off or flash lights mid-steam? Overheating protection kicked in. You tried to brew and steam back-to-back without a cool-down period.
Write down which symptom you have. The next four sections cover each fix in detail, starting with the most common cause.
The #1 Culprit: Clogged Steam Wand and How to Clear It
Milk protein and calcium from hard water form a crust inside the wand. This isn’t a maybe; it’s a when. Every time you steam milk and don’t purge the wand immediately afterward, you’re leaving a thin film of milk residue that bakes onto the metal.
Immediate Purge After Every Steam
Right after you finish steaming, wipe the wand with a damp cloth, then open the steam valve for two seconds into a empty cup. This blasts out any milk that got sucked back into the tip. If you skip this, the residue hardens and narrows the opening. You’ll notice the steam pressure dropping over a week or two.
Deep Clean a Partially Clogged Wand
For a wand that’s already sputtering, you need a mechanical clean. Turn off the machine and let it cool. Unscrew the steam tip (most are hand-tight or need a small wrench). Soak the tip in hot water with a drop of dish soap for 10 minutes. Use a paper clip or a dedicated steam wand cleaning needle to poke through the tiny hole. Rinse and reattach.
If the wand itself is blocked higher up, you’ll need to backflush. Fill a small cup with hot water, place the wand in it, and open the steam valve. The pressure will push water backward through the wand, dislodging the blockage. If nothing comes out, the blockage is solid. You’ll need to descale the machine (details in the descaling section below).
One thing I learned the hard way: don’t use a toothpick. It breaks off inside the hole and makes the clog worse. Use a metal needle or a specialty cleaning tool.
Temperature and Pressure: Why Your Machine Won’t Froth
Your machine needs two things to steam milk: enough heat and enough pressure. If the heating element is scaled up, it can’t transfer heat efficiently to the water. The result is lukewarm steam that barely moves the milk.
Check the Steam Pressure
Most home machines, including the CASABREWS CM5418, have a pressure gauge. During steaming, the needle should sit in the green zone or between 1 and 2 bars. If it’s below that, the machine hasn’t fully heated up. Wait an extra 30 seconds after the machine signals it’s ready. Many machines reach brew temperature before they reach steam temperature.
If the pressure never builds, you likely have scale on the heating element or a failing pump. A pump that’s weak won’t push water through the boiler fast enough to generate steam. This is a more serious repair and often costs nearly as much as a new machine.
Overheating Protection Mode
Here’s a scenario that trips up new owners: you pull a shot, then immediately flip to steam. The machine’s thermostat reads a temperature that’s too high for the boiler to handle, and it cuts power. The lights on the 1-cup and 2-cup buttons flash repeatedly.
This is a safety feature, not a malfunction. The fix is simple: wait 3 to 5 minutes, run a small amount of water through the group head to cool the boiler, and try again. The CASABREWS manual specifically warns about this. You can read more about flashing light troubleshooting if you’re seeing similar patterns on a different machine.
The Milk Matters: Fat Content, Temperature, and Plant-Based Alternatives
You can have a perfect machine and still get terrible foam if the milk is wrong. Whole milk (3.25% fat) is the easiest to froth because the fat stabilizes the bubbles. Skim milk creates a dry, stiff foam that collapses fast. 2% is a middle ground.
Milk Temperature and Freshness
Start with cold milk straight from the fridge. Cold milk gives you more time to stretch and texture before it hits 140°F, the point where proteins denature and stop trapping air. If the milk is already warm, you’ll get big bubbles and no microfoam.
Freshness matters more than people think. Milk that’s close to its expiration date froths poorly because the protein structure has broken down. If your technique is solid and the milk still won’t foam, try a fresh carton from a different brand.
Plant-Based Milk Is a Different Game
Almond, oat, and soy milk behave differently under steam. Barista blends (labeled ‘barista edition’) have added stabilizers and fats that mimic dairy. Regular oat milk will separate and turn watery. If you’re using plant milk, buy the barista version and expect a learning curve. You’ll need to angle the wand slightly differently and stop steaming earlier.
The best approach is to use a thermometer. Pull the pitcher when it hits 130°F for plant milk, 140°F for dairy. That’s the difference between silky microfoam and a burnt mess that tastes like scorched nuts.
Technique Check: Are You Frothing Wrong?
Let’s be honest. Most frothing failures are technique, not hardware. The machine is fine; the wrist motion is off.
The Two-Phase Process
Frothing is two steps: stretching and texturing. First, you stretch the milk by keeping the wand tip just below the surface. You’ll hear a gentle hissing sound, like paper tearing. This phase adds air. It should last 5-10 seconds.
Second, you texture by submerging the wand tip deeper, creating a whirlpool that breaks the big bubbles into microfoam. This phase lasts until the pitcher is too hot to hold comfortably (about 5 seconds longer).
The most common mistake is keeping the wand too deep the whole time. You never add air, so the milk just heats up. The second most common mistake is tilting the pitcher wrong. The wand should be at an angle, not straight down, to create that vortex.
If your milk has bubbles the size of quarters, you stretched too aggressively. If it’s flat and just hot, you didn’t stretch at all. Both are fixable with practice. It took me a week of daily lattes to get consistent, and I was using a decent machine from day one.
Integrated vs. Standalone Frothers: Different Problems, Different Fixes
The machine you have determines the failure modes. An integrated steam wand (like the one on the CASABREWS CM5418) is directly connected to the boiler. A standalone automatic frother is a separate device with its own heating element and motor.
Fixing a Broken Automatic Frother (Motor and Heating Issues)
Automatic frothers (the kind with a whisk inside a jug) fail in two ways. The motor stops spinning, or the heating plate stops working. If the whisk spins but the milk stays cold, the heating element is dead. If nothing spins, the motor or its wiring is the issue.
These are rarely worth repairing. A replacement automatic frother costs $30 to $60. The motor replacement alone will cost more in labor. If yours is under warranty, file a claim. If not, recycle it and buy a new one. The Breville frother repair guide covers the specifics for that brand, but the cost logic applies across the board.
Manual Frother Maintenance and Repair
Manual steam wands have no motor to fail. Their problems are always clogs, scale, or a worn steam valve gasket. The gasket is a small rubber ring that seals the valve. If it’s leaking steam around the knob, you can replace it for a few dollars. This is a 15-minute job with a screwdriver.
Scale on the heating element is the silent killer. It reduces steam pressure over time until the wand just dribbles water. The only fix is descaling, which we cover next.
The Descaling Schedule That Prevents 90% of Problems
Scale is the enemy. Hard water leaves calcium deposits on the heating element and inside the boiler. These deposits act as insulation, so the machine takes longer to heat and produces weaker steam. Over time, they can permanently damage the heating element.
How Often to Descale
If you have soft water, descale every 3 months. If you have hard water, every 1 to 2 months. You can tell if you have hard water by looking at your kettle. White crust on the heating coil means hard water. If you’re unsure, buy a cheap water hardness test strip from a hardware store.
Use a commercial descaling solution, not vinegar. Vinegar works but leaves a smell and can damage rubber seals over time. Descaler is cheap and designed for coffee machines.
The Descaling Process
Mix the descaler with water per the instructions. Pour it into the reservoir. Run the machine without coffee, letting the solution flow through the group head and the steam wand. Here’s the key: you need to open the steam wand for 10 seconds every minute or so. This pulls the descaling solution through the boiler and out the wand, clearing scale from that path.
After the cycle, run two full tanks of fresh water through to rinse. Your steam pressure should noticeably improve. For a full walkthrough, check our coffee machine descaling guide.
Safety First: What Not to Do When Repairing Your Machine
Steam wands get hot enough to cause third-degree burns instantly. The boiler inside is under pressure. Before you touch anything, unplug the machine and wait at least 30 minutes for it to cool completely.
Never open the boiler housing while the machine is hot or plugged in. The steam inside can escape and scald your face. If you’re checking for a clog, only remove the steam tip, not the internal hoses.
Electrical issues are a different beast. If you see sparks, smell burning plastic, or the machine trips a breaker, stop. Do not open the casing to poke around. That’s a job for a professional or a replacement. The cost of a new machine is far less than an emergency room visit.
When to Call a Pro vs. When to Buy a New Machine (Cost Analysis)
This is the decision everyone faces. Here’s a simple rule: if the repair costs more than 50% of a new machine, buy new.
| Problem | Estimated Part Cost | Labor (If Professional) | Verdict |
|---|---|---|---|
| Clogged steam wand tip | $5 – $10 (new tip) | DIY (10 min) | Fix it yourself |
| Steam valve gasket leak | $5 – $15 | DIY (15 min) | Fix it yourself |
| Scale buildup (needs descale) | $10 – $20 (descaler) | DIY (45 min) | Fix it yourself |
| Heating element failure | $40 – $80 | $80 – $150 | Consider replacing the machine |
| Pump failure | $30 – $60 | $60 – $120 | Consider replacing the machine |
| Control board / electronics | $50 – $100+ | $100+ | Replace the machine |
For a compact machine like the CASABREWS CM5418, the price point means most internal repairs aren’t economical. The exception is the steam wand tip and the gasket, which are cheap and easy. For anything involving the pump or heating element, you’re better off putting that money toward a new unit.
Before you buy, check the warranty. Many machines have a 1-year warranty covering parts and labor. That’s free money if you’re within the window.
5-Minute Quick Fixes for Busy Mornings
You’re rushing, and the wand won’t cooperate. Try these in order before you give up and pour a cold brew.
- Purge the wand: Open the steam valve for 5 seconds into a cup. This clears any milk residue from the last session.
- Check the tip: Unscrew the steam tip and look at the hole. If you see a speck of dried milk, poke it out with a paper clip.
- Reheat the boiler: If the machine has been idle for 10 minutes, run a small amount of water through the group head to trigger a fresh heating cycle. This ensures the boiler is at max temp.
- Use cold milk: Don’t even think about steaming warm milk. Cold milk is non-negotiable.
- Shake the milk carton: A quick shake redistributes the fat and protein. It sounds silly, but it helps with older cartons.
These won’t fix a dead pump, but they solve 80% of the ‘why is my frother not working’ moments that happen at 7 AM.
FAQ: Common Frothing Questions, Answered
Why does my steam wand spit water instead of steam?
You haven’t purged the condensation from the wand. Water sits in the wand after the last use. Open the steam valve for 3-4 seconds into a cup before you put the wand in the milk. This clears the water and gives you dry steam.
How do I know if my machine needs descaling?
Watch the steam pressure. If it takes longer to heat up, or the steam feels weak and wet, scale is likely. Another sign is a rumbling sound from the boiler. If your water is hard and you haven’t descaled in 2 months, just do it. It’s cheap insurance.
Can I use vinegar to descale my espresso machine?
You can, but I wouldn’t. Vinegar is acidic enough to work, but it leaves a lingering smell and can degrade the rubber gaskets in the steam valve. A dedicated descaling solution is safer for the machine and rinses clean. It costs a few dollars more.
Why does my milk taste burnt?
You overheated it. Milk proteins scorch above 160°F. The fix is to stop steaming at 140°F. Use a thermometer until you get a feel for the pitcher’s temperature. The pitcher should be too hot to hold comfortably but not burning.
Is it normal for the steam wand to be loud?
A hissing sound is normal, but a high-pitched whistle or a gurgling sound is not. A whistle means the tip is partially blocked. A gurgle means water is getting into the steam line, which points to a heating cycle issue. Clean the tip first; if the gurgle persists, check the heating element for scale.
What Actually Works: A Straightforward Checklist
You don’t need to be a technician to keep your frother running. You need a routine.
- Purge the steam wand for 2 seconds after every single use. Always.
- Descale every 1-3 months based on your water hardness. Hard water means more frequent.
- Use cold, fresh whole milk for the easiest learning curve. Switch to barista plant milk if you’re dairy-free.
- Master the two-phase frothing technique: stretch for 5-10 seconds, then texture until the pitcher is hot.
- Check the steam tip for clogs weekly. A paper clip is all you need.
- If the pressure gauge stays low after a descale, suspect the pump or heating element. Compare repair costs to a new machine before committing.
- For a reliable machine that handles all this well, the CASABREWS CM5418 is worth a look. Check the current price on Amazon to see if it fits your budget.
Frothing problems are rarely mysteries. They’re clogs, scale, or technique. Run the diagnostic, do the cleaning, and you’ll be back to pouring latte art in under an hour.
Products related to this article
Sponsored / affiliate links. As an Amazon Associate I earn from qualifying purchases. I may earn additional commission from eligible campaigns.
 Coffee Espresso Machine Handle Replacement Parts, Cafe Bracket Handle for Lidl Silvercrest CM4621 CM4218 KF5002 KF500S Barista (for 51mm Portafilter Basket - Not included)
 Linnkyfloa Coffee Espresso Maker Handle Replacement for Stovetop Moka Pot or Percolator, Black Plastic for Spare Part Compatible with Italian(9-12 Cup)
 Wrenmor Replacement Handle For Coffee Espresso Moka Stove Pot, Black Plastic Accessory Compatible With 1/3/6/9/12 Cup Sizes For Easy Installation And Long-Lasting Use(1 Cup)