You just finished a perfect cup of stovetop espresso. You rinse the pot under hot water, give it a quick shake, and set it on the counter. Then life happens. Two days later you find the base still has a puddle of stale water in it, and the gasket smells faintly of old coffee.
That scenario is more common than you think. Most people don’t ruin their moka pot by using it wrong. They ruin it by storing it wrong. Moisture trapped inside the chamber leads to mold, musty smells, and—if you own an aluminum pot—that ugly white oxidation that makes coffee taste metallic. This guide covers exactly how to store a moka pot so it stays clean, dry, and ready for the next brew.

ZUWIT
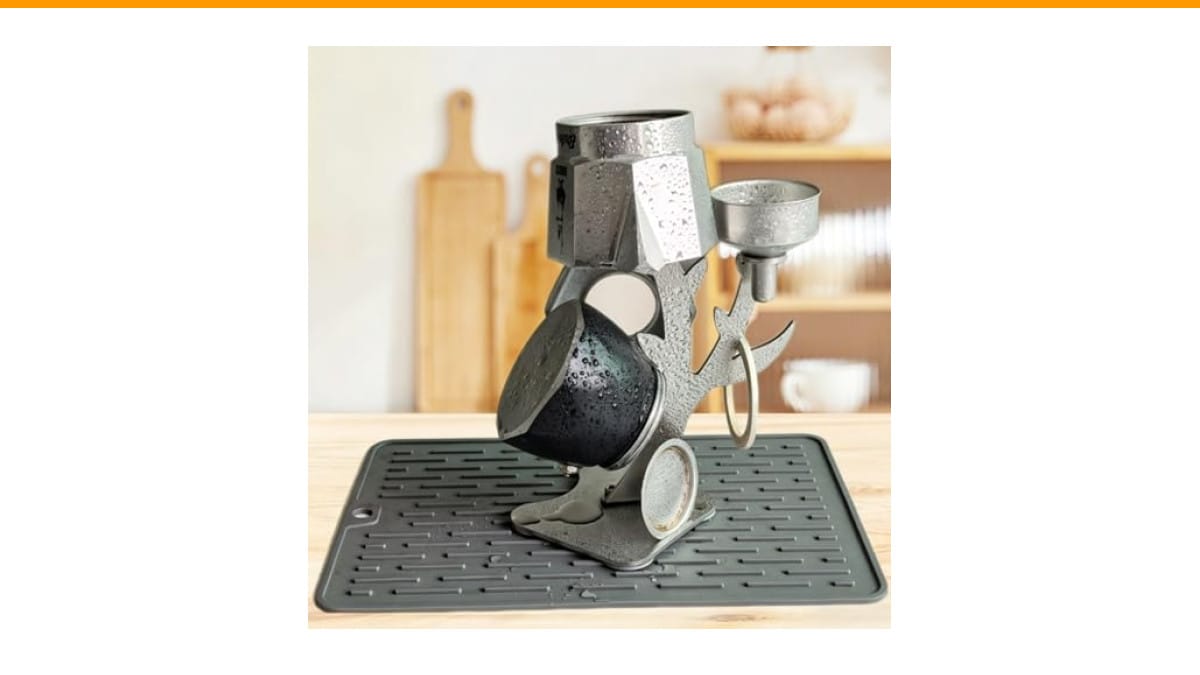
ZUWIT Moka Pot Drying Rack, 304 Stainless…
- Compatible with 99% of Moka pots – Fits 1 to 12 cup sizes from popular brands:Bialetti, Primula, GROSCHE, Bellemain, IMUSA (alumin…
- High Quality: The espresso coffee pot draining rack crafted from a robust 304 stainless steel frame. Non-rust nor corrosive. Guara…
- Multifunction: The drying rack can quickly drain the water, keep pots clean and dry, to clean that just need a simple wipe or rins…
As an Amazon Associate I earn from qualifying purchases.
You’ll learn the difference between short-term storage (daily) and long-term storage (weeks or months), how to handle the gasket and filter plate, and why you should never put a moka pot in the dishwasher—even if the box says it’s safe.
One tool that makes the daily routine much easier is the ZUWIT Moka Pot Drying Rack. It holds the pot upside down so water drains out instead of pooling inside. More on that in a minute.
Why Drying Matters More Than Cleaning
Moka pots are simple machines. A bottom chamber, a funnel basket, a filter plate, a gasket, and a top chamber. There’s nothing electronic, nothing fragile. But the materials are reactive. Aluminum oxidizes when it stays wet. The rubber gasket absorbs odors and degrades when exposed to soap or standing water. Even stainless steel pots develop hard water spots if you let them air dry without wiping.
The goal of storage is simple: keep every component completely dry before you put it away. That doesn’t mean you need to towel-dry every nook and cranny after each use. It means you need a system that gets the pot dry within a few hours, not a few days.
Here’s the routine that works best in testing:
- Rinse the pot with hot water immediately after brewing. Do not use soap on aluminum—it strips the seasoning layer that prevents metallic taste.
- Disassemble the pot fully. Top chamber, bottom chamber, funnel basket, filter plate, and gasket all come apart.
- Shake off excess water from each piece.
- Place everything upside down on a drying rack or a clean dish towel.
- Wait at least 2–3 hours before reassembling and storing.
Most people skip step two. They rinse the assembled pot and leave it on the counter. That traps water between the gasket and the chamber—the exact spot where mold takes hold. If you do nothing else, disassemble the pot before drying.
Short-Term vs. Long-Term Storage
Daily use changes how you store the pot. If you brew every morning, you can keep the pot assembled after it’s fully dry. Just leave the top chamber slightly ajar so air circulates. That prevents stale odors from building up inside.
For weekly use, keep the pot disassembled in a dry cabinet. The gasket should sit loosely on top of the filter plate, not pressed into the groove. Rubber under constant compression loses its springiness faster. You’ll end up replacing gaskets every six months instead of every year.
Long-term storage—anything over two weeks—requires a different approach. Here’s what to do:
- Clean the pot thoroughly and dry every component for 24 hours.
- Store the gasket separately in a sealed plastic bag. This keeps it from absorbing odors from other kitchen items.
- Wrap the aluminum chambers in a dry cloth or paper towel. This absorbs any residual moisture and protects the surface from scratches.
- Keep the pot in a cabinet away from the stove. Heat and humidity from cooking accelerate oxidation.
- Do not store the pot with the lid closed tightly. Leave a small gap for airflow.
If you’re storing an aluminum pot for more than a month, consider rubbing a thin layer of food-grade mineral oil on the exterior before wrapping it. That creates a barrier against moisture. Wipe it off before the first use.
Aluminum vs. Stainless Steel: Different Rules
Aluminum pots need more care. They’re lighter and conduct heat better, but they’re prone to pitting and oxidation. You’ll notice a grayish-white powder forming on the surface if you leave water in the pot. That’s aluminum oxide, and it’s harmless in small amounts but it ruins the taste of your coffee.
Stainless steel pots are more forgiving. They don’t oxidize, and they can handle occasional soap washing. But they show water spots and fingerprints easily. A quick wipe with a microfiber cloth before storage keeps them looking new.
Here’s a comparison of the two materials to help you decide how much effort to put into storage:
| Factor | Aluminum Moka Pot | Stainless Steel Moka Pot |
|---|---|---|
| Oxidation risk | High—forms white powder when wet | None |
| Soap safe | No—strips seasoning | Yes—mild dish soap is fine |
| Dishwasher safe | Never | Technically yes, but avoid it |
| Drying time needed | Critical—must be bone dry | Moderate—dry to avoid spots |
| Gasket replacement | Every 12–18 months | Every 12–18 months |
| Storage prep | Wrap in cloth, store gasket separately | Wipe dry, store assembled |
One thing both materials share: never store the pot while it’s still warm. Thermal shock can warp the base, especially in aluminum pots. Let it cool to room temperature before you even rinse it.
The Right Way to Use a Drying Rack
A dedicated drying rack solves the biggest storage problem—water pooling in the bottom chamber. The ZUWIT Moka Pot Drying Rack holds the pot upside down with the top chamber resting on the rack’s branches. Water drips down and away instead of sitting in the base.
The rack fits most standard moka pots from 1 to 12 cups. It’s made of 304 stainless steel, so it won’t rust or corrode. The base has non-slip rubber feet that keep it stable on the counter. There’s also a silicone mat underneath that catches drips and keeps water from running across your countertop.
What I like about this design is that it also holds the small parts—the filter plate, gasket, and funnel basket. Those tiny components are the ones that usually get lost or forgotten. Having a dedicated spot for them means you’re more likely to actually disassemble the pot and let everything dry properly.
It’s not perfect. The rack takes up counter space, and you’ll need to wipe the silicone mat occasionally. But compared to the alternative—a moldy gasket and a metallic-tasting brew—it’s a small trade-off.
If you don’t want to buy a rack, a clean dish towel works fine. Just fold it in half and place the disassembled pot pieces on top. The key is making sure air can circulate around every piece. Stacking parts on top of each other traps moisture.
Common Mistakes That Shorten a Moka Pot’s Life
After years of testing and talking to home baristas, I’ve seen the same mistakes repeat. Here are the ones that cause the most damage.
Storing with the gasket in place. The gasket needs to breathe. Leaving it compressed in the groove for weeks at a time makes it lose elasticity. When you finally brew, coffee leaks around the edges. Replace the gasket sooner than you’d like, or store it loose.
Putting the pot in the dishwasher. Even stainless steel pots suffer in the dishwasher. The high heat and harsh detergents degrade the gasket and the finish. Hand washing takes two minutes. It’s worth it.
Leaving coffee grounds in the funnel basket. Old grounds turn into a hard, crusty layer that’s difficult to remove. They also attract moisture and cause odors. Empty the basket immediately after brewing, even if you plan to wash the pot later.
Storing the pot in a sealed container. Some people put their moka pot in a plastic bin or a ziplock bag to keep dust off. That traps any residual moisture and creates a perfect environment for mold. Use a breathable cloth cover instead, or just leave it open in a cabinet.
Ignoring the safety valve. The safety valve on the bottom chamber can get clogged with old coffee oils. If you store the pot without cleaning around the valve, it might not function when you need it. Give it a quick rinse and check that the little spring moves freely before each use.
If you want to keep your moka pot in good shape for years, the cleaning habits matter as much as the storage. Take a look at our guide on proper coffee maker cleaning for a deeper dive on removing built-up oils and scale.
Frequently Asked Questions
Can I store a moka pot in the refrigerator?
You can, but you shouldn’t. The cold temperature causes condensation when you take it out, which introduces moisture. If you’re storing it to keep bugs away or save space, a dry cabinet is a better choice. For more on what’s safe to put in the fridge, check our article on storing pots in the fridge.
How long can I leave water in a moka pot?
No more than a few hours. If you leave water in the bottom chamber overnight, you’re inviting oxidation and bacterial growth. Always empty and rinse the pot after brewing, even if you plan to wash it properly later.
Should I oil the gasket before storage?
No. The gasket is made of rubber or silicone, and oil can break down the material over time. A dry gasket stored loosely in a bag is the safest approach. If the gasket feels stiff or cracked, replace it—it’s cheap and takes 30 seconds to swap.
Is it safe to store a moka pot with the lid closed?
For short-term storage (a few days), yes. For longer periods, leave the lid slightly open so air can circulate. A closed lid traps any residual moisture and can cause a stale smell inside the top chamber.
Why does my moka pot have white spots after drying?
That’s mineral buildup from hard water or aluminum oxidation. If it’s on the outside, wipe with a cloth dampened with white vinegar, then rinse. If it’s inside the bottom chamber, it’s likely oxidation—boil a 50/50 mix of water and vinegar once, then rinse thoroughly.
What to Remember Before You Put It Away
Storing a moka pot isn’t complicated, but it does require a few consistent habits. Here’s the short version:
- Always disassemble the pot before drying—never store it assembled with moisture inside.
- Dry every component for at least 2–3 hours before putting it away.
- Store the gasket separately for long-term storage to preserve its elasticity.
- Never use soap on aluminum pots—hot water rinse only.
- Keep the pot away from heat and humidity in a cabinet or on a counter.
- Use a drying rack like the ZUWIT model to keep the pot upside down and let water drain naturally.
- Check the safety valve before each use, especially if the pot has been sitting for a while.
Follow these steps, and your moka pot will last a decade or more. Skip them, and you’ll be buying a new one every couple of years—or worse, drinking coffee that tastes like old metal. The choice is straightforward.
For more on keeping your coffee gear in top shape, see our guide on cleaning a steam wand and the basics of how often to clean your coffee maker.
Products related to this article
Sponsored / affiliate links. As an Amazon Associate I earn from qualifying purchases. I may earn additional commission from eligible campaigns.
 Belly Moka Coffee Maker Stovetop Espresso Maker 9 Cup Aluminum Moka Pot Percolator 15oz 450ml Easy Brewing for Electric Ceramic Stoves Home Camping Italian Cuban Café Classic Black
 Belly Moka Coffee Maker Stovetop Espresso Maker 6 Cup Aluminum Moka Pot Percolator 10oz 300ml Easy Brewing for Electric Ceramic Stoves Home Camping Italian Cuban Café Classic Silver
 Supvision 3 Cup Moka Pot Aluminum 150ml Italian Coffee Maker