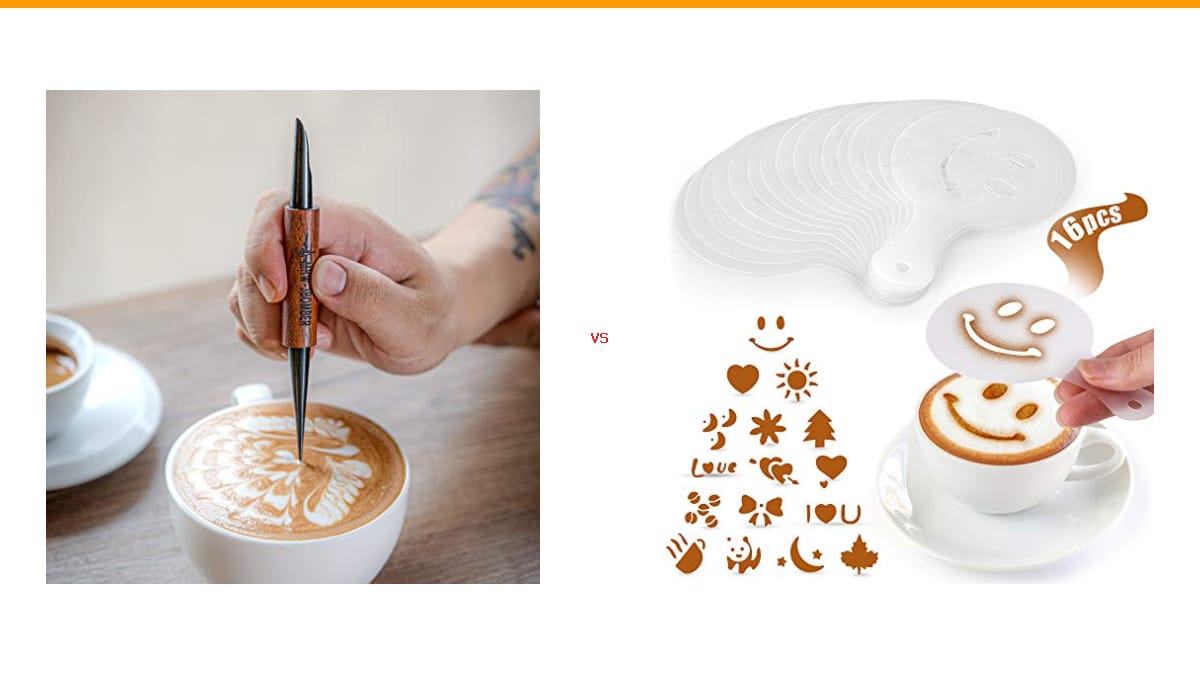
Ask any home barista where they spent their first $30 on coffee art tools, and you’ll get one of two answers: a pen or a set of stencils. Both promise café-looking drinks, but they work in completely different ways. One requires a steady hand and some practice. The other is basically a coloring book for your cappuccino.
| Our Pick | Runner Up |

|

|
| MHW-3BOMBER MHW-3BOMBER Latte Art Pen for Barista, Rosewood… | Zulay Kitchen Zulay Kitchen 16 Pcs Coffee Stencils for… |
| See on Amazon | See on Amazon |
As an Amazon Associate I earn from qualifying purchases.
I’ve spent the last few weeks using the MHW-3BOMBER Latte Art Pen and the Zulay Kitchen 16-piece stencil set side by side. I made dozens of lattes, cappuccinos, and hot chocolates. I messed up plenty. Here’s what I learned about which tool deserves a spot on your counter.
Spoiler: they’re not direct competitors. One is a skill-building tool. The other is a shortcut to a pretty drink. But depending on your goals, one is clearly the better first purchase.
The Core Difference: Precision vs. Pattern
A latte art pen is an etching tool. You draw directly into the milk froth or espresso crema. It has a pointed stainless steel tip and a wide spoon on the other end. The spoon scoops up dense foam, and the tip drags it around to create lines, swirls, and shapes.
A stencil is a flat plastic template. You hold it over the cup, sprinkle cocoa powder or cinnamon through the cutouts, and lift it away. The design appears instantly. No drawing required.
One is a drawing tool. The other is a printing press. That’s the whole argument in one sentence.
MHW-3BOMBER Latte Art Pen: The Skill-Building Option
The first thing you notice about the MHW-3BOMBER pen is the rosewood handle. It’s warm to the touch and heavier than you’d expect. The stainless steel tip is sharp enough to make clean lines but not so sharp that it tears the foam. The wide spoon on the other end is genuinely useful for scooping thick foam and placing it where you need it.
I spent about an hour getting comfortable with it. My first attempts at drawing a heart looked like a lumpy potato. By day three, I could do a decent rosetta. By the end of the week, I was adding small details to free-poured designs that would have looked plain otherwise.
The learning curve is real. You need to understand milk texture first. If your milk is too thin, the pen just drags through liquid. If it’s too thick, the lines come out chunky. The pen won’t fix bad milk. It will make you better at working with good milk.
What impressed me most was the control. The pointed tip lets you pull fine lines through crema that a steam wand pitcher spout can’t achieve. You can write words, draw faces, add tiny flourishes. The design complexity is limited only by your patience.
Cleaning is straightforward but fussy. The instructions say to rinse only the stainless steel tip and keep the wooden handle dry. I wiped the handle with a damp cloth once and noticed the wood darkening slightly. It’s a tool that demands a little respect.
Pros of the MHW-3BOMBER Latte Art Pen
- Fine control for detailed designs
- Wide spoon is handy for shaping foam
- Rosewood handle looks great on a counter
- Works on espresso crema without adding powder
- Builds real barista skills over time
Cons of the MHW-3BOMBER Latte Art Pen
- Steep learning curve for beginners
- Requires properly textured milk
- Wood handle needs careful maintenance
- One tool, one design at a time
Zulay Kitchen 16-Piece Stencil Set: The Instant Gratification Option
The Zulay set is a completely different experience. You open the box and find 16 plastic templates. Maple leaf, coffee bean, crescent moon, panda, Christmas tree, a heart, and more. Each one is about 5 by 3.5 inches, sized for wide-mouthed mugs.
Using one takes about ten seconds. Hold the stencil over the cup, sprinkle cocoa powder through the cutouts, lift it off. Done. You get a clean, recognizable image every single time. My first attempt looked better than my hundredth attempt with the pen.
The catch is the powder. These stencils work with dry toppings, not milk foam. You’re decorating the surface of the drink, not the foam itself. That means you need cocoa powder, cinnamon, or nutmeg on hand. The designs sit on top of the drink and mix in as you sip.
I found the stencils work best on drinks with a stable surface. A cappuccino with thick foam holds the powder nicely. A latte with thin microfoam will absorb the powder and blur the design within a minute. Hot chocolate is the sweet spot — the marshmallow or whipped cream surface holds powder perfectly.
The plastic is durable and flexible. I washed them under running water after each use and they showed no wear. The cutouts are clean enough that powder doesn’t clump or stick. They stack flat, so storage is a non-issue.
My honest complaint: the designs are limited. You get 16 patterns and that’s it. Once you’ve made the panda and the moon and the Christmas tree a few times, the novelty fades. There’s no room for personal expression.
Pros of the Zulay Kitchen Stencil Set
- Instant results with zero practice
- 16 designs included in one box
- Works on hot chocolate and baked goods too
- Easy to clean under running water
- BPA-free plastic is sturdy
Cons of the Zulay Kitchen Stencil Set
- Limited to dry powder toppings
- Designs blur quickly on thin foam
- No room for customization
- Requires buying cocoa or cinnamon separately
Head-to-Head: Pen vs. Stencil
| Feature | MHW-3BOMBER Pen | Zulay Stencil Set |
|---|---|---|
| Skill required | Moderate to high | None |
| Design complexity | Unlimited | 16 fixed patterns |
| Speed per drink | 1-3 minutes | 10 seconds |
| Tools needed | Just the pen | Stencil + powder shaker |
| Works on espresso crema | Yes | No, needs dry powder |
| Learning curve | Steep | Flat |
| Durability | Years with care | Years, plastic is tough |
| Gift appeal | High for serious baristas | High for casual coffee lovers |
Speed is the biggest gap. The stencil finishes a design before the pen finishes its first line. But the pen’s output is personal. No two drinks look the same. The stencil’s output is identical every time.
Cost-per-use favors the stencil if you only make coffee art occasionally. The pen favors the dedicated hobbyist who will use it daily. The pen has no consumables. The stencil needs a steady supply of cocoa powder.
The Hybrid Approach: Combining Pens and Stencils
Here’s the trick most people miss. These tools work brilliantly together.
Use a stencil to lay down a base design with cocoa powder. Then use the pen to add details. Draw a stem on the maple leaf. Add eyes to the panda. Write a message under the heart. The stencil gives you a clean foundation, and the pen adds the personal touch.
I tested this with the crescent moon stencil. I sprinkled cocoa, then used the pen to draw tiny stars around it. The result looked like something from a specialty café. My wife thought I’d ordered it from a shop.
The hybrid approach also solves the stencil’s biggest weakness. When powder designs start to blur, the pen can reinforce the edges with foam or chocolate syrup. You get the speed of a stencil with the polish of a hand-drawn design.
How to Choose Based on Your Setup
Your choice depends on your equipment and your goals.
If you have a basic espresso machine without a steam wand, or you only make instant coffee and hot chocolate, get the stencils. They work on any drink with a surface. You don’t need to texture milk. You don’t need a pitcher. You just need powder and a steady hand.
If you have a machine with a steam wand and you’re already working on milk texture, get the pen. It will push your skills further. The pen rewards practice in a way stencils never will.
If you’re buying a gift, think about the recipient. A casual coffee drinker will love the stencil set. It’s fun, immediate, and forgiving. A self-proclaimed home barista will appreciate the pen more. It shows you take their hobby seriously.
Space is another factor. The stencil set takes up almost no room — 16 thin plastic sheets stack into a slim pile. The pen is a single tool. Both fit in a drawer, but the pen is easier to grab one-handed mid-morning.
Troubleshooting Common Issues
Why do my stencils sink into the foam?
This happens when your foam is too thin or too wet. The stencil’s weight presses down and breaks the surface. Fix it by using thicker foam or holding the stencil slightly above the cup instead of resting it on the surface. A powder shaker with a fine mesh also helps distribute powder evenly without pressing down.
Why does my pen drag through the milk instead of drawing?
Your milk is too thin. The pen needs a dense foam to push against. Steam your milk longer to create more microfoam, or scoop thicker foam from the top of the pitcher with the pen’s spoon and place it on the surface before drawing.
How do I clean a clogged pen tip?
Rinse the stainless steel tip under warm water immediately after use. If milk residue dries and clogs it, soak the tip in warm soapy water for a few minutes, then rinse. Never submerge the wooden handle.
Can I use stencils with chocolate syrup instead of powder?
No. Syrup will soak through the cutouts and blur. Stick to dry powders like cocoa, cinnamon, or nutmeg. If you want syrup designs, use the pen or a squeeze bottle.
Maintenance and Cleaning: Keeping Your Tools Sharp
The pen needs more care than the stencils. The wooden handle is the weak point. Keep it dry. Rinse only the stainless steel tip after each use. Use mild dish soap and water, then wipe it dry immediately. If the handle gets damp, wipe it with a soft cloth and let it air-dry completely before storing.
The stencils are nearly maintenance-free. Rinse them under running water after use. They’re BPA-free plastic, so they won’t rust or corrode. Let them air-dry and stack them flat. I’ve had mine for weeks and they look brand new.
In a commercial setting, both need more attention. The pen’s wooden handle makes it unsuitable for commercial dishwashers. You’d need to hand-wash it every time. The plastic stencils are more forgiving but can warp if exposed to high heat. If you run a café, consider the pen for detail work and stencils for high-volume simplicity.
Verdict: Which Tool Should You Buy First?
For most home users, the Zulay Kitchen stencil set is the better first purchase. It delivers instant results with zero practice. You’ll make drinks that look impressive on Instagram from day one. The 16 designs give you variety, and the plastic construction will last for years. It’s the low-risk, high-reward option.
But the MHW-3BOMBER pen is the better long-term investment if you’re serious about coffee art. It’s a skill tool. The first week will be frustrating. The second week gets better. By the third week, you’ll create designs that no stencil can match. And you’ll never need to buy cocoa powder just for decoration.
My honest recommendation: buy the stencils first to build confidence and enjoy pretty drinks immediately. Then add the pen when you’re ready to level up. They cost about the same, and together they cover every coffee art situation you’ll encounter at home.
If you’re only buying one, ask yourself a single question. Do you want to learn a skill or just make a pretty drink? The pen teaches. The stencil delivers. Neither answer is wrong.
For more on fixing your espresso setup, check our grind and brew guide or the clogged valve fix.
Frequently Asked Questions
Do I need both a pen and stencils?
Not necessarily. If you’re a beginner, start with stencils. They’re easier and give instant results. Add the pen later when you want more control and personal expression. Many home baristas end up owning both.
Can I use a latte art pen on hot chocolate?
Yes, but it works differently. Hot chocolate has a thinner surface than milk foam. The pen can draw through whipped cream or marshmallow, but it works best on a dense foam layer. For hot chocolate, stencils with cocoa powder are actually easier and more reliable.
How long does it take to learn latte art with a pen?
Most people can do a basic heart within a week of daily practice. Rosettas and more complex designs take 2-4 weeks. The pen doesn’t speed up the learning curve, but it does make the details easier once you understand milk texture.
Are plastic stencils reusable?
Yes. The Zulay stencils are designed for repeated use. Rinse them under water after each use and they’ll last for years. They’re BPA-free and durable enough for daily use.
Products related to this article
Sponsored / affiliate links. As an Amazon Associate I earn from qualifying purchases. I may earn additional commission from eligible campaigns.