You’ve dialed in your grinder, bought fresh beans, and your water temperature is spot on. Yet your morning cup still tastes inconsistent — sometimes bitter, sometimes sour, rarely the same twice. The missing piece is often the simplest one: you’re not measuring your coffee and water precisely, and you’re not tracking time.
A coffee scale with a timer solves both problems at once. It lets you weigh your dose, watch your yield, and time your extraction from the same device. This guide walks through exactly how to use one, whether you’re pulling espresso shots or brewing pour-over. You’ll learn the specific workflows, the numbers to hit, and the mistakes to avoid.

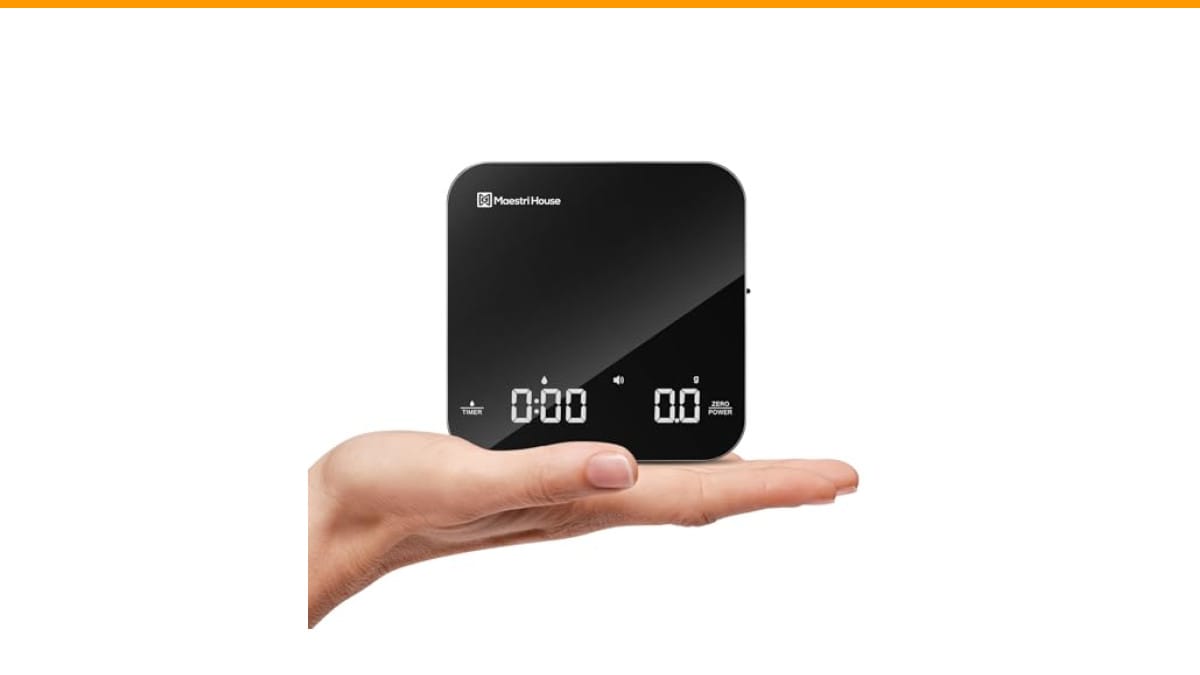
Maestri House
Maestri House S2 Espresso Coffee Scale with…
- 【Ultra Small, Yet Professional】The Espresso Scale is small enough to fit in your palm. It measures 4.13*4.13*0.78 inches and weigh…
- 【0.1g High Precision】This digital kitchen coffee scale is equipped with high-precision sensors and a reliable microprocessor, guar…
- 【Three Units & Dual Timekeeping Modes】The Espresso Digital Timer Scale has three units of measurement (g/oz/ml) that can be conver…
As an Amazon Associate I earn from qualifying purchases.
If you’re shopping for one, the Maestri House S2 Espresso Coffee Scale with Timer is a solid option. It’s compact, reads to 0.1g, and includes both automatic and manual timing modes — the two features you’ll actually use every day. It also runs on a rechargeable battery, so you won’t be hunting for AAA cells at 6 a.m.
Why a Timer Matters as Much as the Weight
Weight alone tells you half the story. A 1:2 ratio — 18g of coffee in, 36g of espresso out — means nothing if you don’t know how long that shot took. A 36g yield in 25 seconds tastes completely different from the same yield in 40 seconds. The timer gives you the second half of the equation.
For pour-over, time controls extraction directly. A 3-minute brew vs. a 4-minute brew from the same grounds will produce noticeably different acidity and body. Without a timer, you’re guessing. With one, you can repeat your best cups or diagnose what went wrong.
How to Use a Coffee Scale with Timer for Espresso
Here’s the workflow I use when pulling shots. It assumes your scale has both manual and automatic timing modes, like the Maestri House S2.
- Place the scale on the drip tray. Make sure it’s level and centered under the portafilter. If your machine has a raised tray, check that the scale fits underneath with room for your cup.
- Tare the cup. Put your espresso cup on the scale and press tare to zero it out. This gives you a clean reading for both dose and yield.
- Dose your coffee. Grind directly into the portafilter, then weigh it. Most recipes use 18–20g for a double shot. Adjust your grinder until the dose lands within 0.2g of your target.
- Start the timer when you start the pump. In manual mode, press the timer button the moment you flip the switch. In automatic mode, the scale starts timing when it detects the weight change from the first drops hitting the cup.
- Watch the yield and time together. Your target is usually a 1:2 ratio — for 18g in, aim for 36g out. Stop the shot when the scale hits 36g, and note the time. A well-extracted shot typically finishes between 25 and 35 seconds, including pre-infusion.
- Log your results. Write down the dose, yield, and time. Change one variable at a time — usually grind size — and compare.
The automatic mode is handy when you’re pulling multiple shots or dialing in. It removes the split-second timing error that happens when your hand is on the switch. Just be aware that it starts timing from the first drop, not from the moment you start the pump. That’s fine for consistency, as long as you’re always comparing like with like.
How to Use a Coffee Scale with Timer for Pour-Over
Pour-over is less forgiving about timing than espresso, but a scale makes it repeatable. Here’s the method I recommend:
- Set the scale to grams. Most scales let you switch units. Grams are easier for coffee ratios than ounces.
- Tare your brewer and filter. Place the dripper on the scale, add the filter, and zero it out.
- Add your ground coffee. A standard ratio is 1:15 or 1:16 — 20g of coffee to 300–320g of water. Weigh the grounds directly into the filter.
- Start the timer before the first pour. You want to time the entire brew, including the bloom. In manual mode, press start right before you pour. In automatic mode, the scale will start when water first hits the bed.
- Bloom for 30–45 seconds. Pour about twice the coffee weight in water — 40g for 20g of coffee — and let it sit. The timer tells you when to start the main pour.
- Pour in stages, watching the total weight. Common recipes use 3–5 pours. Each pour should bring the total water weight closer to your target. For 300g of water, you might do 60g bloom, then 80g, 80g, 80g.
- Stop when you hit the target weight. Total brew time should land between 3 and 4 minutes for a medium roast. If it’s faster, grind finer. If it’s slower, grind coarser.
The automatic timing mode works well here because it starts when you pour, not before. That gives you a true brew time without fumbling for a separate stopwatch.
Manual vs. Automatic Timing: Which Should You Use?
Both modes have their place. Manual timing gives you full control — you decide when the clock starts and stops. Automatic timing is more convenient but depends on how the scale detects weight changes.
| Mode | Best For | Pros | Cons |
|---|---|---|---|
| Manual | Espresso, dialing in, repeatable recipes | Full control, starts when you decide, works for any brew method | Requires a free hand, slight timing delay possible |
| Automatic | Pour-over, single-shot brewing, quick brews | Hands-free, starts with first drop, consistent start point | May not detect very light first drops, can’t start before water touches coffee |
For espresso, I prefer manual timing. The shot starts when the pump starts, not when liquid hits the cup. For pour-over, automatic is usually fine, but test it with your dripper to see if it catches the first few drops.
Common Mistakes and How to Fix Them
Even with a good scale, people make the same errors. Here are the ones I see most often:
- Not taring between steps. If you weigh your cup, then add coffee, then add water, you need to tare at each stage. Forgetting to zero out the cup adds its weight to every reading.
- Using a scale that reads only to 1g. For espresso, 1g is the difference between a balanced shot and a sour one. You need 0.1g resolution.
- Ignoring the timer. Weighing your dose but not timing your brew is like driving with a speedometer but no clock — you know how fast, but not how long.
- Moving the scale mid-brew. Any movement can shift the reading. Set it down, leave it alone, and don’t bump the table.
- Not checking the battery. A low battery can cause drift in readings. The Maestri House S2 lasts up to 90 days per charge, but it’s worth checking the level before a long session.
One more thing: keep the scale clean. Coffee grounds get under the buttons and mess with the sensors. A quick wipe after each use prevents headaches later. If you’re dealing with buildup, a regular coffee maker cleaning routine extends the life of all your gear.
Frequently Asked Questions
Do I really need a 0.1g scale, or is 1g enough?
For espresso, 0.1g matters. An 18g dose vs. an 18.5g dose changes the flow rate and extraction noticeably. For pour-over, 1g is acceptable, but 0.1g gives you finer control when you’re dialing in a new bean.
Can I use the same scale for espresso and pour-over?
Yes, as long as it has a timer and reads to 0.1g. The Maestri House S2 handles both. Its 2kg capacity covers even large pour-over batches. Just switch between your two workflows.
What’s the correct coffee-to-water ratio?
For espresso, start at 1:2 (18g in, 36g out). For pour-over, start at 1:15 or 1:16 (20g coffee, 300–320g water). Adjust based on taste — more water for lighter roasts, less for darker ones.
How do I know if my shot is too fast or too slow?
If your espresso finishes in under 25 seconds, it’s running too fast — grind finer. If it takes longer than 35 seconds, it’s too slow — grind coarser. For pour-over, a 4-minute brew that tastes bitter means your grind is too fine.
Does automatic timing work with all coffee makers?
No. Automatic timing relies on weight changes. It works well with pour-over and espresso machines where liquid accumulates on the scale. It won’t work with a French press if you’re adding water before the scale detects it, or with machines that hold water away from the cup.
What to Remember When You Start Using a Scale
You don’t need to obsess over every gram to make good coffee. But you do need consistency. A scale with a timer gives you that. Here’s the short version:
- Always tare between each ingredient — cup, coffee, water.
- Use 0.1g precision for espresso; 1g is too coarse.
- Track dose, yield, and time together — never just one.
- Start with a 1:2 ratio for espresso and 1:15 for pour-over.
- Use manual timing for espresso, automatic for pour-over.
- Change one variable at a time when dialing in.
- Keep the scale clean and charged.
Once you get into the habit, you’ll notice your coffee tastes more like the cafe version. That’s not magic — it’s just measurement. And if your machine starts acting up from mineral buildup, check out our guide on descaling your coffee machine to keep everything running smoothly.
Products related to this article
Sponsored / affiliate links. As an Amazon Associate I earn from qualifying purchases. I may earn additional commission from eligible campaigns.
 HomeBeyond Espresso Coffee Maker 12 Cups, Classic Stovetop Espresso Maker, 600ml / 20oz Coffeemaker for Gas & Ceramic Stovetops (Silver)
 Coffee Mug Warmer & You are Awesome Mug Set, Electric Cup Warmer for Desk
 Quick Heating Cup Warmer, Three Temperature Settings, Splashproof and Portable, for Coffee, Milk, Lightweight ABS Material