You wake up, stumble to the kitchen, load the filter, pour in the water, and press start. Ten minutes later you have half a pot of brown water, or worse, nothing at all. This is the reality of owning a 12 cup drip coffee maker. They are simple machines, but simple does not mean they are immune to failure. Most of the time the issue is not a dead machine; it is a small, fixable part that has worn out or a blockage that is easy to clear.
This guide walks you through the most common failure points on a standard 12 cup brewer. You will learn how to diagnose a slow brew, a machine that stops mid-cycle, and a basket that overflows. I will also cover the specific part that fails most often: the spring-loaded stopper in the brew basket. By the time you finish, you will know whether to fix it yourself or start shopping for a new unit.

SURPOUF
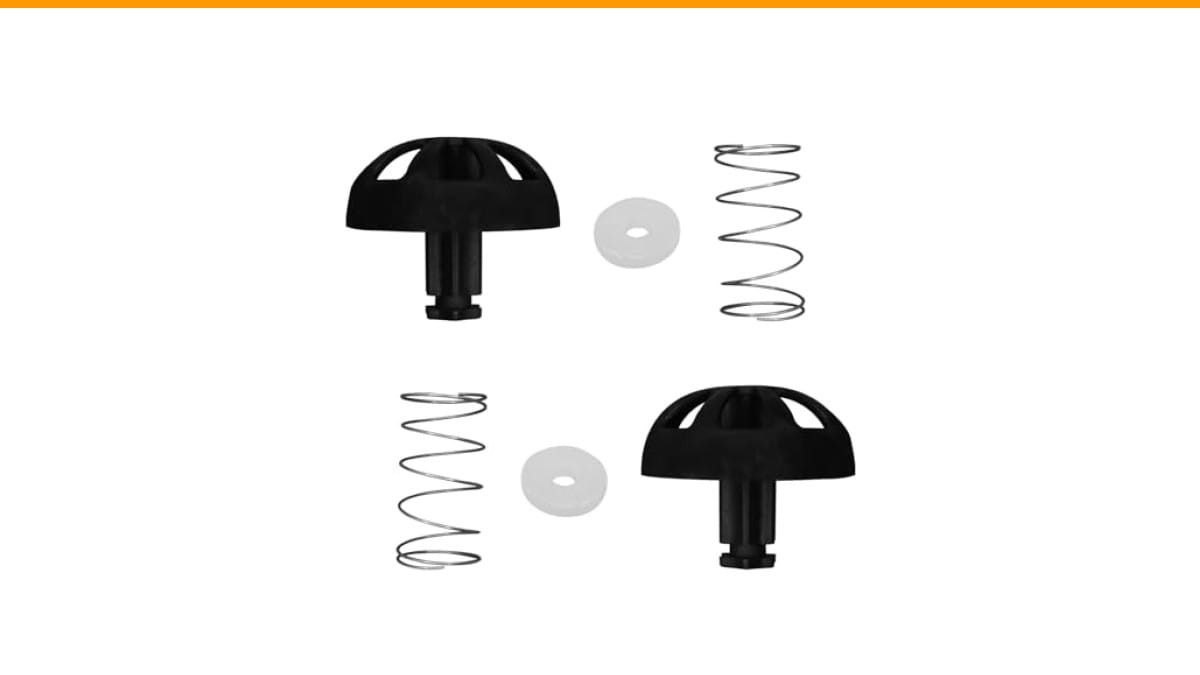
2-Pack Coffee Replacement Brew Basket Spring Loaded…
- The coffee machine spring stop kit is located at the bottom of the coffee replacement brewing basket and is suitable for 112435-00…
- We have learned from feedback from multiple users that they have received multiple complete coffee blues, but the springs at the b…
- This component has high compatibility and is suitable for models such as 49947, 49954, 49957, 49966, 49976 for Mr. Coffee; Black a…
As an Amazon Associate I earn from qualifying purchases.
If you have a Mr. Coffee, Black+Decker, or Hamilton Beach model, the odds are high that your problem is the spring stopper. That little plastic and metal valve at the bottom of the basket controls the flow of coffee. When it gets weak or breaks, the water just sits there. This replacement spring stopper kit is a direct fit for many of those models and costs a fraction of a new machine. It is worth trying before you give up on the brewer.
Why Your 12 Cup Maker Brews Slow or Not at All
The most common complaint is a machine that takes 20 minutes to brew a full pot. Normal brew time for a 12 cup cycle is 8 to 10 minutes. If yours is running long, you have a flow restriction somewhere. There are three main suspects: the spray head, the filter basket, or the water tube inside the machine.
Start with the spray head. That is the flat disc where the hot water comes out over the coffee grounds. Over time, mineral scale builds up in the tiny holes. Less water gets through, so the brew slows down. Remove the spray head if you can, or just hold a toothpick up to each hole and clear them out. You will be surprised how much crusty white buildup you dislodge.
Next, look at the filter basket itself. If you use paper filters, check that the basket is not warped. A warped basket sits crooked, and the water pools on one side, which slows extraction. If you use a permanent gold-tone filter, those mesh screens clog with coffee oils. A quick soak in hot soapy water usually fixes that.
If the spray head and basket are clear, the problem is deeper. The internal water tube that runs from the heating element to the spray head can also scale up. That requires a descaling cycle. Use a solution of one part white vinegar to two parts water and run a full brew cycle without coffee. Then run two more cycles with plain water to rinse it out. This is the same process we outline in our vinegar cleaning guide.
One thing I see often is people using distilled water. That actually causes more scaling, not less. Distilled water is aggressive and leaches minerals from the metal parts, which then deposit as scale. Use filtered tap water instead.
The Spring Stopper: The Part That Breaks Most
If your machine fills the basket with water and it just sits there, dripping slowly or not at all, you have a failed spring stopper. This is the valve at the bottom of the brew basket. When the basket is in place, the stopper stays closed. When you pull the basket out, the spring pushes the stopper down, allowing the coffee to drain into the carafe.
On older machines, this spring was metal and could rust. On newer machines, it is often a thinner plastic spring that loses its tension after a year or two of daily use. The symptom is always the same: the water level in the filter basket rises to the top, the coffee is weak because it is over-extracted, and the brew cycle takes forever.
Testing the spring is easy. Pull the empty basket out of the machine and look at the bottom. Press up on the stopper with your finger. It should move freely and spring back. If it is stuck, or if it stays in the down position, it is broken. Sometimes the spring is fine but the stopper itself is cracked. That allows air to enter the tube, which stops the siphoning action.
Replacing it is a five-minute job. Flip the basket over, pop out the old stopper assembly, and snap in the new one. The SURPOUF replacement kit comes with two complete sets, so you have a spare. It fits most Mr. Coffee, Black+Decker, and Hamilton Beach baskets, including models 49947, 49954, and 49966. The quality is noticeably better than the factory part; the spring has real tension, not the floppy feel you get on cheap replacement parts.
One caveat: not all baskets are the same. Check the shape of your stopper before ordering. If your basket has a wider oval opening, you need a different style. The SURPOUF kit fits the round, standard opening found on most 12 cup machines.
Machine Stops Mid-Cycle or Won’t Turn On
A machine that stops halfway through the brew cycle is usually overheating. The safety thermostat on the heating element trips when the temperature gets too high, which happens when there is no water flowing past it. This is a symptom, not the root cause. The root cause is usually a blocked tube or a failed check valve.
The check valve is a small rubber or plastic piece at the bottom of the water reservoir. It prevents hot water from flowing back into the tank. If it gets stuck open, the water just recirculates inside the machine and never reaches the shower head. The machine heats up, the thermostat trips, and the power cuts out.
To test this, unplug the machine and remove the water tank. Look at the bottom of the tank for a small rubber flap or ball. Poke it gently with a chopstick. It should move. If it is stuck, soak the tank in hot vinegar water for 30 minutes. That usually loosens the scale holding it in place.
If the machine does not turn on at all, check the obvious things first. Is the outlet live? Is the cord damaged? Is the power button stuck? On many models, the power button is a membrane switch that wears out. If the button feels mushy, it might not be making contact.
I have also seen the heating element fail completely. That is a death sentence for a $40 coffee maker. If you have confirmed power at the outlet, the cord is fine, and the button clicks, but the machine is dead, do not bother replacing the element. The cost of the part plus your time is not worth it. Buy a new machine.
Overflowing Basket and Messy Countertops
An overflowing basket is almost always a clogged stopper or a misaligned carafe. The stopper opens only when the carafe is pushing up on the release lever. If the carafe is not sitting flush, the stopper stays closed, and the water backs up over the sides of the basket.
Check the carafe lid. Many carafes have a little plastic tab on the lid that presses the release lever. If that tab is broken, the stopper never opens. You can test this by running the machine without the carafe lid and watching the basket. If it drains properly without the lid, the lid is the problem.
Another cause is using a carafe from a different brand. They look similar, but the height is slightly different. The release lever does not get pushed far enough, so the stopper only opens halfway. That restricts flow and causes the basket to fill up.
If you have a thermal carafe instead of a glass one, the same rules apply. Thermal carafes are taller, so they usually work fine, but the lid mechanism is more complex. If the stopper release tab on a thermal carafe is worn, you will get the same overflow.
In my experience, the overflow issue is the second most common failure after the spring itself. It is also the messiest. A full pot of hot coffee on the counter is a bad way to start a day.
Comparing Your Options: Repair vs. Replace
Before you tear the machine apart, run through this quick comparison to decide if it is worth fixing. The math changes depending on the age of your machine and the cost of the part.
| Symptom | Likely Cause | Repair Cost | Time to Fix | Worth It? |
|---|---|---|---|---|
| Slow brew (20+ min) | Scale in tube or spray head | $2 (vinegar) | 45 min | Yes, if machine is under 3 years old |
| Water stays in basket | Broken spring stopper | $8-12 (replacement kit) | 10 min | Yes, always |
| Machine stops mid-cycle | Clogged check valve or thermostat trip | $0 (cleaning) | 30 min | Yes, try cleaning first |
| Won’t turn on | Failed heating element or switch | $20-30 (part) + labor | 2 hours | No, buy a new machine |
| Overflowing basket | Misaligned carafe or broken lid tab | $15 (new carafe) | 5 min | Depends on carafe cost |
The pattern here is simple. If the fix takes less than 30 minutes and costs under $15, do it. If you need to disassemble the base unit or replace the heating element, stop. A new 12 cup maker costs $30 to $50. Your time is worth more than the $20 you save by fixing an old one.
One more thing to consider: the age of the machine. If it is more than five years old and has never been descaled, the internal plastic parts are likely brittle. Even if you fix the current issue, another part will fail soon. I have repaired machines that worked for another month and then died. It is the nature of cheap appliances.
For the spring stopper issue specifically, the repair is almost always worth it. The part is cheap, the installation is trivial, and it directly solves the most annoying failure mode. I keep a spare kit in my pantry because I know this will fail again eventually.
Five Questions People Actually Ask About This
Why does my coffee maker brew faster with a paper filter than a permanent one?
Paper filters have uniform pore size and do not clog with oils. Permanent filters accumulate a film of coffee oil that slows drainage. If you use a permanent filter, wash it after every brew, not just rinse it. A weekly soak in hot water with a drop of dish soap keeps the mesh open.
Can I use vinegar instead of descaling solution?
Yes, white vinegar works fine. Use a 1:2 ratio of vinegar to water. The downside is the smell. It lingers for a few days even after rinsing. Commercial descaler is odorless and works faster, but it costs more. For a stubborn scale buildup, vinegar is actually stronger because it is more acidic.
Why does my coffee taste burnt even after I clean the machine?
Burnt taste usually comes from the warming plate, not the brew. The plate keeps the carafe at 180°F, which cooks the coffee. If you leave the pot on the plate for more than 20 minutes, it will taste scorched. Pour the coffee into a thermal carafe or a thermos immediately after brewing. If the taste is still bad, your water temperature is too high. Most drip makers run at 190-200°F, which is fine, but if the thermostat is failing, it can spike to 210°F.
Is it safe to run a 12 cup maker with just water to test it?
Yes. Running a cycle with only water is the best way to test the flow system without wasting coffee. It also flushes out loose scale. Just remember to let the machine cool down for 10 minutes before running a second cycle. Running it back-to-back can trip the thermal breaker.
How often should I replace the spring stopper?
There is no set schedule. It depends on how hard your water is and how often you use the machine. If you brew daily, inspect the spring every six months. Press the stopper up and see if it returns to the closed position with a snap. If it moves slowly or stays down, replace it. You can also check for cracks on the plastic stopper itself. A hairline crack will cause a slow leak that you notice as a puddle under the basket.
What to Do Next: A Checklist for the Morning
- Run a vinegar descale cycle before you do anything else. It fixes 40% of slow brew issues instantly.
- Test the spring stopper with your finger. If it is weak, replace it with a SURPOUF spring kit.
- Check the carafe lid tab for wear. A broken tab is a $15 problem, not a $50 problem.
- Time your brew cycle. If it exceeds 12 minutes for a full pot, you have a flow restriction.
- Clean the spray head holes with a toothpick every month to prevent scale buildup.
- Use filtered tap water, not distilled. Distilled water accelerates scale formation.
- If the machine is over 5 years old and the heating element fails, replace the whole unit. Do not sink money into a dying appliance.
Most 12 cup coffee maker problems are not mysteries. They are the result of mineral scale, a worn spring, or a misaligned carafe. You can diagnose all three in under ten minutes with no tools. The fix is usually cheap and fast. If you run through this checklist and the machine still fails, that is your sign to upgrade. A reliable brewer is worth the money, but you do not need to spend a fortune to get one. Just keep the basket clean and the spring tight.
Products related to this article
Sponsored / affiliate links. As an Amazon Associate I earn from qualifying purchases. I may earn additional commission from eligible campaigns.
 Quick Heating Cup Warmer, Three Temperature Settings, Splashproof and Portable, for Coffee, Milk, Lightweight ABS Material
 Belly Moka Coffee Maker Stovetop Espresso Maker 9 Cup Aluminum Moka Pot Percolator 15oz 450ml Easy Brewing for Electric Ceramic Stoves Home Camping Italian Cuban Café Classic Black
 Belly Moka Coffee Maker Stovetop Espresso Maker 6 Cup Aluminum Moka Pot Percolator 10oz 300ml Easy Brewing for Electric Ceramic Stoves Home Camping Italian Cuban Café Classic Silver