You bought a reusable K cup to save money, and now you are wiping wet coffee sludge off your counter for the third time this week. The filter basket is overflowing, the lid won’t snap shut, and your cup has a gritty layer of fines at the bottom. The problem is not the product you bought. The problem is the method.
Most people treat a reusable pod like a disposable one. They scoop in coffee, slam the lid, and hit brew. That works about half the time. The other half ends with a mess and a weak cup. This guide walks through the exact grind size, fill level, and tamping technique to get a clean brew every time.

PERFECT POD
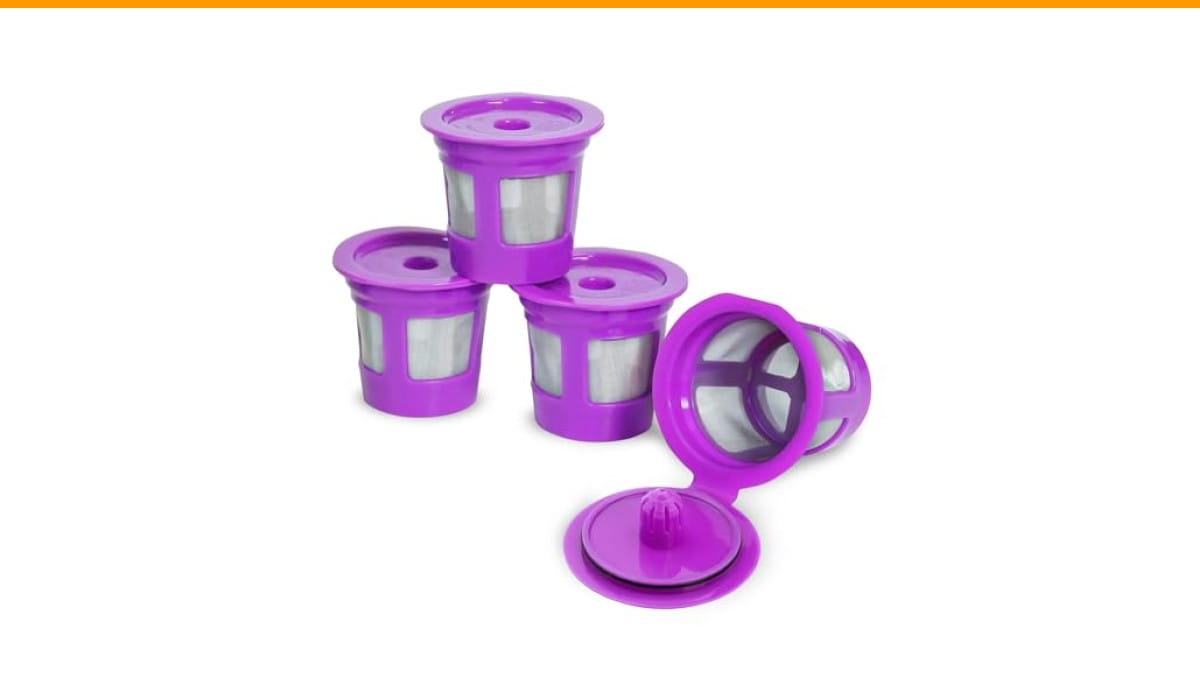
Perfect Pod Café Save Reusable Coffee Pod…
- Save Money – Our Café Save reusable pod coffee filters offer excellent value for budget-conscious coffee drinkers. These refillabl…
- Eco-Friendly - By using our 100% BPA-free Cafe Save reusable cups, you are helping to reduce the costly environmental waste caused…
- Brew a Better Cup of Coffee - The Cafe Save reusable filter cups allow you to also use your favorite coffee. Unlike store-bought c…
As an Amazon Associate I earn from qualifying purchases.
You will learn what actually causes the overflow, why the lid pops open, and how to fix it. You will also see a comparison of different reusable pod styles so you can pick the right one for your machine.
The Perfect Pod Café Save Reusable K-Cup Coffee Filter Capsules solve part of this problem. They use a fine mesh basket that drains faster than many cheaper metal filters, which reduces the chance of pressure building up and blowing the lid off. The snap-on lid design also helps keep grounds contained during the brew cycle.
Why Your Reusable K Cup Makes a Mess
The mess comes from one of three mistakes. The most common is using a grind that is too fine. Espresso grind or even fine drip grind can clog the mesh. Water backs up, pressure builds, and the lid pops off. You get a counter full of wet grounds.
The second mistake is overfilling. A reusable K cup holds about two tablespoons of ground coffee. That is the same amount as a standard K-Cup pod. People think they need to heap it to get a stronger cup. Overfilling prevents the lid from sealing. Water takes the path of least resistance and pushes grounds out the sides.
The third mistake is tamping. You should not press the coffee down. Tamping compacts the grounds, which slows water flow even more. The machine forces water through at a set pressure. If the coffee is too dense, something has to give. That something is the lid.
The fix is simple: use a medium grind, fill to the fill line, and do not tamp. If your pod does not have a fill line, leave a quarter-inch of space below the rim.
The Right Grind Size and Fill Level
Grind size matters more than any other variable. You want a medium grind, similar to table salt or pre-ground commercial drip coffee. It should not look like powder. It should not look like coarse sea salt either. If you buy pre-ground coffee from the grocery store, it is usually fine. If you grind your own, set the grinder to a medium setting, usually between 10 and 14 on a typical burr grinder.
Fill the basket to about 90 percent full. Do not heap it. Do not pack it. Just scoop, tap the side to settle the grounds, and level it off with a finger. The lid should close without resistance. If you have to push hard to get the lid to click, you have too much coffee.
One thing people forget: the paper filter. Some reusable pods work better with a small paper filter on top of the grounds. It catches the fines that would otherwise end up in your mug. The Perfect Pod Café Save does not need one, but if you are using a metal mesh pod that lets silt through, adding a #4 paper filter on top makes a noticeable difference.
Brew time also matters. If your machine has a strength setting, use the regular setting, not the strong or bold setting. The bold setting adds about 20 seconds to the brew time. That extra time lets more water soak into the grounds, which increases the chance of overflow. You can always make a stronger cup by using a darker roast, not by jamming more coffee in the basket.
Myth: You Need to Use the Exact Same Amount as a Disposable Pod
People assume a reusable pod should hold the same volume as a plastic K-Cup. That is wrong. A disposable K-Cup contains about 9 to 12 grams of coffee. A reusable basket holds a little more, usually 12 to 15 grams. The difference is small, but it matters.
If you fill a reusable pod to the top with fine grind, you are putting in 18 grams or more. That is double the intended dose. The machine is not designed to push water through that much coffee in 30 seconds. It will stall, overflow, or both.
Use less coffee than you think you need. Start with a level scoop, about 2 tablespoons. Brew a cup. If it tastes weak, add half a teaspoon next time. Work up slowly until you find the dose that works for your taste. It will be less than what you thought.
Myth: All Reusable Pods Work the Same Way
There are two main designs. The first is a plastic cup with a metal mesh bottom. The second is a metal basket with a snap-on lid. They behave differently.
Plastic cup designs, like the Café Save, have a solid wall and a mesh base. Water flows through the bottom only. The mesh is usually fine enough to hold back most grounds. These work best with medium grind. They drain slower than metal baskets, so you need to be careful about overfilling.
Metal basket designs have mesh on the sides and bottom. They drain faster, which means less pressure buildup. But the side mesh lets more fines through. You will see sediment in your cup. Some people like that. Others do not.
I have tested both side by side on a Keurig K-Classic. The plastic cup design gave a cleaner cup with no silt. The metal basket gave a slightly stronger cup but left a thin layer of grounds at the bottom of the mug. Neither is wrong. It depends on whether you prefer a clean cup or a fuller body.
If you have a Keurig 2.0 model, check compatibility before buying. Some older reusable pods do not fit the 2.0 brewers because of the different needle placement. The Café Save is tested for both 1.0 and 2.0 machines, but not for the newer 5-Stream brewers. If you have a Multi Stream model, you need a different pod.
| Feature | Plastic Cup + Mesh Bottom | Metal Basket + Mesh Sides |
|---|---|---|
| Grind Size | Medium only | Medium to medium-coarse |
| Sediment in Cup | Minimal | Noticeable fines |
| Overflow Risk | Higher if overfilled | Lower, drains faster |
| Durability | Plastic can crack over time | Metal lasts longer |
| Cleaning | Rinse, wipe mesh | Rinse, brush mesh |
| Best For | Clean cup, no silt | Stronger brew, less clogging |
Cleaning is part of the mess problem. If you do not rinse the pod right after brewing, the grounds dry and clog the mesh. Then the next brew overflows because water cannot pass through. Rinse the pod immediately after use. A quick tap on the trash can removes most of the grounds, then a 3-second rinse under the faucet clears the mesh. Once a week, soak the pod in warm water with a drop of dish soap to remove coffee oils.
If you notice your brew slowing down over time, the mesh is clogged. Soak it in a vinegar solution for 15 minutes, then rinse thoroughly. This is the same principle as cleaning a coffee maker with vinegar. The acid dissolves the oils that water cannot.
Step-by-Step: Mess-Free Brewing
Here is the exact routine that works every time.
- Grind coffee to a medium consistency. If it feels like flour, it is too fine.
- Scoop one level tablespoon of coffee into the basket. Tap the side to settle it.
- Add a second level tablespoon. Do not press down.
- Check the fill level. The coffee should sit just below the rim, not above it.
- Snap the lid closed. It should click with light pressure. If it resists, remove half a spoon of coffee.
- Place the pod in the machine and brew on the regular setting.
- After brewing, remove the pod immediately. Tap it over the trash to dump the grounds.
- Rinse the basket and lid under running water for a few seconds. Set it on the drying rack.
That is the whole process. It takes 10 seconds longer than using a disposable pod, but it saves you money and keeps grounds out of your mug.
One more tip: keep your coffee dry. Wet coffee clumps and sticks to the mesh. Store your beans in an airtight container, not in the hopper of your grinder. If your coffee is oily, it will stick to the mesh more. That is normal. Just rinse it immediately.
If you are dealing with a machine that is not brewing a full cup, the problem might not be the pod. Check the needle for clogs. A blocked needle prevents water flow and causes pressure issues. That is a separate issue from the reusable pod, but it produces the same symptoms. See our guide on Keurig not brewing full cup for troubleshooting steps.
Frequently Asked Questions
Why does my reusable K cup leak coffee grounds into the mug?
Fines, the smallest coffee particles, pass through the mesh. This happens more with metal mesh baskets than plastic cup designs. Use a medium grind, not a fine one. If the problem persists, place a small paper filter on top of the grounds before closing the lid. This catches most of the fines. You can also try a pod with a finer mesh, like the Café Save, which uses a tighter weave.
Can I use espresso grind in a reusable K cup?
Technically yes, but it will make a mess. Espresso grind is too fine for the mesh. It clogs quickly, slows water flow, and causes the lid to pop off. Use a medium grind. If you want a stronger cup, use a dark roast or add a few extra seconds to the brew time. Do not use espresso grind.
How much coffee should I put in a reusable K cup?
Start with two level tablespoons, about 12 grams. That is the sweet spot for most machines. If the cup tastes weak, add half a teaspoon. If the lid does not close easily, remove half a teaspoon. The fill line on the pod is a guide, not a suggestion. Do not exceed it.
Why does my reusable K cup overflow during brewing?
Overflow happens when water cannot pass through the coffee fast enough. The most common cause is overfilling. The second is using a grind that is too fine. The third is a clogged mesh from leftover coffee oils. Fix all three: fill to the line, use medium grind, and rinse the pod immediately after each use. If you use the bold setting on your machine, switch to regular. The extra brew time increases the chance of overflow.
Do I need to tamp the coffee in a reusable K cup?
No. Tamping is for espresso machines, which use 9 bars of pressure. A Keurig uses much less pressure, around 1 bar. Tamping compacts the grounds and blocks water flow. Just level the coffee with your finger and close the lid. The water will do the rest.
What to Remember for Clean Brews
- Use a medium grind, not fine or coarse. This is the single biggest factor.
- Fill to the line or leave a quarter-inch of space. Less is better than more.
- Never tamp. Just level the grounds.
- Rinse the pod immediately after brewing. Dried grounds clog the mesh.
- Soak the pod in vinegar water weekly if you brew daily.
- Skip the bold setting on your machine. It increases overflow risk.
- If you get silt in your cup, add a paper filter on top of the grounds.
Reusable pods take a few tries to get right. The first cup might be a mess. The second will be better. By the third, you will have the routine down. Once you do, you will not go back to plastic pods. The coffee tastes fresher, the cost per cup drops dramatically, and you stop throwing away plastic every morning. If you are dealing with other kitchen cleanup issues, check out our guide on cooking bacon without smoke for similar practical fixes.
Products related to this article
Sponsored / affiliate links. As an Amazon Associate I earn from qualifying purchases. I may earn additional commission from eligible campaigns.
 Quick Heating Cup Warmer, Three Temperature Settings, Splashproof and Portable, for Coffee, Milk, Lightweight ABS Material
 Coffee Mug Warmer & You are Awesome Mug Set, Electric Cup Warmer for Desk
 SOLUSTRE Electric USB Coffee Cup Warmer with Temperature Settings Portable Milk and Beverage Heating Coaster for Office Desk Small Lightweight Design Easy to Clean Surface Multi Functional