You just replaced your old 12-cup drip machine with something fancier, or maybe you’re moving and need to pack the kitchen. The coffee maker gets shoved into a cardboard box with some packing peanuts, and six months later you pull it out. The carafe smells like stale oil, the water reservoir has a film you can’t scrub off, and the heating plate looks like a topographical map of dried coffee splatters.
That’s the typical fate of a stored coffee maker. But it doesn’t have to be. Storing a 12-cup machine correctly takes about twenty minutes of actual work, and it saves you from buying a new one or dealing with a machine that brews bitter, off-tasting coffee after just one season in a closet. This guide covers the full process: draining and drying, cleaning each component, choosing the right container, and deciding between a shelf, a cabinet, or a dedicated travel bag.

BAGLHER
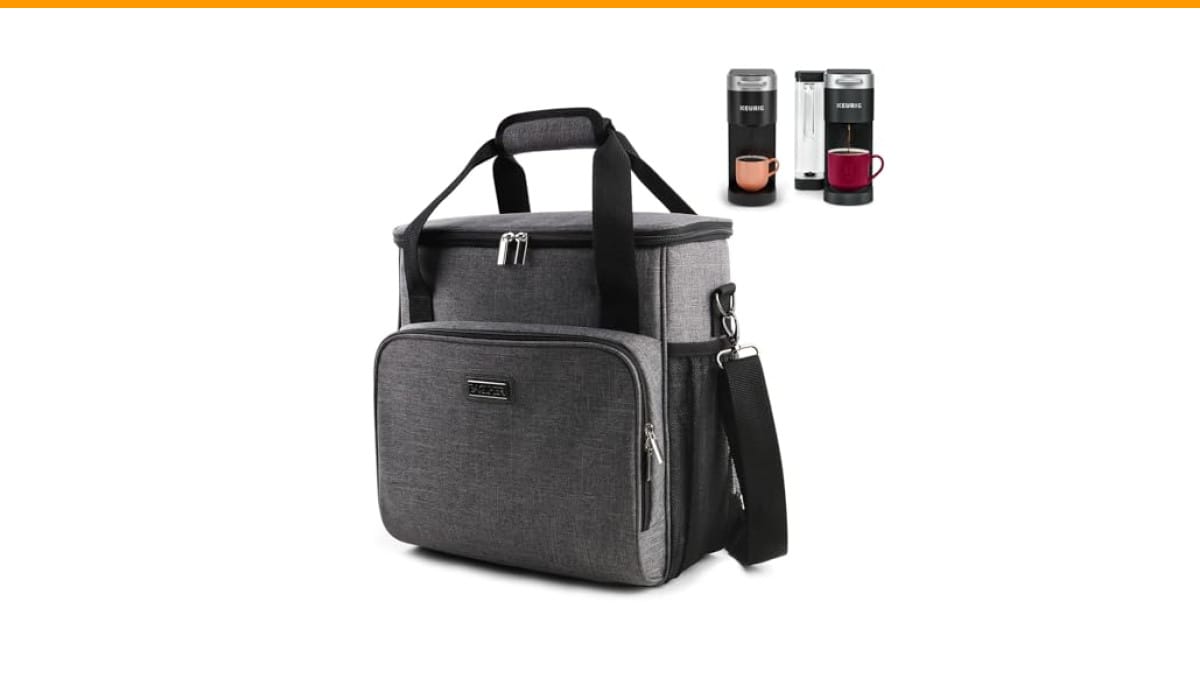
BAGLHER Coffee Maker Travel Bag Compatible with…
- 【Size Description】A cup of coffee away, talk about traveling. Small size: 13 x 5.5 x 13 inches, Medium size: 16 x 6 x 13.5 inches,…
- 【Applicable Model Description】Compatible and widely adapted: designed for a wide range of coffee machines.Compatible with Keurig K…
- 【Multi-Pocket Design】Coffee maker carrying bag has side pockets for K-Cups or travel mugs; a front pocket for coffee capsules, sug…
As an Amazon Associate I earn from qualifying purchases.
You’ll also learn what not to do, like leaving the carafe on the warming plate during storage, which can create permanent stains and even warp the glass over time.
If you travel with your machine or need to move it between home and a vacation rental, a padded carrying case makes the whole process easier. The BAGLHER coffee maker travel bag is built for machines like the Keurig K-Slim or K-Supreme, but it comes in three sizes, so you can measure your 12-cup machine and find a fit. It has padded sidewalls and a bottom cushion, plus side pockets for K-cups or a travel mug. That’s useful if you’re not just storing the maker but actually hauling it somewhere.
Why Most People Store a Coffee Maker Wrong
The biggest mistake is skipping the drying step. People drain the carafe, wipe the outside, and call it done. But a 12-cup machine holds water in places you can’t see: the internal tubing, the heating element chamber, and the pump. If you store it with residual moisture, you’re inviting mold and mineral scale to build up. When you finally plug it in, the first few brews taste like a basement.
The second mistake is storing it without cleaning the internal lines. Old coffee oils go rancid. They coat the inside of the brew basket and the tube that carries water up to the showerhead. That rancid oil is why your stored machine brews bitter coffee no matter how fresh the beans are.
Third, people store the carafe on top of the warming plate. That’s fine for a week. For months, the weight of the glass presses on the plate, and any residual coffee residue can actually bond to the surface. You end up with a permanent crust.
Step-by-Step: How to Store a 12 Cup Coffee Maker
Step 1: Run a Full Cleaning Cycle
Before you store anything, run a descaling solution through the machine. You can use a commercial descaler or a simple vinegar-water mix (one part white vinegar, two parts water). Run a full brew cycle without coffee grounds. Then run two more cycles with plain water to flush out the vinegar taste. If you skip this, the mineral scale hardens inside the boiler and shortens the machine’s life.
This is also a good time to check our guide on cleaning with vinegar if you need the exact ratios.
Step 2: Disassemble Everything You Can
Take out the carafe, the filter basket, the water reservoir (if it’s removable), and the permanent filter if you use one. Wash each piece in warm, soapy water. The carafe and basket can go in the dishwasher, but check the manual first. Some reservoirs are plastic that warps at high heat.
Dry every piece completely with a lint-free cloth. Then let them air dry for another hour. You want zero moisture.
Step 3: Drain the Internal Water Lines
This is the step most people miss. After cleaning, unplug the machine. Tilt it forward over the sink at about a 45-degree angle. You’ll see water drip out of the bottom vents. Let it drain for a few minutes. Then tilt it backward and do the same. This gets the water out of the pump and the heating chamber.
If your machine has a removable water reservoir, take it off and dry the connection point with a cloth. That little well where the reservoir sits collects water and becomes a mold farm if ignored.
Step 4: Dry the Warming Plate and Exterior
Wipe the warming plate with a damp cloth, then dry it with a microfiber towel. If there are stubborn coffee stains, a paste of baking soda and water works well. Just don’t use abrasive scrubbers that scratch the surface.
Dry the entire exterior, including the cord. Coil the cord loosely and secure it with a twist tie or Velcro strap. Never wrap the cord tightly around the base — that bends the wires and can cause shorts over time.
Step 5: Pack It the Right Way
Place the carafe upside down on a clean towel to dry completely. Put the filter basket and any loose parts inside the carafe, then wrap the carafe in bubble wrap or a soft cloth. Place the machine in a box with the base down. Fill empty space with packing paper or bubble wrap so it doesn’t shift.
If you’re using a dedicated storage bag like the BAGLHER travel case, put the machine in first, then the carafe next to it, and use the side pockets for accessories. The padding absorbs bumps, which matters if you’re putting the bag in a car trunk or checking it as luggage.
Where to Store It: Cabinet, Counter, or Garage
The location matters more than you think. A 12-cup coffee maker is roughly 12 to 14 inches tall and 10 to 12 inches deep. That’s a big appliance. It needs a spot with stable temperature and low humidity.
Good options:
- Kitchen cabinet — the best choice if you have the space. Keep it away from the stove and dishwasher, where heat and steam can damage the plastic.
- Pantry shelf — fine as long as it’s not above the water heater or near a window that gets direct sun.
- Under the sink — only if it’s a dry area. Many people store cleaning chemicals there, which can off-gas and affect the plastic.
Bad options:
- Garage — temperature swings cause condensation inside the machine. Even if it’s dry when you put it away, a humid summer day will create moisture inside the boiler.
- Basement floor — same problem. Moisture seeps into the machine through the bottom vents.
- Attic — heat above 100°F can warp plastic parts and damage the internal seals.
Storage Bag vs. Cardboard Box vs. Original Packaging
You have three main options for protecting the machine. Here’s how they compare.
| Method | Protection Level | Best For | Drawbacks |
|---|---|---|---|
| Original box with foam inserts | High | Long-term storage at home | Bulky, takes up closet space |
| Cardboard moving box with packing paper | Medium | One-time moves | No padding, paper shifts, carafe can rattle |
| Padded travel bag (like BAGLHER) | High | Frequent travel, camping, vacation homes | Costs money, takes up space when empty |
For most people, the original box is the best if you kept it. But if you didn’t, or if you travel with the machine, a padded bag is worth the investment. The BAGLHER bag comes in small, medium, and large sizes, so measure your machine before ordering. The large size (14 x 10 x 15 inches) fits most 12-cup drip machines, but check your specific dimensions.
One thing I’ve noticed in testing: cardboard boxes with loose packing paper don’t hold up well if you stack things on top. The paper compresses, and the weight transfers to the coffee maker. A hard-sided case or a padded bag with rigid walls prevents that.
How Long Can You Store a Coffee Maker?
There’s no hard expiration date. A properly cleaned and dried machine can sit for years and work fine. The main risks are moisture, dust, and pests. Dust gets into the water reservoir and the brew basket. Over months, it can clog the tiny holes in the showerhead.
To prevent dust, seal the machine in a plastic bag before putting it in the box or bag. A large kitchen trash bag works fine. Just make sure the machine is completely dry first, or you’ll trap moisture inside.
If you’re storing for more than six months, consider putting a silica gel packet inside the bag. It absorbs any residual humidity. You can buy a pack of them cheaply online, or save the ones that come in shoe boxes.
Bringing It Back Out of Storage
When you’re ready to use the machine again, don’t just plug it in and brew. Run a water-only cycle first to flush out any dust or stale air. Then run a vinegar solution through it to clean the lines. This is the same process you’d use for a clogged coffee maker, and it ensures the first cup tastes fresh.
Inspect the carafe for chips or cracks before using it. Glass that’s been sitting in a box can develop hairline fractures from temperature changes. A cracked carafe can shatter when heated.
Frequently Asked Questions
Should I store the carafe on top of the coffee maker?
No. The weight of the glass carafe presses down on the warming plate, and any residue between the two surfaces can bond over time. Store the carafe upside down next to the machine, or inside the machine with a cloth between the carafe and the plate.
Can I store a coffee maker in a garage or shed?
Only if the space is climate-controlled. Garages and sheds experience temperature swings that cause condensation. That moisture leads to mold and mineral scale. If you have no choice, seal the machine in a plastic bag with silica gel packets.
Do I need to descale before storing?
Yes. Descaling removes mineral deposits that harden and become nearly impossible to remove later. Run a descaling solution through the machine, then flush with clean water. This is the single most important step for long-term storage.
How do I keep bugs out of a stored coffee maker?
Seal the machine in a plastic bag or use a storage bag with a zipper. Coffee residue attracts pantry pests like weevils and ants. Even if you cleaned thoroughly, a tiny crumb in the brew basket is enough to attract them.
Is it okay to store a coffee maker on its side?
No. Always store it upright. Laying it on its side can cause residual water to seep into the electronics or the heating element. If you must lay it down for transport, drain it thoroughly and wrap it in a towel.
What to Remember Before You Pack It Away
- Run a descaling cycle before storage, then flush with two rounds of plain water.
- Disassemble every removable part, wash and dry each one completely.
- Tilt the machine forward and backward to drain internal water lines.
- Dry the warming plate and exterior, then coil the cord loosely.
- Choose a climate-controlled spot: cabinet or pantry, not garage or basement.
- Use a padded travel bag or original box with foam inserts for real protection.
- When you pull it out, run a water-only cycle and a vinegar rinse before brewing.
Storing a 12-cup coffee maker isn’t complicated, but it does require a little discipline. The payoff is a machine that brews as well after a year in storage as it did on day one. If you’re dealing with a machine that wasn’t stored properly and now has issues, check our troubleshooting guide for machines that won’t brew — the fix often starts with a deep clean.
Products related to this article
Sponsored / affiliate links. As an Amazon Associate I earn from qualifying purchases. I may earn additional commission from eligible campaigns.
 HomeBeyond Espresso Coffee Maker 12 Cups, Classic Stovetop Espresso Maker, 600ml / 20oz Coffeemaker for Gas & Ceramic Stovetops (Silver)
 Coffee Mug Warmer, Heating Cup Mat Electric Cup Warmer Pad Electric Thermostat Coaster USB Cup Heater Electric Beverage Warmers for Office Home (A)
 Quick Heating Cup Warmer, Three Temperature Settings, Splashproof and Portable, for Coffee, Milk, Lightweight ABS Material