You dial in a new bag of beans, pull a shot, and it tastes hollow. Sour, bitter, or just flat. You check your water temperature and your puck prep. Everything looks fine. The culprit is often hiding inside your grinder: stale coffee oils and micro-fines stuck to the burrs and chute.
Oil from coffee beans goes rancid. It coats the cutting surfaces and makes every subsequent grind taste dull. This guide walks you through the full process of cleaning an espresso grinder, from a quick daily brush-out to a deep clean that restores flavor. You’ll know exactly what to do, what tools work best, and how often to do it.
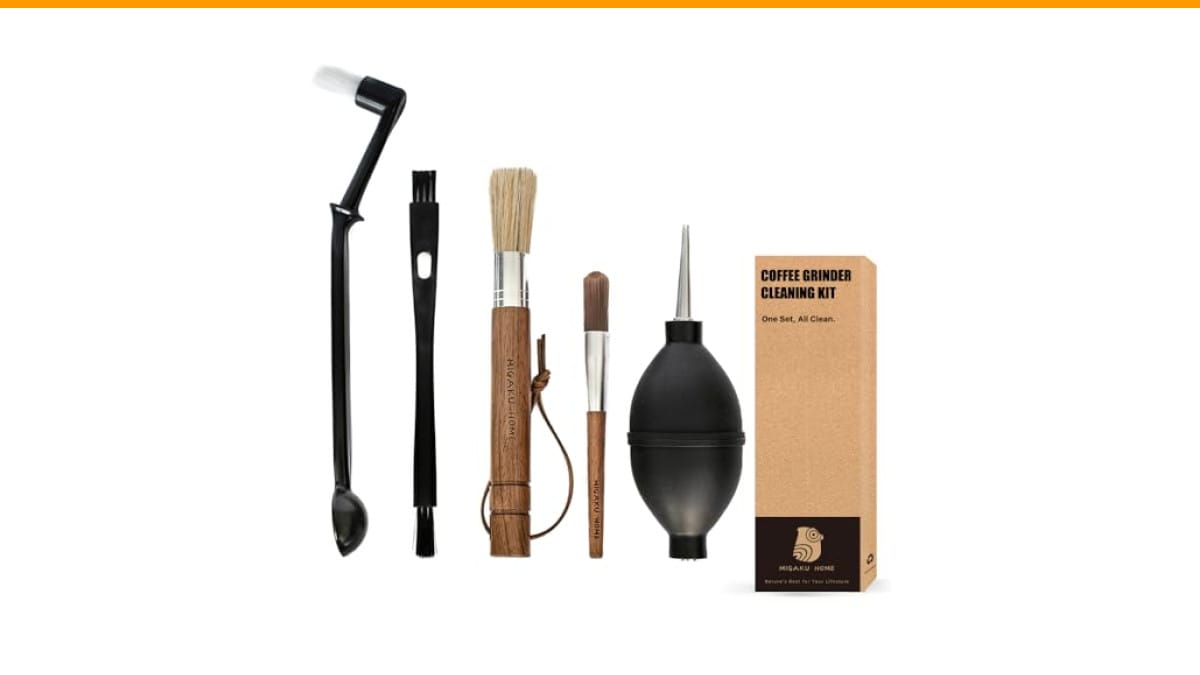
For this job, I’ve been using the MIGAKU HOME Coffee Grinder Cleaning Kit. It’s a 5-piece set with a large soft brush, a small hard brush, a group head brush, a long-reach brush, and an air blower. The walnut brushes feel solid in hand, and the hard brush is stiff enough to scrape off caked-on grounds without scratching the burrs.
Why Your Grinder Gets Dirty (And Why It Matters)
Coffee beans are about 10-15% oil by weight. When you grind, that oil smears across the burrs. It mixes with fine coffee dust and forms a sticky paste. Over time, this paste hardens into a crust that changes the grind size and slows the grind speed.
The result is inconsistent extraction. You might see channeling in your portafilter or a longer shot time than yesterday. The grinder also runs hotter, which accelerates wear on the burrs.
Think of it like a kitchen knife. You wouldn’t leave it covered in grease and expect it to cut clean. Burrs work the same way.
What You Need Before You Start
You don’t need expensive chemicals. Here’s the short list:
- A stiff brush (the small hard brush in the kit works well)
- A soft brush for the hopper and exterior
- A long-reach brush for the chute and crevices
- An air blower or compressed air for blowing out loose particles
- Grinder cleaning tablets (like Grindz or Urnex) for deep cleaning
- A microfiber cloth
Skip the water. Never rinse burrs under a tap unless the manufacturer explicitly says you can. Water causes rust on most steel burrs.
If you don’t have a cleaning kit yet, the MIGAKU HOME 5-piece set covers all the brush types you need. The air blower is handy for blowing grounds out of tight spots where brushes can’t reach.
Step-by-Step: How to Clean an Espresso Grinder
I’ll break this into two routines: a quick daily clean and a full deep clean. Do the quick one every day. Do the deep clean every 2-4 weeks, depending on how much coffee you grind.
Daily Quick Clean (2 Minutes)
- Unplug the grinder. Always.
- Remove the hopper and any remaining beans. Store them in an airtight container.
- Use the soft brush to sweep loose grounds from the hopper area and the top of the burrs.
- Use the air blower to puff out any grounds sitting in the chute or around the burr carrier.
- Wipe the exterior and the grind chute with a dry microfiber cloth.
This takes less time than pulling a shot. It stops oil from building up in the first place.
Deep Clean (15-30 Minutes)
This is the routine that actually fixes flavor issues. Here’s the process I use on my own grinder.
- Remove the burrs. Most grinders let you take out the upper burr carrier with a twist or a few screws. Check your manual. If you can’t remove them, you can still clean in place with a brush and vacuum.
- Brush the burrs. Hold the burr over a trash bin. Use the stiff brush to sweep across the cutting edges. Work in one direction. You’ll see dark, oily residue come off. Keep brushing until the metal looks clean.
- Clean the chamber. Use the long-reach brush to sweep out the grinding chamber. Pay attention to the exit chute where grounds travel to the portafilter. This is where clogs form.
- Use cleaning tablets (optional but recommended). Run a dose of grinder cleaning tablets through the grinder. They’re made of food-grade grain or rice-based material that absorbs oil. Grind them like coffee and discard the output. This cleans the internal path you can’t reach with a brush.
- Blow it out. Use the air blower to remove any remaining tablet dust or coffee fines.
- Reassemble. Put the burr carrier back in. Make sure it locks into place properly. Run a few grams of fresh coffee through and discard it. This clears out any residual cleaning material.
That last step is important. Nobody wants a shot that tastes like cleaning tablet.
Burr Types and Cleaning Differences
Not all grinders clean the same way. Here’s a quick comparison of the two main burr styles.
| Burr Type | Common Grinders | Cleaning Approach | Main Risk |
|---|---|---|---|
| Flat Burrs | Eureka, Mazzer, Baratza Vario | Remove both burrs, brush each face, clean the carrier | Misalignment when reassembling |
| Conical Burrs | Baratza Encore, Sette, most home grinders | Remove upper burr, brush the cone and ring | Small screws getting lost |
| Stepped vs Stepless | N/A | Same cleaning, but check the adjustment ring for grounds | Grinds stuck in the adjustment mechanism |
Flat burrs give you more uniform particle size, but they trap more coffee between the two parallel faces. Conical burrs are easier to clean because you only have one moving part to remove. If you own an automatic espresso machine, your grinder is likely built-in. Check our guide on automatic espresso machine vs semi to see if your machine has a removable burr assembly.
For those with a manual grinder like a Porlex, the process is similar but simpler. You can see the specific steps in our clean Porlex grinder guide.
What About Grinder Cleaning Tablets?
Tablets are the closest thing to a miracle product in coffee maintenance. They work by absorbing oils and neutralizing odors. They don’t scrub the burrs physically, so you still need a brush for that.
My take: use them every 4-6 weeks if you drink dark roasts or flavored beans. If you only use light roasts, a good brush-out might be enough. Tablets are cheap insurance against rancid oil buildup.
One warning. Don’t use rice as a substitute. Uncooked rice is harder than coffee beans and can chip ceramic burrs. Steel burrs might handle it, but it’s not worth the risk. Stick to proper cleaning tablets.
If you’re dealing with a clogged machine, not just the grinder, check our guide on cleaning a clogged coffee maker for the rest of your setup.
How Often Should You Clean?
There’s no single right answer. It depends on your usage and bean type.
- Daily users (2+ shots/day): Quick clean daily, deep clean every 2 weeks.
- Weekend warriors: Quick clean after each session, deep clean monthly.
- Dark roast drinkers: Deep clean more often. Dark beans are oilier.
- Light roast drinkers: You can stretch the deep clean to 4-6 weeks.
You’ll know it’s time when your shots pull faster than usual or the grinder sounds higher-pitched. That’s the burrs working harder to cut through the gunk.
For the rest of your machine, a regular descale schedule matters too. See our guide on how often to clean a coffee maker to build a full maintenance routine.
Frequently Asked Questions
Can I wash the burrs with water?
No. Water causes rust on steel burrs. Ceramic burrs are less prone to rust, but water can still get into the bearings and motor housing. Dry brushing is the only safe method.
Do I need to remove the burrs every time I clean?
No. For a quick daily clean, leave them in place and brush the exposed surfaces. Remove them only for the deep clean every few weeks. Removing and reinstalling burrs too often increases the risk of stripping screws or misaligning them.
Why does my espresso taste bitter after cleaning?
You probably didn’t season the burrs. After a deep clean, the burrs need to grind a few doses of coffee to re-coat the cutting surfaces with a thin layer of oil. Grind and discard about 20-30 grams of coffee before pulling your next shot.
How do I know if my burrs are dull and need replacing?
Dull burrs produce more fines and a slower grind time. If you’ve been cleaning regularly and the grind time has increased by 50% or more compared to when they were new, it’s time to replace them. Most home burrs last 500-1000 pounds of coffee.
Can I use a vacuum cleaner instead of an air blower?
Yes, but be careful. Use a soft brush attachment and low suction. High suction can pull small parts or shims out of the grinder. The air blower is safer because it just pushes loose grounds out without the risk of sucking up a spring or washer.
What to Remember After You Finish
Cleaning your grinder is a 15-minute job that pays off in every cup. You don’t need to be obsessive about it, but you do need to be consistent.
- Unplug the grinder before any cleaning. Non-negotiable.
- Brush the burrs in one direction to avoid pushing grounds deeper.
- Use an air blower for the chute and motor housing vents.
- Run cleaning tablets monthly if you drink oily dark roasts.
- Always discard the first few grams of coffee after a deep clean.
- Replace burrs when grind time increases noticeably.
- Keep your cleaning kit near the grinder so you actually use it.
Your grinder is the most important piece of equipment in your espresso setup. Treat it well, and it’ll return the favor with consistent, flavorful shots. If you’re still troubleshooting flavor issues after a clean, it might be time to look at your water or your machine’s internal parts.
Products related to this article
Sponsored / affiliate links. As an Amazon Associate I earn from qualifying purchases. I may earn additional commission from eligible campaigns.
 Coffee Espresso Machine Handle Replacement Parts, Cafe Bracket Handle for Lidl Silvercrest CM4621 CM4218 KF5002 KF500S Barista (for 51mm Portafilter Basket - Not included)
 Linnkyfloa Coffee Espresso Maker Handle Replacement for Stovetop Moka Pot or Percolator, Black Plastic for Spare Part Compatible with Italian(9-12 Cup)
 Belly Moka Coffee Maker Stovetop Espresso Maker 9 Cup Aluminum Moka Pot Percolator 15oz 450ml Easy Brewing for Electric Ceramic Stoves Home Camping Italian Cuban Café Classic Black