You just finished a perfect pour-over. The kettle cools down, and you face the usual question: where does this thing go? Shoving it in a low cabinet risks scratching the finish. Leaving it on the counter collects dust and grease. And if you live somewhere with hard water, storing it wet is how you end up with chalky flakes in tomorrow’s coffee.
Storing an electric gooseneck kettle isn’t complicated, but it does require a different approach than a standard drip coffee maker. The gooseneck spout is delicate, the base has electrical components, and the heating element sits right at the bottom. This guide covers daily storage, long-term storage, and how to organize the space around the kettle so your brewing station actually stays tidy.
You’ll walk away knowing exactly what to do after every brew, what to do if you won’t use the kettle for months, and which storage setups are worth your counter space.
Why a Gooseneck Kettle Needs Different Storage Rules
A gooseneck kettle isn’t a standard electric kettle. The long, curved spout gives you precise flow control, but it also creates a weak point. That spout bends or dents if something heavy presses against it in a crowded cabinet. The base, meanwhile, has vents and a heating plate that need airflow. Stacking stuff on top of it traps heat and can warp the plastic housing over time.
There’s also the water factor. Most gooseneck kettles are stainless steel, which resists rust but isn’t immune to it. If you store the kettle with a few inches of water left inside, you’re asking for mineral deposits and a metallic taste in your next cup. Even a small amount of residual moisture in the spout can grow mold, and you won’t see it until you pour.
So the core rules are simple: dry it fully, protect the spout, and keep the base clear. Everything else is about fitting those rules into your kitchen layout.
Daily Storage: The Countertop Setup
If you use your kettle every morning, storing it on the counter is the right call. Dragging it in and out of a cabinet daily gets old fast, and you’re more likely to skip the drying step when you’re half awake. Keep it out, but keep it organized.
First, empty the kettle completely after each use. Don’t just pour out the water and set it down. Tilt it over the sink for a few seconds to get the last drops out of the spout. Then leave the lid open for about ten minutes so the interior can air dry. This single habit prevents 90 percent of the scale and odor problems people complain about.
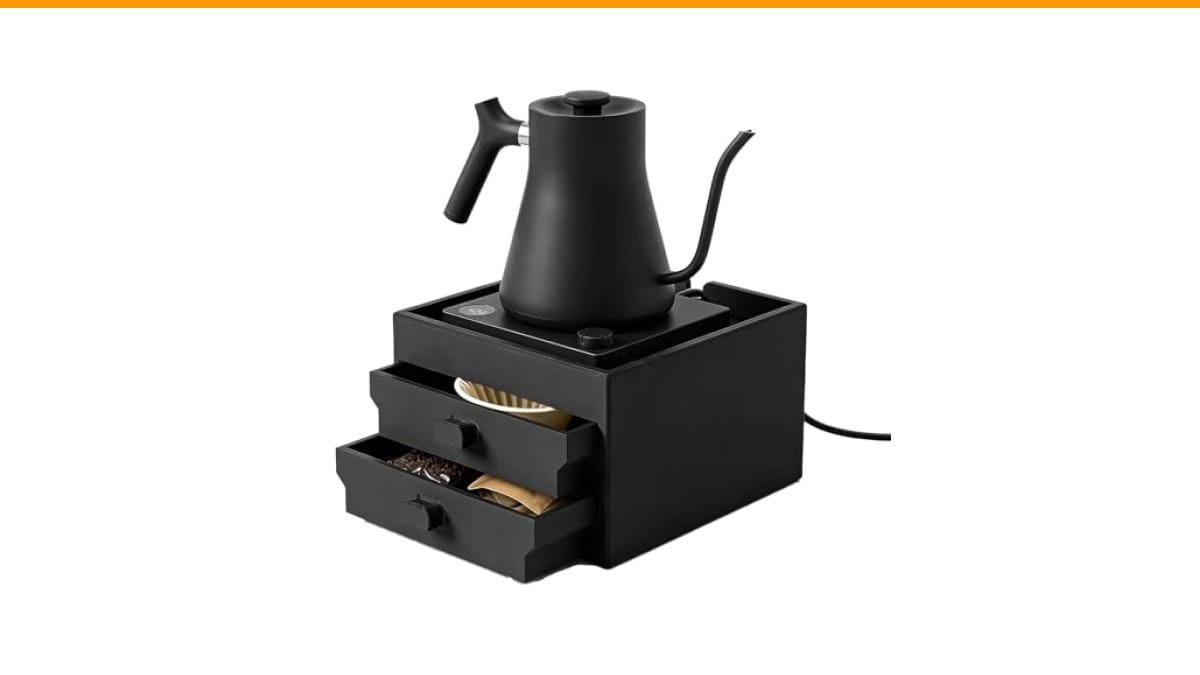
Second, give the kettle a dedicated spot. A bare counter works, but a small organizer makes a real difference. The HOMFIXPRO Coffee Brewer Organizer is designed specifically for Intasting electric gooseneck kettles. It holds the base on an elevated platform, which keeps the kettle off the counter and frees up the space underneath for two pull-out drawers. Those drawers are perfect for filters, tea bags, or a coffee scoop, so you don’t have a pile of accessories crowding the kettle.
The two-tier design also solves a common problem: the kettle cord. Most gooseneck kettles have short, thick cords that dangle awkwardly. The organizer’s wire hole lets you route the cord down and out of sight, which keeps the counter clean and prevents the cord from kinking under the base.
One thing to watch with any countertop setup is sunlight. Direct sun on a stainless steel kettle can cause discoloration over months of exposure. If your counter faces a window, rotate the kettle occasionally or store it in a spot that gets indirect light.
Long-Term Storage: What to Do Before You Put It Away
Maybe you’re moving, or you only use the kettle during winter pour-over season. Long-term storage requires a few extra steps, and skipping them leads to a nasty surprise when you pull the kettle out later.
Start with a full descale. Even if you don’t see scale, there’s a thin film of mineral buildup on the heating element. Mix one part white vinegar with two parts water, fill the kettle to the max line, and boil it. Let it sit for 30 minutes, then dump it and boil fresh water twice to rinse. This removes the deposits that would otherwise harden into stubborn crust during months of disuse.
Dry the kettle thoroughly, inside and out. Use a soft cloth on the exterior to remove fingerprints and water spots. For the interior, wipe it with a dry cloth, then leave the lid off for 24 hours in a well-ventilated area. Any trapped moisture in the spout will evaporate during this window.
Wrap the spout. A rubber band around a paper towel, or a small piece of bubble wrap taped loosely over the spout, protects it from dents. This matters more than people think. A bent gooseneck spout ruins your pour control, and it’s not easily straightened without cracking the metal.
Store the kettle upright, never on its side. Lying it down puts pressure on the spout and allows any residual moisture to pool in the electronics housing. If you’re putting it in a box, use crumpled paper around the base for cushioning. Keep the lid off or slightly ajar so any trapped air can escape.
Don’t wrap the cord tightly around the base. Coil it loosely and tuck it beside the kettle. Tight wrapping stresses the cord’s internal wires, which can cause intermittent power failures later. You’ll also want to store the base separately if it detaches, with the heating plate facing up so nothing presses on it.
Comparing Storage Methods: Cabinet, Counter, or Organizer
There’s no single right answer for everyone. The best method depends on how often you brew, how much counter space you have, and whether you mind seeing the kettle out. Here’s a breakdown of the three main approaches.
| Storage Method | Best For | Pros | Cons |
|---|---|---|---|
| Closed cabinet | Rare use, small kitchens, dust-prone homes | Protects from grease and sunlight; hides clutter | Risk of spout damage; easy to forget to dry first; inconvenient for daily use |
| Open counter (kettle only) | Daily brewers with ample counter space | Always ready; no lifting; visible reminder to dry | Collects dust; cord can clutter; takes up prime counter real estate |
| Counter with organizer | Daily brewers who also store accessories | Elevates kettle, adds drawer storage, hides cord, keeps everything in one zone | Takes up slightly more footprint than a bare kettle; needs a compatible base size |
If you brew more than a few times a week, the organizer route wins for usability. The added drawers mean you never have to hunt for a filter while the water is heating. If you only use the kettle occasionally, a cabinet is fine, provided you follow the drying and spout-protection steps above.
Cleaning Before Storage: The Step Most People Skip
Storing a dirty kettle is like putting away a damp towel. It comes back smelling musty, and you have to clean it again before using it. A quick wipe-down before storage takes thirty seconds and saves you a full wash later.
For the exterior, use a damp microfiber cloth. Avoid abrasive scrubbers, which scratch the brushed finish. If you have fingerprints, a drop of dish soap on the cloth handles it. Don’t submerge the kettle or the base in water. The base has electrical components that will short out, and the kettle body itself isn’t fully waterproof below the rim.
For the interior, a rinse with hot water after each use is usually enough. If you see scale, a weekly vinegar boil keeps it at bay. This is especially important if you store the kettle on the counter, because visible scale on the rim or spout is an eyesore and a hygiene concern.
One more tip: check the spout’s interior occasionally. Mineral deposits build up inside the curve where you can’t see them, and they eventually flake off into your coffee. A narrow bottle brush reaches into the spout if you need to scrub it. Do this every few months, and your kettle will pour clean for years.
Frequently Asked Questions
Can I store my gooseneck kettle with water in it?
No. Storing water in the kettle leads to limescale buildup, metallic taste, and potential mold in the spout. Empty it completely after each use and leave the lid open to air dry. If you’re storing it long-term, make sure the interior is bone dry before sealing it away.
Is it safe to store the kettle on its base?
Yes, for daily use. The base is designed to hold the kettle’s weight. Just make sure the heating plate is dry before you set the kettle down, and don’t stack anything on top of the kettle while it’s on the base. For long-term storage, remove the kettle from the base and store them separately.
How do I remove limescale before storing?
Use a 1:2 vinegar-to-water solution, boil it, let it sit for 30 minutes, then rinse with two fresh boils of water. This dissolves mineral deposits that would otherwise harden during storage. If your water is especially hard, you may need to repeat the process.
Can I put my gooseneck kettle in a cabinet?
You can, but protect the spout first. Wrap it in a paper towel or bubble wrap, and make sure the kettle is upright. Never store it on its side, and don’t let heavy items press against the spout. Also, confirm the interior is completely dry before closing the cabinet door.
Does the cord need special care when storing?
Yes. Don’t wrap the cord tightly around the base. This stresses the internal wires and can cause connection issues. Coil it loosely and place it beside the kettle. If the cord detaches from the base, store it separately in a drawer or bag.
What to Remember When You Put the Kettle Away
Getting the storage routine right comes down to a few habits. Here’s the short version.
- Empty the kettle fully after every use, including the spout.
- Leave the lid open for 10 minutes to air dry before covering or storing.
- Use a countertop organizer with drawers if you brew daily, so the kettle has a stable home and accessories stay nearby.
- Descale with vinegar before any long-term storage to prevent hardened scale.
- Wrap the spout in a soft material before putting it in a cabinet or box.
- Store the kettle upright only, and never wrap the cord tightly around the base.
- Keep the base and heating plate dry at all times, and wipe down the exterior with a damp cloth, never a soaking one.
If you’re setting up a dedicated coffee corner, keeping your kettle and its accessories in one place makes the morning routine smoother. A clean, organized storage spot also protects your equipment, so it lasts longer and pours better. And if you’re already deep into coffee maker maintenance, remember that your kettle needs the same kind of regular attention. For those who also grind fresh beans, a quick grinder cleaning session pairs well with kettle descaling. Keeping both in good shape means every cup starts with clean equipment.
Products related to this article
Sponsored / affiliate links. As an Amazon Associate I earn from qualifying purchases. I may earn additional commission from eligible campaigns.
 SOLUSTRE Electric USB Coffee Cup Warmer with Temperature Settings Portable Milk and Beverage Heating Coaster for Office Desk Small Lightweight Design Easy to Clean Surface Multi Functional
 Coffee Mug Warmer & You are Awesome Mug Set, Electric Cup Warmer for Desk
 VOBAGA Coffee Mug Warmer with 15oz Mug Set, Electric Coffee Cup Warmer