You just got an espresso machine with a built-in grinder, or you’re thinking about getting one. The first morning you try it, the coffee tastes sour, or bitter, or it comes out watery. You fiddle with the buttons, the dials, and the steam wand, but nothing seems right. Pretty frustrating, right?
The good news: most of these problems come from a few simple mistakes. Grind size, dose amount, and timing. Once you understand those three things, you can pull a decent shot on almost any machine. This guide walks you through the entire process, from grinding to steaming, with specific numbers and steps you can follow today.

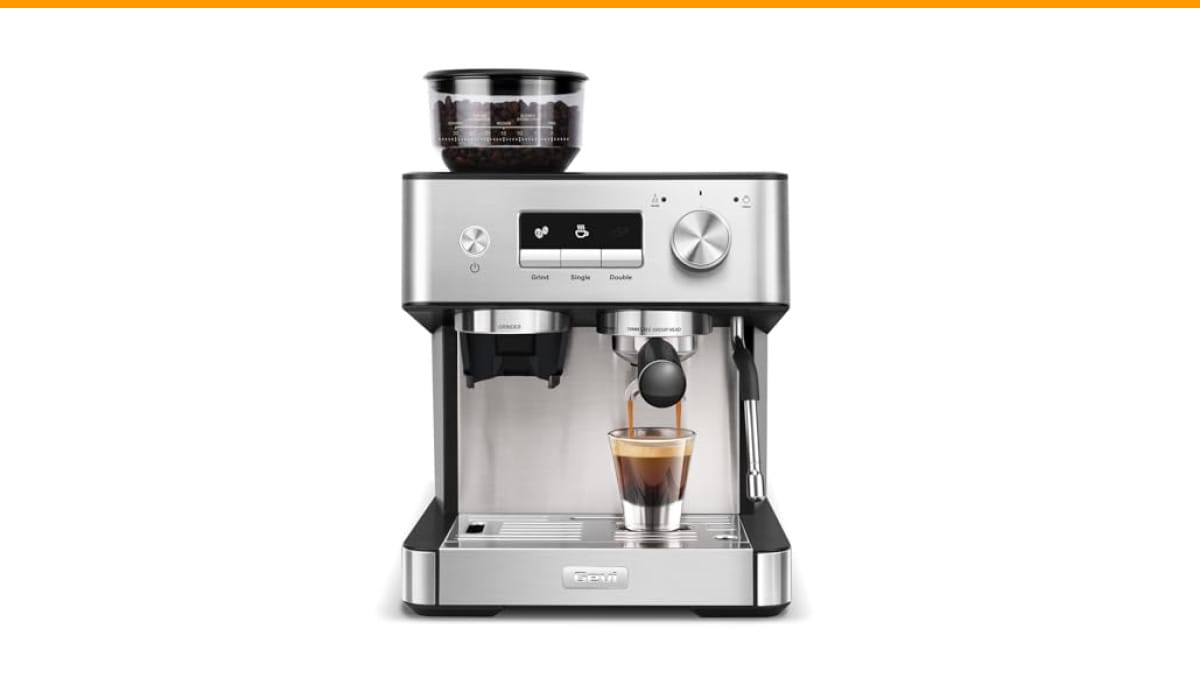
Gevi
Gevi 20 Bar Espresso Machine with Grinder…
- 【𝐁𝐚𝐫𝐢𝐬𝐭𝐚-𝐆𝐫𝐚𝐝𝐞 𝐄𝐬𝐩𝐫𝐞𝐬𝐬𝐨】Craft café-quality coffee at home with our premium espresso machine. Equipped with a built-in conical burr…
- 【𝐁𝐮𝐢𝐥𝐭-𝐈𝐧 𝐁𝐮𝐫𝐫 𝐆𝐫𝐢𝐧𝐝𝐞𝐫 𝐰𝐢𝐭𝐡 𝟑𝟎 𝐀𝐝𝐣𝐮𝐬𝐭𝐚𝐛𝐥𝐞 𝐒𝐞𝐭𝐭𝐢𝐧𝐠𝐬】Enjoy freshly ground espresso with every brew, thanks to the precision grinder…
- 【𝐏𝐫𝐨𝐟𝐞𝐬𝐬𝐢𝐨𝐧𝐚𝐥 𝐌𝐢𝐥𝐤 𝐅𝐫𝐨𝐭𝐡𝐞𝐫 & 𝐒𝐭𝐞𝐚𝐦 𝐖𝐚𝐧𝐝】Craft velvety microfoam for lattes and cappuccinos with our high-pressure steam wand. The…
As an Amazon Associate I earn from qualifying purchases.
You’ll learn how to dial in your grind, set the right dose, pull a balanced shot, and froth milk that actually pours well. We’ll also cover cleaning and troubleshooting. By the end, you’ll know exactly what to do when a shot runs too fast or too slow.
If you’re shopping for a machine that does most of this automatically, the Gevi 20 Bar Espresso Machine with Grinder & Steam Wand is a solid option. It has a built-in conical burr grinder with 30 settings, plus adjustable temperature and brew strength. That means you can practice the steps below without buying a separate grinder.
Understanding the Grinder First
Your espresso machine’s grinder is not a decoration. It’s the most important part of the shot. The grind size controls how fast water passes through the coffee. Too fine, and the water struggles, over-extracting and turning bitter. Too coarse, and the water rushes through, under-extracting and turning sour.
Most built-in grinders, like the one on the Gevi, have numbered settings. Start in the middle, not at the finest or coarsest. For espresso, you want a fine grind that feels like powdered sugar, not like sea salt. If your machine has a dial from 1 to 30, start around 15 and adjust from there.
Here’s the key: change one variable at a time. If your shot runs too fast (under 20 seconds), grind finer. If it runs too slow (over 30 seconds), grind coarser. Wait until you’ve pulled at least two shots before making another change. Small adjustments matter—a difference of one or two grind settings can change the shot time by five seconds.
Pro tip: always grind fresh. Beans start losing flavor within minutes of grinding. A built-in grinder means you can grind right before brewing, which is a huge advantage over buying pre-ground coffee.
Setting Up Your Machine for the First Use
Before you pull your first shot, you need to prep the machine. Most espresso machines, including the Gevi, require a quick rinse cycle. Fill the water tank with fresh, cold water. Turn the machine on and let it heat up. Run a blank shot (no coffee) through the group head to warm the parts and flush out any manufacturing residue.
Next, set your temperature. If your machine has PID control, like the Gevi does, set it between 195°F and 205°F. That’s the ideal range for espresso extraction. Start at 200°F and adjust based on taste. Dark roasts often prefer lower temps; light roasts do better hotter.
Now, set your shot volume. Most machines default to a 1:2 ratio—meaning if you use 18 grams of coffee, you want about 36 grams of liquid out. Some machines let you program this. On the Gevi, you can select single or double shot volumes. Start with the double, as it’s easier to dial in.
Don’t skip the warm-up. A cold machine pulls terrible shots. Give it at least 15 minutes to fully heat up, even if the indicator light says it’s ready. That extra time makes a difference.
The Step-by-Step Shot Pulling Process
Now we get to the actual process. Follow these steps in order, and you’ll get a consistent shot every time.
- Grind your beans. Weigh out 18 grams of whole beans. If your grinder has a hopper, fill it with beans and set the grind size. If it has a dose function, use that. If not, grind into the portafilter directly and weigh after.
- Distribute the grounds. Tap the portafilter gently to level the coffee. You want an even surface before tamping. Use your finger or a distribution tool to break up any clumps.
- Tamp with consistent pressure. Press down firmly, about 30 pounds of pressure. The goal is a flat, compact bed of coffee. Don’t twist the tamper; just press straight down.
- Lock in the portafilter. Attach it to the group head. Make sure it’s snug, but don’t over-tighten.
- Start the shot. Place your cup or scale under the spout. Start the brew and watch the timer. You want the first drops to appear in 5-7 seconds (the pre-infusion phase). Then the shot should flow steadily, like warm honey.
- Stop at the right weight. If you’re using a scale, stop the shot when you hit 36 grams of liquid. If you’re using the machine’s pre-set volume, trust it but check the taste. Adjust your grind if the shot runs too fast or too slow.
- Check the crema. A good shot has a thick, golden-brown crema on top. If it’s thin or pale, your grind is too coarse. If it’s dark and streaky, your grind is too fine.
Pro tip: pull your shot directly onto a small digital scale. That way you can measure the output precisely. After a few days, you’ll be able to eyeball it, but the scale accelerates the learning curve.
Frothing Milk Like a Barista
Milk texture is the difference between a latte and a hot mess. The goal is microfoam—tiny, velvety bubbles that mix with the espresso smoothly. You’re not making a cloud of dry foam; you’re making something that pours like paint.
Start with cold milk. Whole milk works best because the fat helps create stable foam. Fill your pitcher about a third full. That leaves room for the milk to expand.
Here’s the process:
- Purge the steam wand for a second to clear out any water.
- Submerge the tip just below the milk’s surface.
- Turn the steam on full blast.
- You’ll hear a hissing sound—that’s the air being incorporated. Keep the tip near the surface for 2-3 seconds, then lower it deeper.
- Once the milk is swirling, keep the wand at a slight angle. You want a vortex, not a splash.
- When the pitcher feels warm to the touch (about 130°F), turn off the steam.
- Tap the pitcher on the counter to pop big bubbles, then swirl it gently.
The milk should look like wet paint. If you see large bubbles, you aerated too long or the tip was above the surface. Practice makes perfect—don’t expect barista-level foam on your first try. It took me about two weeks of daily practice to get consistent microfoam.
If your machine has a dual-function steam wand, like the Gevi, you can also use it to dispense hot water for Americanos. That’s handy, but it means you need to flush the wand after every use. Milk residue dries fast and clogs the tip.
Comparing Built-In Grinders vs. Separate Grinders
You might wonder if a built-in grinder is actually good enough. I’ve tested both, and here’s the honest breakdown.
| Factor | Built-In Grinder (e.g., Gevi) | Separate Grinder |
|---|---|---|
| Convenience | One machine, less counter space | Extra equipment, more setup |
| Grind Quality | Good for home use, consistent enough | Usually better, especially at higher price points |
| Adjustability | 30 settings on the Gevi—plenty for most | Often stepless or more precise |
| Cleaning | One machine to clean, but grinder parts can be tricky | Separate cleaning, but easier access |
| Cost | Lower upfront cost | Higher cost for quality |
| Best For | Home users who want simplicity | Enthusiasts who want total control |
For most home users, a built-in grinder is more than sufficient. The Gevi’s 30 settings give you room to dial in almost any bean. You miss the precision of a $500 standalone grinder, but you also save counter space and money. If you’re just starting out, I’d recommend the built-in route. Upgrade later if you hit the hobby ceiling.
Cleaning and Maintenance
Espresso machines need regular care. The oils from coffee beans build up, and milk residue can harbor bacteria. A clean machine also pulls better shots.
After every session, do a quick flush. Run water through the group head for a few seconds to rinse away coffee residue. Wipe the steam wand with a damp cloth and purge it again. This takes 30 seconds and prevents most problems.
Once a week, backflush if your machine has a blind basket. This pushes water backward through the group head, removing oils and old coffee. If your machine doesn’t have that feature, you can use a cleaning tablet in the portafilter and run a shot cycle.
Monthly, descale your machine. Hard water leaves mineral deposits that clog the boiler and lines. Use a descaling solution—white vinegar works, but it leaves a smell. I prefer a commercial descaler. Follow the machine’s instructions, then run two or three clean water cycles to rinse thoroughly.
Don’t forget the grinder. Burrs collect old coffee dust and oils. Most built-in grinders have a removable upper burr. Brush it out every couple of weeks. For deeper cleaning, check out our coffee grinder cleaning guide.
If you notice your shots taking longer than usual, it might be scale buildup. Learn how to descale your machine at home to keep it running smoothly.
Common Mistakes and How to Fix Them
Three mistakes ruin more shots than anything else.
1. Using stale beans. If your beans were roasted three months ago, they’ll taste flat no matter what you do. Buy fresh beans and use them within two to four weeks of the roast date. Check the bag—if there’s no roast date, it’s probably not fresh.
2. Tamping unevenly. If you tamp at an angle, water will channel through the thinner side, causing a sour, weak shot. Use a level tamper and press straight down. Some machines come with a plastic tamper that’s not great—consider upgrading to a metal one with a flat base.
3. Ignoring the grind size. You can’t just set the grinder once and forget it. Different beans, humidity, and even temperature affect the grind. Dial in every time you switch beans. It takes a few shots to find the sweet spot, but it’s worth it.
If your shot runs too fast consistently, grind finer. If it runs too slow, grind coarser. If it tastes bitter, also try lowering your water temperature by a few degrees. If it tastes sour, raise the temperature.
One more thing: don’t be afraid to waste a few shots while learning. That’s normal. Even professional baristas go through a pound of coffee when dialing in a new batch.
Frequently Asked Questions
How fine should I grind for espresso?
Grind fine enough that it feels like powdered sugar. If you’re using a machine with numbered settings, start in the middle and adjust. The grind should be fine enough that water takes 25-30 seconds to pass through 18 grams of coffee.
Why is my espresso bitter?
Bitterness usually means over-extraction. Your grind is too fine, your water is too hot, or your shot ran too long. Try grinding coarser, lowering the temperature, or stopping the shot a few seconds earlier.
Why is my espresso sour?
Sourness means under-extraction. The water moved through the coffee too fast. Grind finer, increase the dose, or raise the water temperature. Also check your tamp—a loose puck can cause channeling.
How often should I clean my espresso machine?
Flush the group head and steam wand after every use. Backflush weekly if you use it daily. Descale monthly, especially if you have hard water. The grinder burrs should be brushed out every two weeks or so.
Can I use pre-ground coffee in an espresso machine with a grinder?
You can, but you’ll lose freshness. Pre-ground coffee goes stale within hours. A built-in grinder exists so you can grind right before brewing. If you must use pre-ground, buy it in small quantities and store it in an airtight container.
Final Thoughts: What to Remember
Using an espresso machine with a grinder isn’t rocket science, but it does take practice. Here’s a quick recap of the essentials.
- Start with fresh beans and a medium-fine grind.
- Dose 18 grams for a double shot, and aim for 36 grams out.
- Pull your shot in 25-30 seconds. Adjust the grind if it’s faster or slower.
- Froth milk with the tip just below the surface, then submerge to create a vortex.
- Clean the group head and steam wand after every use.
- Descale monthly and brush the grinder burrs regularly.
- Don’t give up after one bad shot. Dialing in takes time, but the payoff is real.
If you’re still deciding between a machine with a built-in grinder and a separate setup, check our comparison of automatic vs. semi-automatic espresso machines. And if your machine ever acts up, our guides on loud noise issues and water leaks can help you troubleshoot. Happy brewing.
Products related to this article
Sponsored / affiliate links. As an Amazon Associate I earn from qualifying purchases. I may earn additional commission from eligible campaigns.
 Coffee Espresso Machine Handle Replacement Parts, Cafe Bracket Handle for Lidl Silvercrest CM4621 CM4218 KF5002 KF500S Barista (for 51mm Portafilter Basket - Not included)
 Quick Heating Cup Warmer, Three Temperature Settings, Splashproof and Portable, for Coffee, Milk, Lightweight ABS Material
 Cutter Grinder Machine, Universal Grinding Machine, U2 Universal Cutter Tool Grinder Sharpener Holder, For Lathes & Factories, Workshops, Green